This widget allows the user to create event senders.

For an event the user can specify the receiving state and parameters. Every state that is added to a RemoteStateOfferer and instantiated can be controlled via Ice.
This control is one-way, so you dont get any information back. To make this easier, there is a Gui-Widget that offers a general interface to such states. It is called EventSender.
The control is event based. Like mentioned in Eventprocessing state transitions are caused by events and the exact transitions are specified in a transition table. So to control a state, one has to send events with parameters to it.
Usually such events are automatically send, if condition becomes true, that was installed by a state.
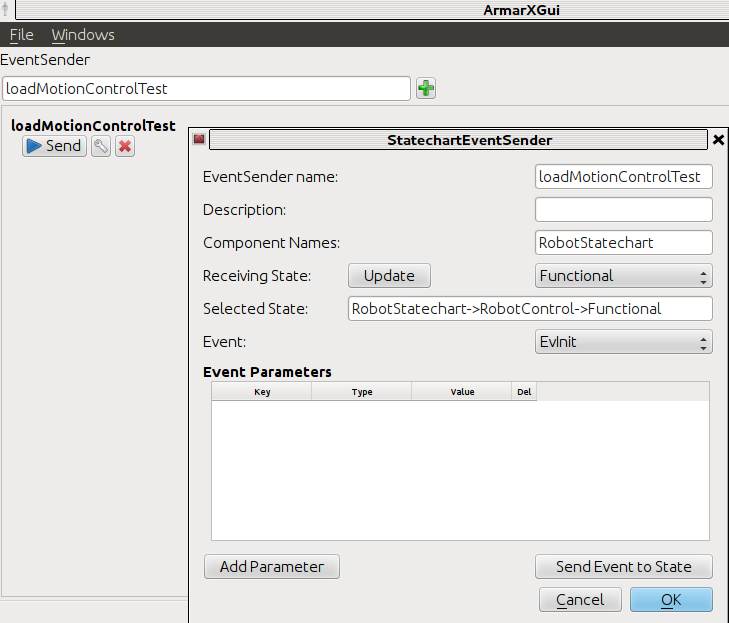
But e.g. for debugging purposes or loading a new robot-program it is needed to send this events manually. To do this, you have to load the EventSender-Widget. In this widget, you can specify control-configurations. These configurations contain:
- a name of the control-action
- a description of the control-action
- the receiving state
- the event
- a dictionary of event parameters
 EventSenderGui
In details these mean:
- The name and description are arbitrary and should only be a human readable description
- The receiving state is the state that has the transition table with this event. In the field Component Names you have to enter the name of the component where the state is located in. If you want to load a robot-program into the robot-mainstatechart this is 'RobotStatechart'. Next press the update-button besides the label 'Receiving State'. Now all found RemoteStateOfferers appear in the ComboBox next to this button. These RemoteStateOfferers contain 2 lists of states: 'Base instances' and 'Requested instances'. The base instances are the initial instances of states from which the requsted instances are copied from. They are only display to show the structure of the states and one cannot communicate with them. The requested instances are the important ones. These instances are created, if a state is called/entered. So in the beginning there are none, except for the robot-mainstatechart. The RobotStatechart creates automatically an instance, that is usable ("Requested Instance"). In the tree under "Requested Instances" one can selected the desired instance and then the state to which the event should be sent. Once a state is selected, the event-combobox beneath is updated with corresponding events.
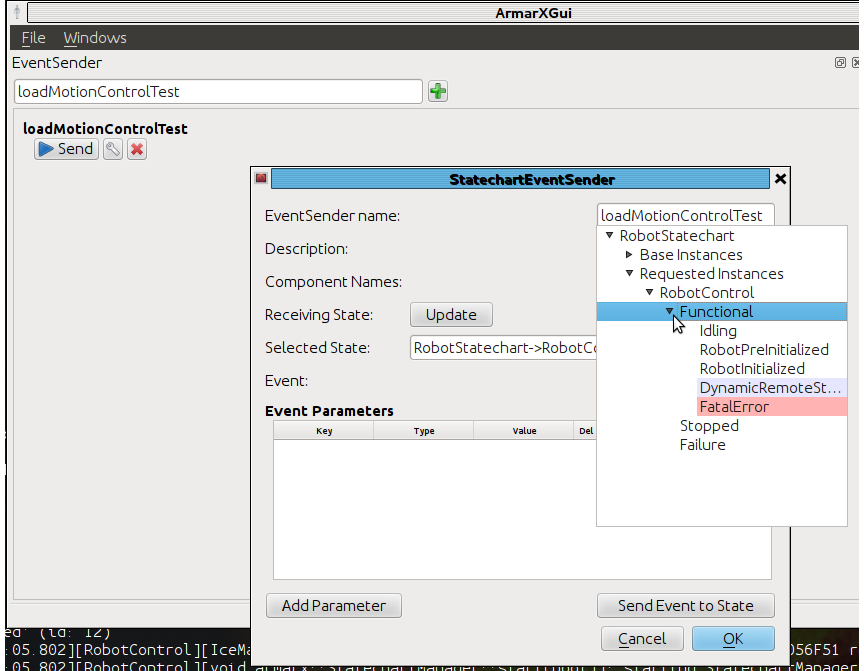 EventSenderGui-ComboBoxOpen
 - In the event-combobox the user can selected the specific event, that should be sent to the statechart.
- In the tableview the dictionary, that should be sent with the event, can be specified. The user can add an arbitrary number of parameters here.
How to load a robot program
To load a robot program (i.e. a statechart offered with a RemoteStateOfferer) into the running robot main statechart configure an EventSender like this:
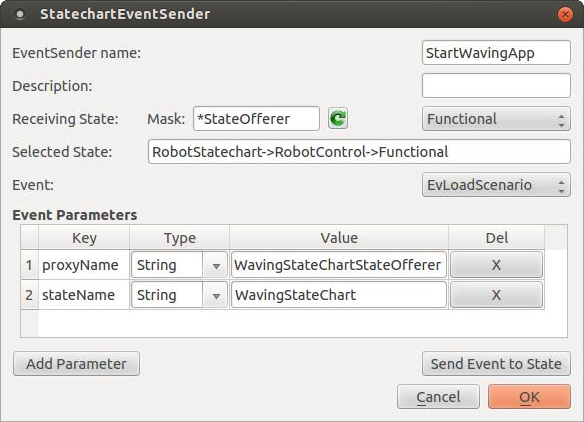
The RobotStatechart must be in the states RobotStatechart->Functional->RobotInitialized (it is automatically in this state after scenario start, but you can re-enter this state by restarting the statechart, see below).
The parameter field 'proxyName' has to contain the component-name of the RemoteStateOfferer, where the state resides in.
The parameter field 'stateName' has to be the name of the state, that should be loaded into the Robot-main-statechart. This state is then automatically entered, when the event was sent.
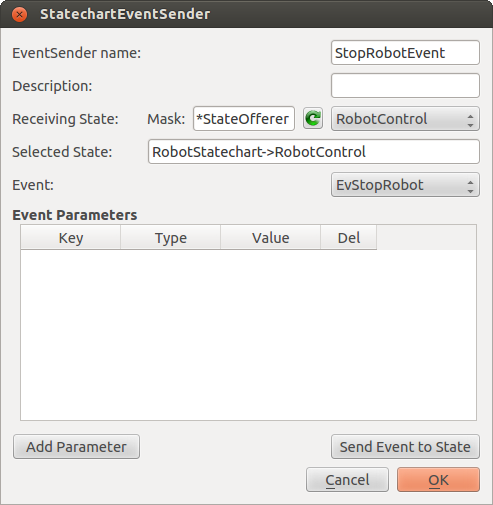
How to restart the RobotStatechart
To restart the RobotStatechart send an Event EvStopRobot (see image below) and an Event EvStartRobot respectively.
For detailed explanations see the class-documentations themself.
- See also
- EventSenderOverview
- StatechartViewer
