Table of Contents
This tutorial shows how to play human motions on Armar4. In a first step, human motions recorded with Vicon are converted to the Armar4 robot model. After testing the converted motions, the motions can be played on Armar4 using the MMMPlayer.
Getting Started
For this tutorial, you need following prerequisites:
- A copy of ArmarX
- A copy of MMMTools and MMMCore
- The latest model of Armar4 (located in the Armar4 repository of ArmarX)
Converting the human motion to robot format
To convert a human motion for the robot we use MMMTools. Make sure you have the latest version of MMMTools and MMMCore on your computer and that nlopt is installed (on Ubuntu 14.04 it is preinstalled, on 12.04 you need to install it).
Create a new bash script for converting the motion and insert following text:
#!/bin/sh
MMMConverterGUI \
    --inputData motion.xml \
    --converter NloptConverter \
    --converterConfigFile NloptConverterConfig.xml \
    --sourceModel {mmmtools_DIR}/data/Model/Winter/mmm.xml \
    --sourceModelProcessor Winter \
    --sourceModelProcessorConfigFile ModelProcessor_Winter_1.79.xml \
    --targetModel {armarx_DIR}/Armar4/data/Armar4/robotmodel/Armar4.xml \
    --targetModelProcessor "" \
    --targetModelProcessorConfig ""
For motion.xml insert the name of your motion. Next, create the "ModelProcessor_Winter_1.79.xml" file and insert the following:
<?xml version="1.0" ?>
<ModelProcessorConfig type='Winter'>
    <height>1.79</height>
    <mass>72</mass>
</ModelProcessorConfig>
Then create the "NloptConverterConfig.xml" file and insert this text:
<?xml version='1.0' encoding='UTF-8'?>
<ConverterConfig type='NloptConverter'>
  <Model name='Armar4' size='1.7'>
    <MarkerMapping>
      <Mapping c3d="MARKER_C7" mmm="MARKER_C7" />
      <Mapping c3d="MARKER_L3" mmm="MARKER_L3" />
      <Mapping c3d="MARKER_CLAV" mmm="MARKER_CLAV" />
      <Mapping c3d="MARKER_RBAK" mmm="MARKER_RBAK" />
      <Mapping c3d="MARKER_T10" mmm="MARKER_T10" />
      <Mapping c3d="MARKER_STRN" mmm="MARKER_STRN" />
      <Mapping c3d="MARKER_RASI" mmm="MARKER_RASI" />
      <Mapping c3d="MARKER_LUPA" mmm="MARKER_LUPA" />
      <Mapping c3d="MARKER_LASI" mmm="MARKER_LASI" />
      <Mapping c3d="MARKER_LHIP" mmm="MARKER_LHIP" />
      <Mapping c3d="MARKER_LPSI" mmm="MARKER_LPSI" />
      <Mapping c3d="MARKER_LKNE" mmm="MARKER_LKNE" />
      <Mapping c3d="MARKER_RPSI" mmm="MARKER_RPSI" />
      <Mapping c3d="MARKER_LFRA" mmm="MARKER_LFRA" />
      <Mapping c3d="MARKER_LWPS" mmm="MARKER_LWPS" />
      <Mapping c3d="MARKER_LWTS" mmm="MARKER_LWTS" />
      <Mapping c3d="MARKER_LMT1" mmm="MARKER_LMT1" />
      <Mapping c3d="MARKER_LMT5" mmm="MARKER_LMT5" />
      <Mapping c3d="MARKER_LTOE" mmm="MARKER_LTOE" />
      <Mapping c3d="MARKER_RUPA" mmm="MARKER_RUPA" />
      <Mapping c3d="MARKER_RHIP" mmm="MARKER_RHIP" />
      <Mapping c3d="MARKER_RKNE" mmm="MARKER_RKNE" />
      <Mapping c3d="MARKER_RWPS" mmm="MARKER_RWPS" />
      <Mapping c3d="MARKER_RWTS" mmm="MARKER_RWTS" />
      <Mapping c3d="MARKER_RMT1" mmm="MARKER_RMT1" />
      <Mapping c3d="MARKER_RMT5" mmm="MARKER_RMT5" />
      <Mapping c3d="MARKER_RTOE" mmm="MARKER_RTOE" />
      <Mapping c3d="MARKER_RHEE" mmm="MARKER_RHEE" />
      <Mapping c3d="MARKER_LHEE" mmm="MARKER_LHEE" />

      <!-- Shoulders
      <Mapping c3d="RSHO" mmm="MARKER_RSHO" />
      <Mapping c3d="LSHO" mmm="MARKER_LSHO" />
      -->

      <!-- Ellbows -->
      <Mapping c3d="MARKER_RAOL" mmm="MARKER_RAOL" />
      <Mapping c3d="MARKER_RAEL" mmm="MARKER_RAEL" />
      <Mapping c3d="MARKER_LAOL" mmm="MARKER_LAOL" />
      <Mapping c3d="MARKER_LAEL" mmm="MARKER_LAEL" />

      <!-- Hands -->
      <Mapping c3d="MARKER_RHTS" mmm="MARKER_RHTS" />
      <Mapping c3d="MARKER_RHPS" mmm="MARKER_RHPS" />
      <Mapping c3d="MARKER_LHTS" mmm="MARKER_LHTS" />
      <Mapping c3d="MARKER_LHPS" mmm="MARKER_LHPS" />

      <Mapping c3d="MARKER_RIFD" mmm="MARKER_RIFD" />
      <Mapping c3d="MARKER_LIFD" mmm="MARKER_LIFD" />

      <!-- Head -->
      <Mapping c3d="MARKER_LFHD" mmm="MARKER_LFHD" />
      <Mapping c3d="MARKER_RFHD" mmm="MARKER_RFHD" />
      <Mapping c3d="MARKER_RBHD" mmm="MARKER_RBHD" />
      <Mapping c3d="MARKER_LBHD" mmm="MARKER_LBHD" />

      <Mapping c3d="MARKER_LANK" mmm="MARKER_LANK" />
      <Mapping c3d="MARKER_RANK" mmm="MARKER_RANK" />
      <Mapping c3d="MARKER_LBAK" mmm="MARKER_LBAK" />
      <Mapping c3d="MARKER_LTIP" mmm="MARKER_LTIP" />
      <Mapping c3d="MARKER_RTIP" mmm="MARKER_RTIP" />
      <Mapping c3d="MARKER_LTHI" mmm="MARKER_LTHI" />
      <Mapping c3d="MARKER_RTHI" mmm="MARKER_RTHI" />
    </MarkerMapping>
    <JointSet>
      <!-- Only upper body -->
      <Joint name='ArmL_Elb1_joint' />
      <Joint name='ArmL_Elb2_joint' />
      <Joint name='ArmL_Sho1_joint' />
      <Joint name='ArmL_Sho2_joint' />
      <Joint name='ArmL_Sho3_joint' />
      <Joint name='ArmL_Sho4_joint' />
      <Joint name='ArmL_Wri1_joint' />
      <Joint name='ArmL_Wri2_joint' />

      <Joint name='ArmR_Elb1_joint' />
      <Joint name='ArmR_Elb2_joint' />
      <Joint name='ArmR_Sho1_joint' />
      <Joint name='ArmR_Sho2_joint' />
      <Joint name='ArmR_Sho3_joint' />
      <Joint name='ArmR_Sho4_joint' />
      <Joint name='ArmR_Wri1_joint' />
      <Joint name='ArmR_Wri2_joint' />

      <!-- <Joint name='Head_1_joint' />
      <Joint name='Head_2_joint' />
      <Joint name='Neck_1_joint' />
      <Joint name='Neck_2_joint' />
      <Joint name='Neck_3_joint' /> -->

      <Joint name='Torso_Pitch_joint' />
      <Joint name='Torso_Yaw_joint' />
    </JointSet>
  </Model>
</ConverterConfig>
This config file is for converting upper body motions only. Adjust it according to your motion!
Now you can run
${motion_DIR} ./NloptConverter.sh
and the converter Gui will open:
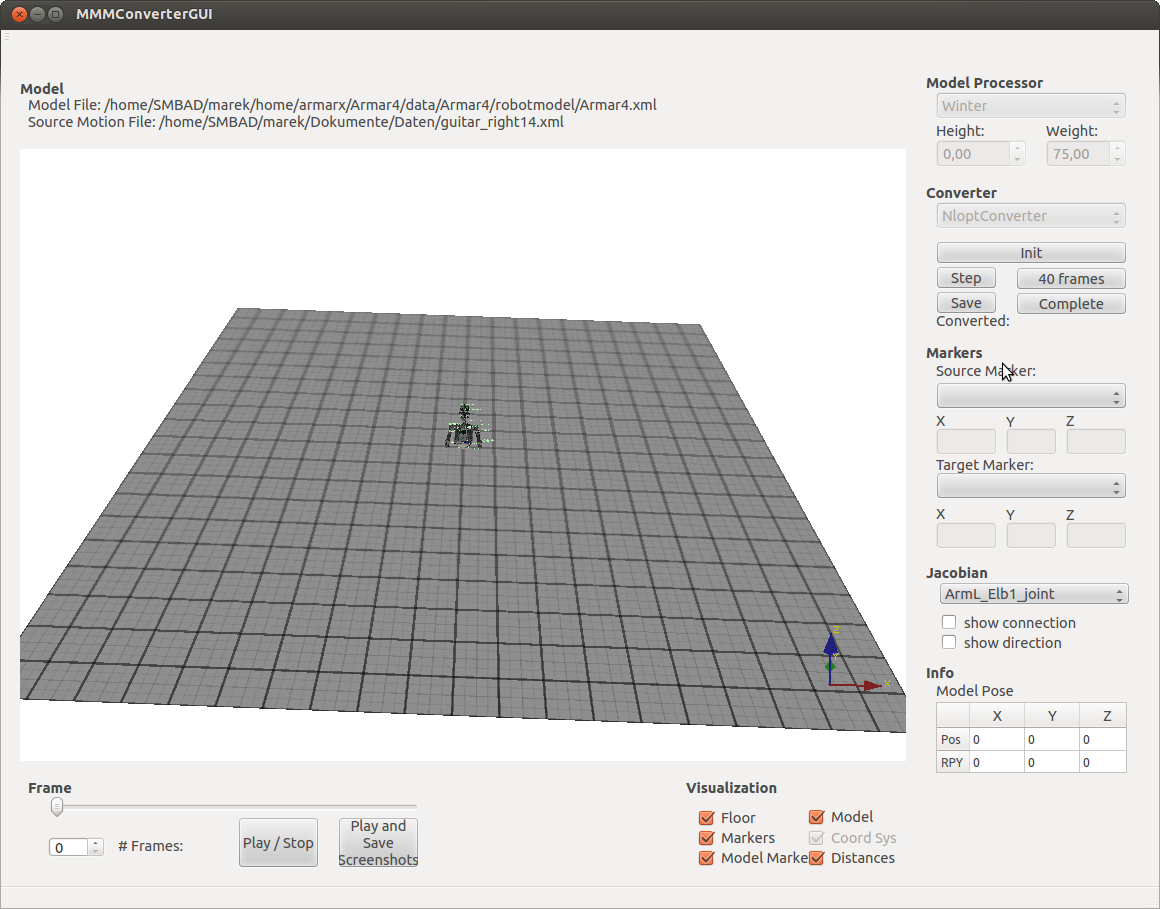
Now click on "Init" (don't worry if the picture of Armar4 will vanish), then "Complete". Once the optimization is done, save the results. You can view (and check) the converted motion with:
${motion_DIR} MMMViewer --motion motion_armar4.xml
Testing the motion and configurations in simulation
Once you obtained a converted motion file for Armar4, you can play this file in the simulation to test the MMMPlayer configurations.
First, start ice. Next you start the Simulation in the Armar4 Simulation Scenario:
armarx scenario start Armar4Simulation -p Armar4
Now, start the Armarx Gui in the armarx Gui directory:
${Gui_DIR}/build/bin/ ./ArmarXGuiRun
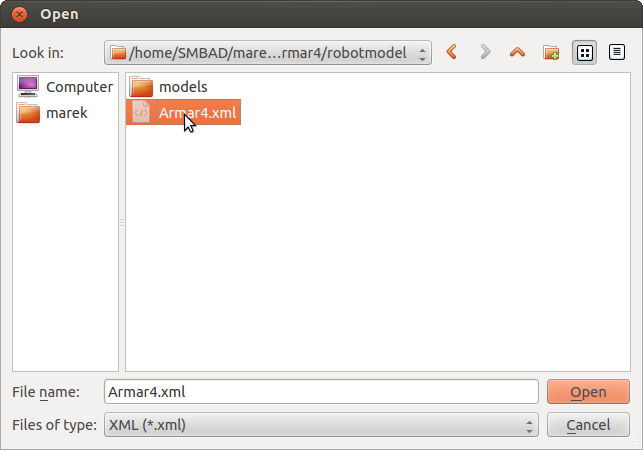
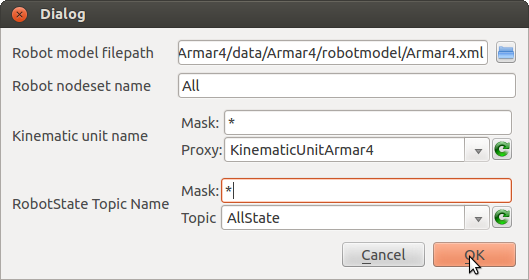
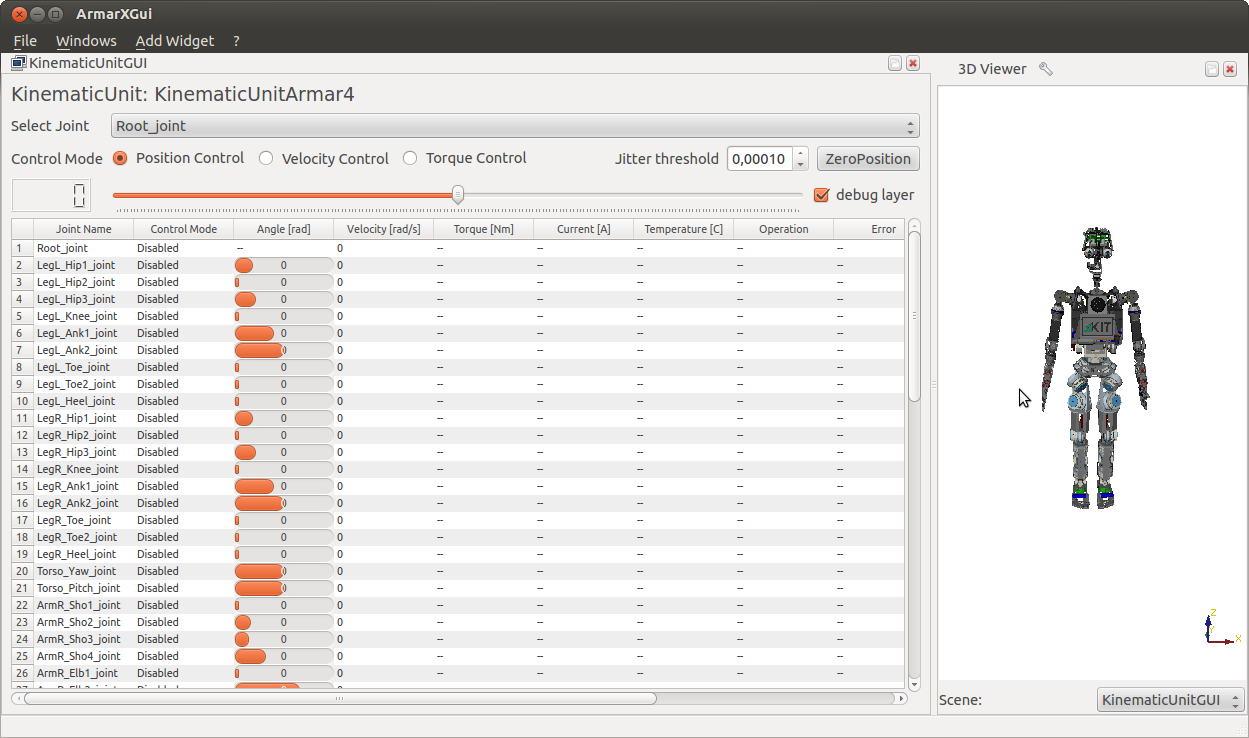
Open a new Kinematic Unit
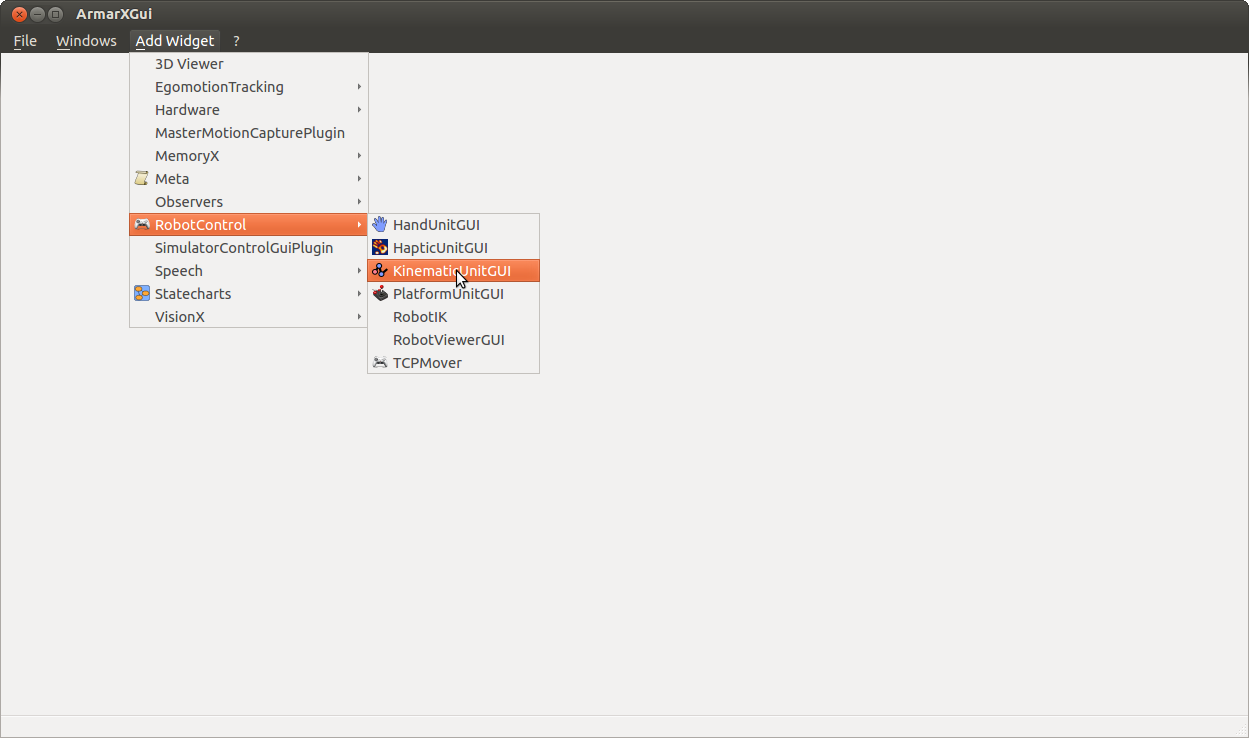
for Armar4 (the Armar4 robot model is located in: {ArmarX_DIR}/Armar4/data/Armar4/robotmodel):
with following settings:
The result should look somewhat like this:
In a next step, you can modify the MMMPlayer-config file to fit it to your motion. Open the MMMPlayerApp.cfg file in {ArmarX_DIR}/RobotComponents/scenarios/MMMScenario/config and add the path to your MMM-motion:
# ArmarX.MMMPlayer.MMMFile:  Path to MMM XML File
#  Attributes:
#  - Case sensitivity:   no
#  - Required:           yes
ArmarX.MMMPlayer.MMMFile = path_to_your_file/file_name
Start the MMMPlayer in the RobotComponents scenarios:
armarx scenario start MMMScenario -p RobotComponents
and watch Armar4 perform the motion in the RobotViewer in the ArmarXGui.
In a next step, you can fit the parameter to the motion by adjusting the values in the config file until the motion looks good in the simulation. First, you can change the velocity of the motion by adjusting the parameter MotionFPS (values between 10 and 40 usually work well in practice):
# ArmarX.MMMPlayer.FPS:  FPS with which the recording should be executed. Velocities will be adapted.
#  Attributes:
#  - Default:            100
#  - Case sensitivity:   no
#  - Required:           no
ArmarX.MMMPlayer.FPS = 30
Next, you can adjust the parameters of the PID controller by changing the values for Kp, Ki and Kd in the config file until the motion is smooth.
To test the new parameters, kill the MMMPlayer with
armarx scenario stop MMMScenario -p RobotComponents
and restart it with:
armarx scenario start MMMScenario -p RobotComponents
Playing the motion on Armar4
First, turn on the power. Make sure the voltage is approx. 48V. Then switch on "Output On" and turn on the Robot and the Elmos. Next, connect the CAN busses necessary for the motion with a CAN adapter to the computer (e.g. for waving with the right hand, connect the ARM-R, for waving with both hands, connect both ARM-R and ARM-L). #Change no. of busses in config
Turn on Mongod:
armarx memory start
Now start the necessary components for Armar4. Replace the file HardwareConfig_ComponentsNeeded.xml with the config file you need (e.g. if you connected only the CAN bus for ARM-R, it is enough to start HardwareConfig_RightArm.xml).
${Armar_DIR}/build/bin ./startArmar4 --config ../../etc/config/Armar4/HardwareConfig_ComponentsNeeded.xml
Next, start the Linux Test scenario:
armarx scenario start LinuxTest -p Armar4
If the error message
Send failed: Network is down
appears where your started the config file, you need to change the CAN number in the config file. With
ifconfig
you can check which CANs are connected to your computer and change the numbers in the config file accordingly:
...
<Bus name="CanBus1" file="can0" frequency="200"> <!-- on robot:  file="5"-->
        <Device id="0x3C" name="ArmL_Sho1_elmo" type="elmo" node="ArmL_Sho1_joint">
            <Conversions>
            ...
If everything went fine, the Gui should look like this (in this picture, both arms are connected):
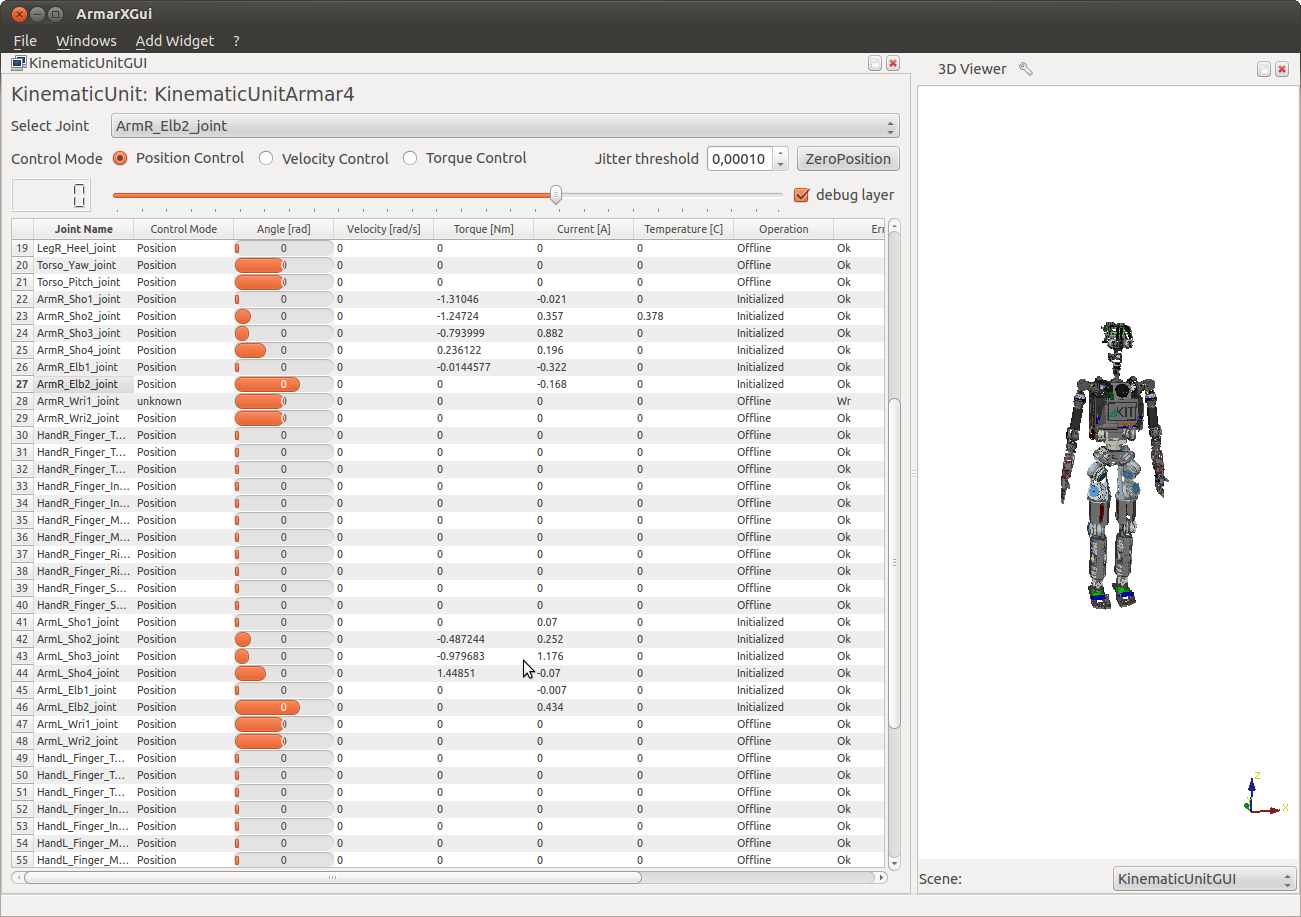
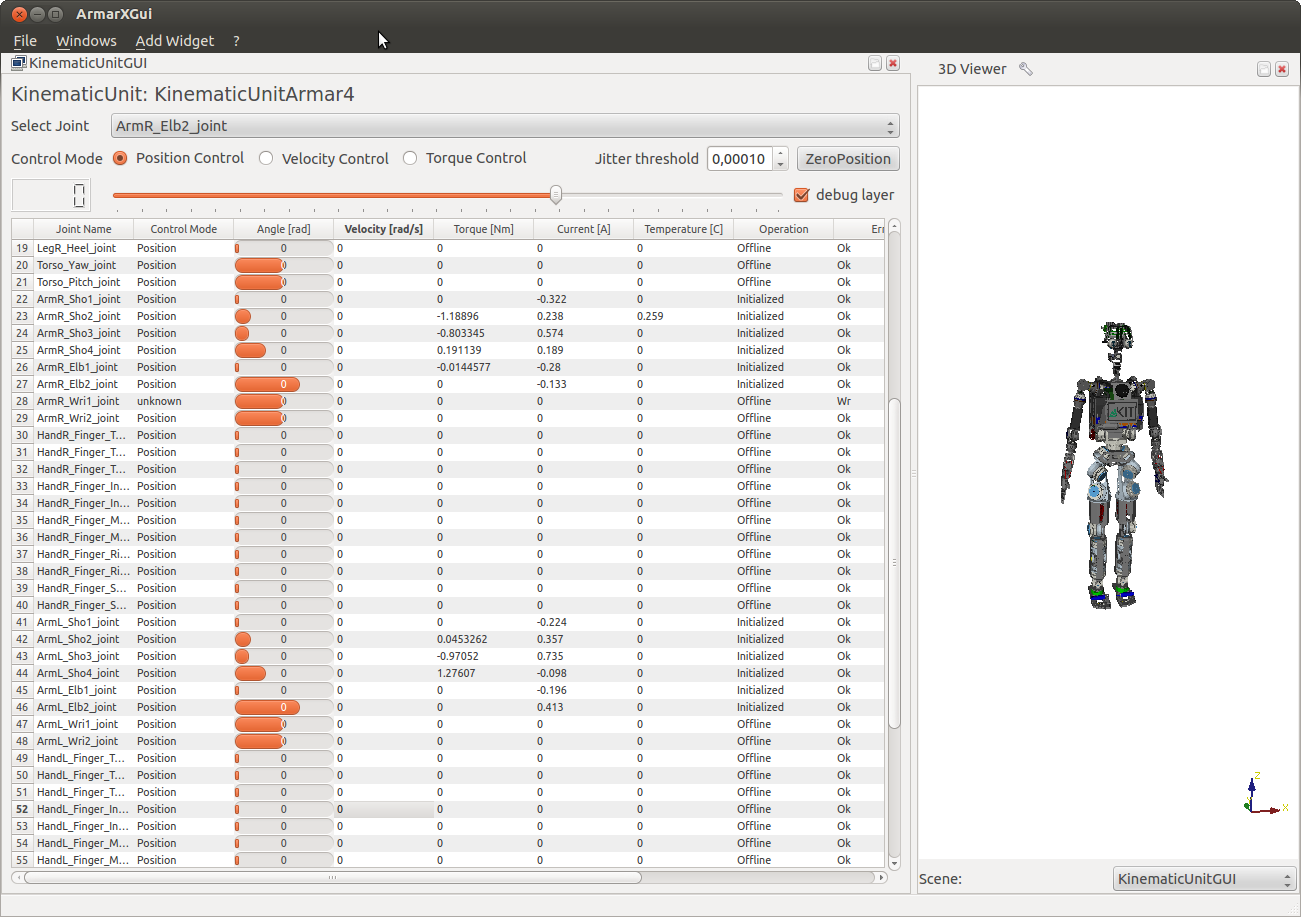
It is important that all current values for the joints you want to use show values differing from zero, the same is true for most torque values. If some joints were found, kill the Linux test scenario and restart both the config and the Linux test scenario. It can take a number of restarts until all joints are found. Sometimes it helps to move the joints it cannot find a little. Once all joints are found, check if all angles are close to 0. If not, move the appropriate joints a bit until they are close to 0. Then you can press the "Zero Position" button. All angles should be 0 now:
Now everything is ready to play the motion on Armar4.
Make sure the emergency stop button is close at hand and you are ready to hit it anytime in case the motion goes wrong!
Start the MMMPlayer by:
armarx scenario start MMMScenario -p RobotComponents
When the motion is finished, press the "Zero Position" button and Armar4 will stop the motion and return to its zero position. Then stop the MMMPlayer scenario and maybe replay it with some other configurations until it looks good.
