Table of Contents
In this tutorial we will create a more complex statechart using already existing statecharts. The scenario will control the robot Armar3 to pick up an object and place it at another position. To test the scenario we will use the Armar3Simulation scenario.
- Attention
- This tutorial assumes you know how to use the Statechart Editor and have started the database and filled it with prior knowledge.
- Note
- An example project can be found at
${ARMARX_WORKSPACE}/armarx/tutorials/pick_and_place_tutorial - In this tutorial you'll learn how to build a complex statechart and use the Armar3Simulation scenario.
Concept
Let us first discuss what we need to do to solve a pick-and-place task.
Preconditions
We have the following preconditions:
- We know the object.
- We know how to grasp the object.
- We know a path from the starting position to a position A.
- If Armar3 is at position A, it can grasp the object.
- We know a path from A to the placing position B.
- We know where to place the object at position B.
- We know a path from B to a final position C.
- When at C Armar3 can not reach the object.
- Note
- After the simulation has ended Armar3's Hand will slowly lower itself and knock over the object. We move to C to prevent Armar3 from knocking over the object at the end of the simulation.
Dividing the problem
First we have to divide the problem:
- Move to position A.
- Pick up the object.
- Move to position B.
- Place the object.
- Move to position C.
We will build a complex statechart that utilizes statecharts from RobotSkillTemplates to solve the individual subproblems.
The movement of the platform will be done using:
The object will be picked up using:
The object will be placed using:
Implementation
First we need a package. You can use an existing package or create a new one with:
If you create one run cmake in the build directory of your package.
Setting up the statechart
Creating the statechart
Now we will create a new statechart using the statechart editor.
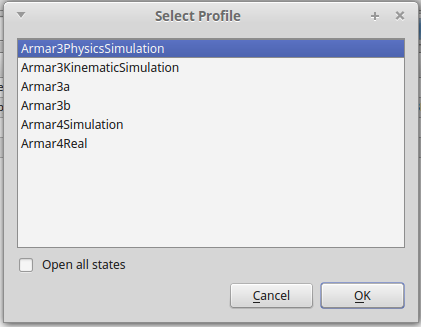
Make sure armarx is running on your system and then open the armarx gui. Either select 'Armar3 Statechart Programming' or 'Open empty gui' and then open the statechart editor manually (add widget → Statecharts → StatechartEditor). If you open it manually select the Armar3PhysicsSimulation (or just Armar3Simulation) profile (deselect "Open all states"):
- Create a new statechart group "PickAndPlaceGroup" in your package
- Open (gearwheel icon -> "Add Path"): ${RobotSkillTemplates_DIR}/../source/RobotSkillTemplates/statecharts/PlatformGroup${RobotSkillTemplates_DIR}/../source/RobotSkillTemplates/statecharts/GraspObjectGroup${RobotSkillTemplates_DIR}/../source/RobotSkillTemplates/statecharts/PlaceObjectGroup${RobotSkillTemplates_DIR}/../source/RobotSkillTemplates/statecharts/HandGroup${RobotSkillTemplates_DIR}/../source/RobotSkillTemplates/statecharts/MotionControlGroup${RobotSkillTemplates_DIR}/../source/RobotSkillTemplates/statecharts/VisualServoGroup
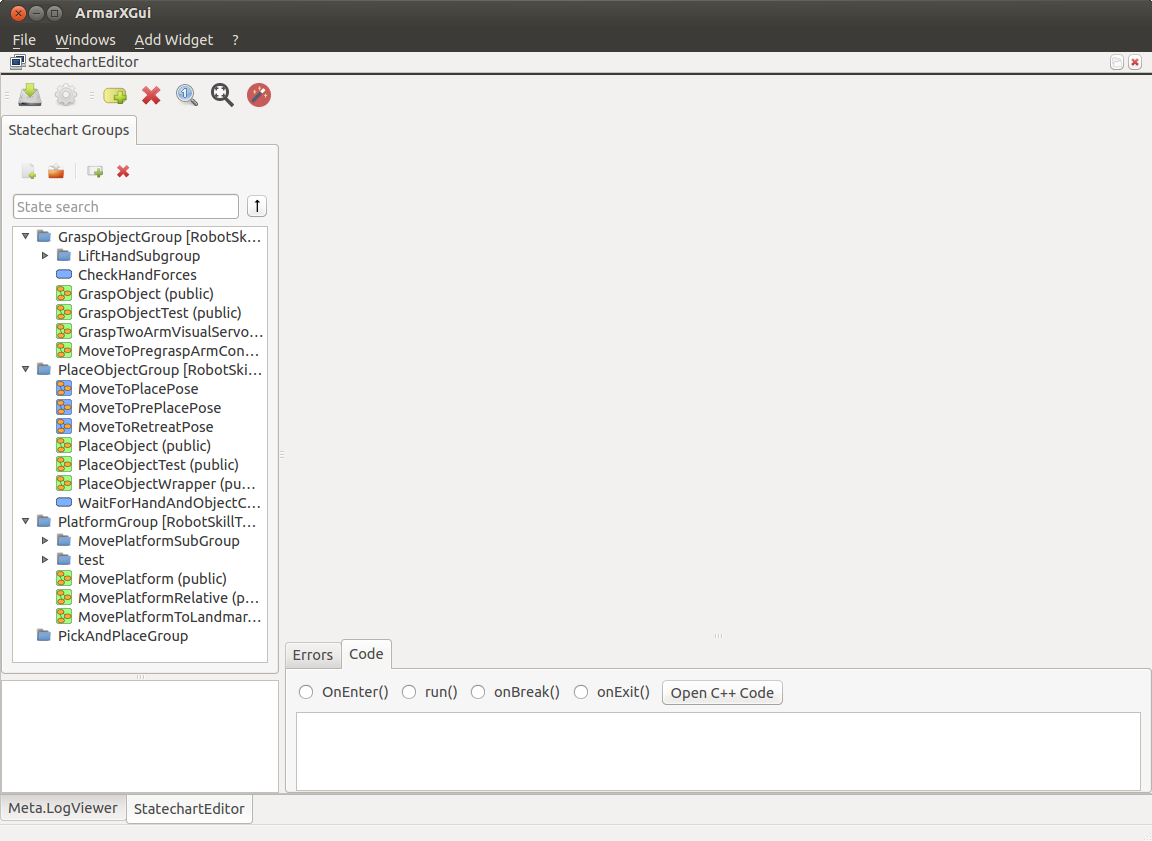
Your GUI should now look like this:
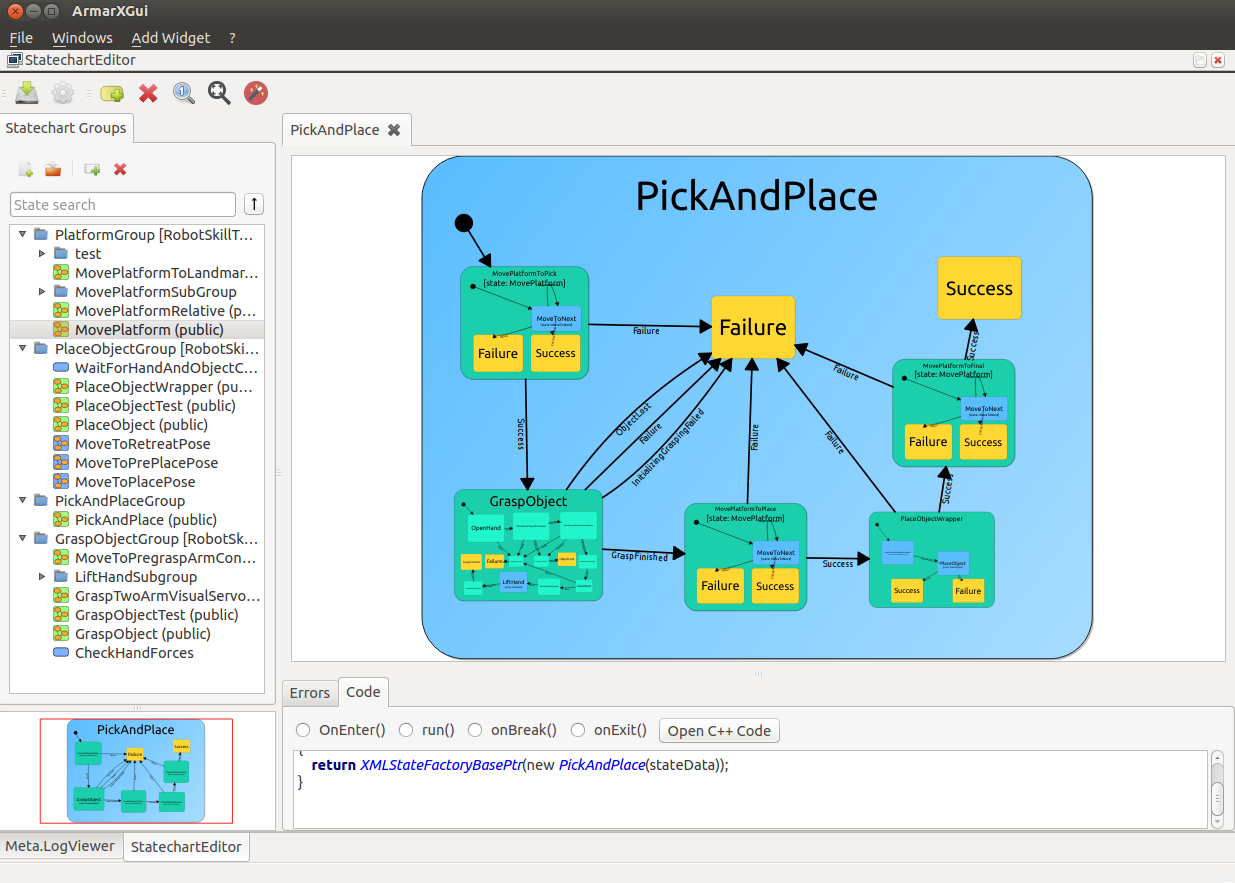
Let's create our PickAndPlace statechart:
- Add a new state definition 'PickAndPlace' to your group (tick 'Create C++ Files') and make it public.
- If they aren't there already, add two states: "Success" and "Failure"
- Add GraspObject (GraspObjectGroup) and PlaceObjectWrapper (PlaceObjectGroup) one time each.
- Add MovePlatform (PlatformGroup) three times.
- Rename the MovePlatform states to 'MovePlatformToPick', 'MovePlatformToPlace', 'MovePlatformToFinal'
- Connect all states as shown in the image below.
Setting input parameters
At the moment no state has sufficient input parameters.
The state MovePlatform requires:
MaxRotationalVelocity  //how fast the robot is allowed turn around at most. (in radians/s)
MaxTranslationVelocity //how fast the robot is allowed to move at most. (in mm/s)
orientationalAccuracy  //orientational accuracy (in rad)
positionalAccuracy     //positional accuracy (in mm)
targetPositions        //list of 3D vectors to move through. The z component is used as orientation around the z axis.
timeoutMoveTo          //maximum duration allowed to move between two following positions. (in ms)
waitAfterLast          //time to wait after the last position was reached (to give the robot some time to "settle down"). (in ms)
GraspObject requires even more:
AccuracyIncreaseTimeout              //accuracy starts a low % of the specified accuracy below, and keeps increasing within the time frame (ms)
CloseHandShapeName                   //name of the closed hand shape.
GraspName                            //name of the grasp to perform.
GraspPreposeName                     //name of the grasp prepose.
GraspSetName                         //name of the grasp set. (It stores the hand and grasp shapes)
HandNameInMemory                     //name of the hand used in memory.
HandNameInRobotModel                 //name of the hand used in the robot model.
KinematicChainName                   //name of the kinematic chain used to move the hand to the object.
ObjectInstanceChannel                //channel that encapsulates the actual object to grasp. (is optional)
ObjectName                           //name of the object class to grasp.
OpenHandShapeName                    //name of the open hand.
OrientationalAccuracyRadGrasp        //orientational accuracy used for the grasp.
OrientationalAccuracyRadGraspPrepose //orientational accuracy used for the grasp prepose.
OrientationalAccuracyRadLiftHand     //orientational accuracy used for lifting the hand. (after the grasp was performed)
PositionalAccuracyGrasp              //positional accuracy used for the grasp.
PositionalAccuracyGraspPrepose       //positional accuracy used for the grasp prepose.
PositionalAccuracyLiftHand           //positional accuracy used for lifting the hand. (after the grasp was performed)
And also PlaceObjectWrapper requires some parameters:
ForceSensorDatafieldName //name of the force sensor
ForceThreshold           //threshold after which the robot hand is considered to be pressing against something
GraspName                //same as above
GraspSetName             //same as above
HandNameForHandUnit      //name for the hand unit, usually something like "TCP L" or "TCP R"
HandNameInMemory         //same as above
KinematicChainName       //name of the kinematic chain to use for planning the placing potion
ObjectName               //same as above
PlacePosition            //position to actually place the object at
TorqueThreshold          //unused (yet?)
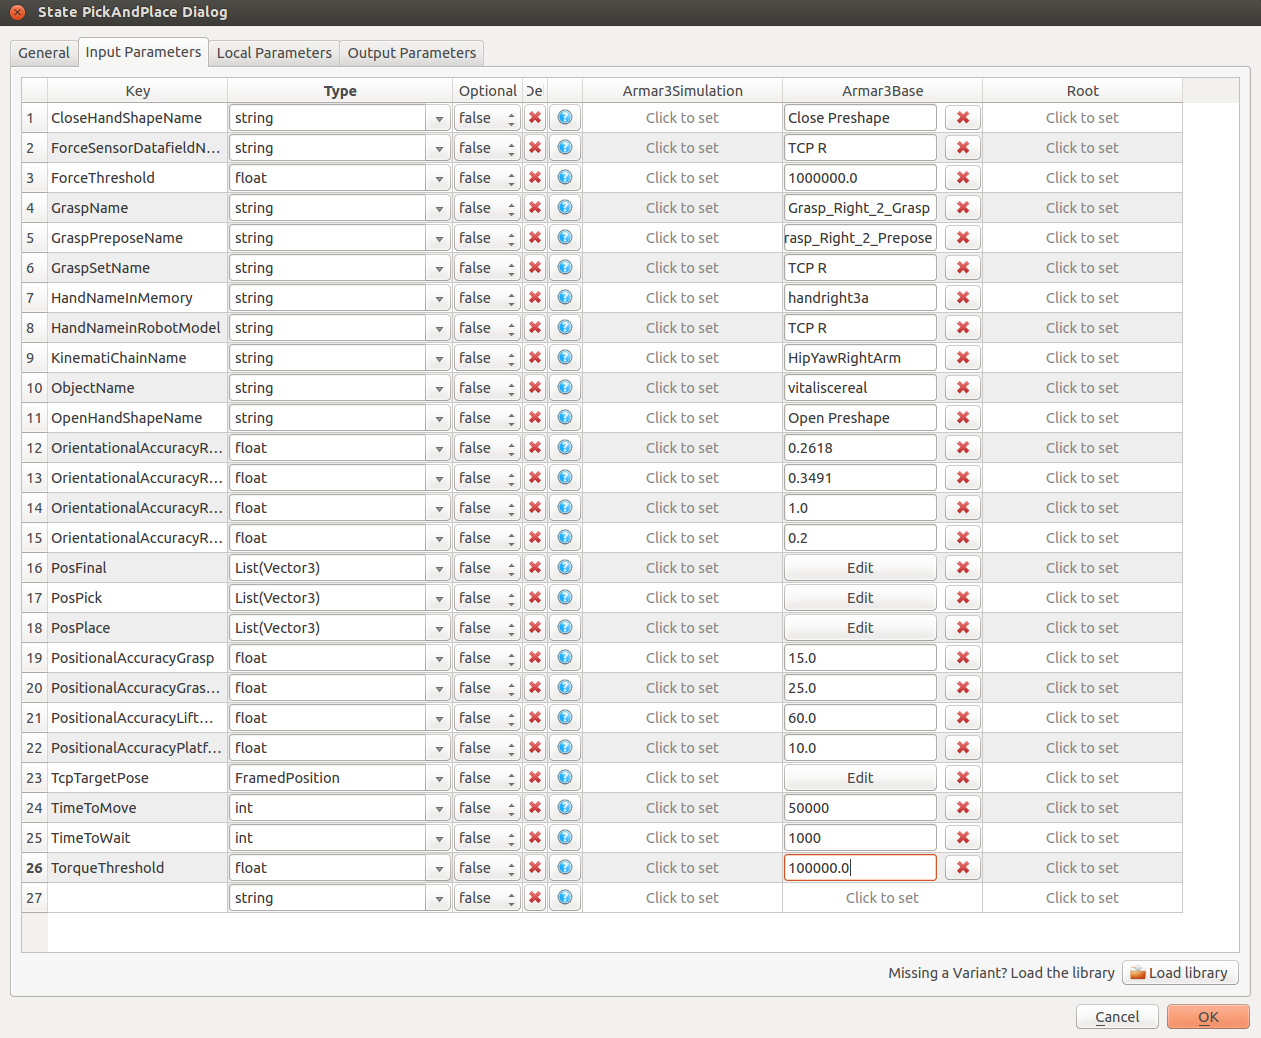
Our state PickAndPlace will pass it's own input parameters to the substates and define useful default values. The input parameters and their default values are as follows:
- Attention
- At the time of writing this tutorial it is important to make sure no value has pre- or appended whitespace. "handright3a " != "handright3a" != " handright3a" These errors can be very hard to find.
The values can be entered in any of the statechart profiles column (see figure below, columns Armar3Simulation, Armar3Base, Root), but for a consistent setup of the standard values we assume to enter the values to the Armar3Base profile. The values on the left have a higher priority than the values in the right columns. The profile is chosen in the configuration file of a state (Default: Root).
| Nr. | Key | Type | Value |
| 1 | CloseHandShapeName | string | Close Preshape |
| 2 | ForceSensorDatafieldName | string | TCP R |
| 3 | ForceThreshold | float | 30.0 |
| 4 | GraspName | string | Grasp_Right_1_Grasp |
| 5 | GraspPreposeName | string | Grasp_Right_1_Prepose |
| 6 | GraspSetName | string | TCP R |
| 7 | HandNameInMemory | string | handright3a |
| 8 | HandNameInRobotModel | string | TCP R |
| 9 | KinematicChainName | string | HipYawRightArm |
| 10 | ObjectName | string | vitaliscereal |
| 11 | OpenHandShapeName | string | Open Preshape |
| 12 | OrientationalAccuracyRadGrasp | float | 0.2618 |
| 13 | OrientationalAccuracyRadGraspPrepose | float | 0.3491 |
| 14 | OrientationalAccuracyRadLiftHand | float | 1.0 |
| 15 | OrientationalAccuracyRadPlatform | float | 0.2 |
| 16 | PosFinal | List(Vector3) |
[
  {
    "x": 3000.0,
    "y": 6000.0,
    "z": 2.329999923706055
  }
]
|
| 17 | PosPick | List(Vector3) |
[
  {
    "x": 3400.0,
    "y": 7100.0,
    "z": -1.570000052452087
  }
]
|
| 18 | PosPlace | List(Vector3) |
[
  {
    "x": 2930.0,
    "y": 5610.0,
    "z": 2.329999923706055
  }
]
|
| 19 | PositionalAccuracyGrasp | float | 20.0 |
| 20 | PositionalAccuracyGraspPrepose | float | 25.0 |
| 21 | PositionalAccuracyLiftHand | float | 60.0 |
| 22 | PositionalAccuracyPlatform | float | 10.0 |
| 23 | TcpTargetPose | FramedPosition |
{
  "agent": "Armar3",
  "frame": "Armar3_Base",
  "x": 150.0,
  "y": 670.0,
  "z": 930.0
}
|
| 24 | TimeToMove | int | 50000 |
| 25 | TimeToWait | int | 1000 |
| 26 | TorqueThreshold | float | 100000.0 |
Once you're done, it should look like this:
Next, we will set the input for all transitions with an endpoint that is no end state. For the initial transition to MovePlatformToPick:
- Note
- The parameters where we selected 'none' as source are optional.
For the transition from MovePlatformToPick to GraspObject:
For the transition from GraspObject to MovePlatformToPlace:
For the transition MovePlatformToPlace to PlaceObjectWrapper:
For the transition PlaceObjectWrapper to MovePlatformToFinal.
Add the object to the scene
When we start the Armar3Simulation scenario it will load the required scene and the robot and set up all the things we need but one. There is no object for us to pick up. Adding an object requires the following:
- Get the object we want to manipulate from the prior knowledge memory.
- Check whether the object was already added to the simulation.
- If it was already added, move it.
- If it has not been added, add it.
To do this we have to get the proxies for the simulation, as well as the prior knowledge proxy. We do this by setting up the context.
Set up the context
In the statechart editor, right-click on the PickAndPlaceGroup and select "Group Properties" Check both the PriorKnowledge and SimulatorInterface proxies. It should look like this:
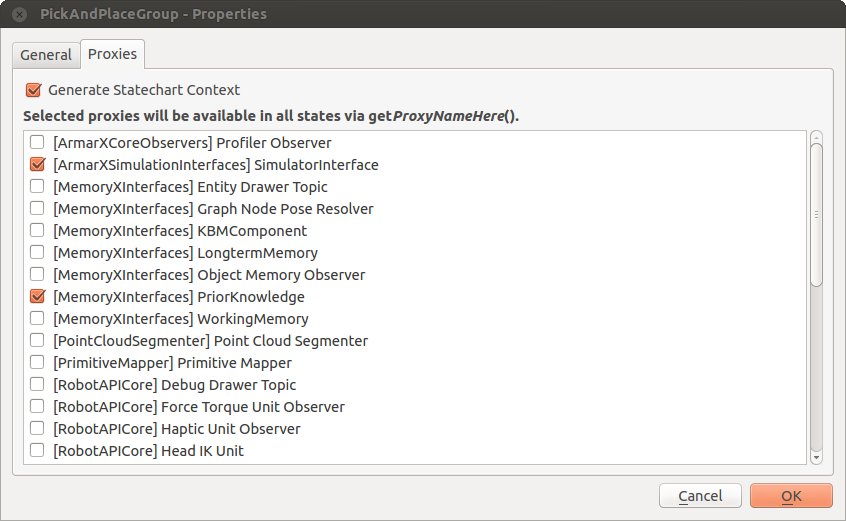
As explained in the previous tutorial, this tells the framework that we require access to the simulator and prior knowledge. Our statechart won't be started before these objects are available.
Before we dive into writing the code, make sure to save. We now have to update several CMakeLists.txt files.
Change CMakeLists.txt
Open the pick_and_place_tutorial/CMakeLists.txt in the QtCreator. Remember to set the build directory of your package as default. Since we're communicating with the simulation as well as the prior knowledge, we have to add the depencies ArmarXSimulation and MemoryX to our pick_and_place_tutorial/CMakeLists.txt as well as other dependencies like this:
# Required ArmarX dependencies.
armarx_find_package(PUBLIC RobotAPI REQUIRED)
armarx_find_package(PUBLIC MemoryX REQUIRED)
armarx_find_package(PUBLIC ArmarXSimulation REQUIRED)
armarx_find_package(PUBLIC RobotComponents REQUIRED)
armarx_find_package(PUBLIC RobotSkillTemplates REQUIRED)

# Optional system dependencies.
armarx_find_package(PUBLIC Eigen3 QUIET)
armarx_find_package(PUBLIC Simox QUIET)
While we don't use any RobotAPI proxies, depending on it is almost always a good bet. It contains types like FramedPosition which we make use of. We only need RobotSkillTemplates so that ArmarX knows where to find the statechars we're using. Once done, we have to specify where the proxy interfaces are actually defined and include those libraries.
In pick_and_place_tutorial/source/pick_and_place_tutorial/statecharts/PickAndPlaceGroup/CMakeLists.txt add the following dependencies:
armarx_add_statechart_group(PickAndPlaceGroup
  SOURCES
    ...
  HEADERS
    ...
  DEPENDENCIES
    # system dependencies
    Eigen3::Eigen
    Simox::VirtualRobot
    Simox::SimoxUtility
    # ArmarX dependencies
    #  - ArmarXCore
    ArmarXCoreInterfaces
    ArmarXCore
    ArmarXCoreStatechart
    ArmarXCoreObservers
    #  - RobotAPI
    RobotAPIInterfaces
    RobotAPICore
    #  - MemoryX
    MemoryXInterfaces
    MemoryXMemoryTypes
    #  - ArmarXSimulation
    ArmarXSimulationInterfaces
)
you'll notice that MemoryXInterfaces and ArmarXSimulationInterfaces were the prefixes of the proxies we added in the statechart editor. MemoryXMemoryTypes contains some types we'll need (ObjectInstance and ObjectClass)
At this point, you should be able to at least compile the project. Next up is the actual code.
Place the object
Now we have to add the code that places the object at the right position. Open 'PickAndPlace.cpp' and include
Further, change the function 'onEnter':
As you can see, this code accesses the simulator and the prior knowledge via the proxies that we added in the statechart editor earlier. First, we retrieve the object class segment from our prior knowledge. From this segment we then retrieve the object class with the class name that we specified as an input parameter to our state (we specified this in the GUI). If the memory database was properly filled with prior knowledge, this should work fine.
Next, we create a pose for the object. We assume that if an instance of the given object class exists, it would be named after the class itself. If it exists, we move it and if it doesn't, we create it.
- Note
- To learn more about the prior knowledge see the documentation of MemoryX Overview.
Now everytime our PickAndPlace state is entered, it is guaranteed that there is an object of the provided class name at the desired pose.
Creating the scenario
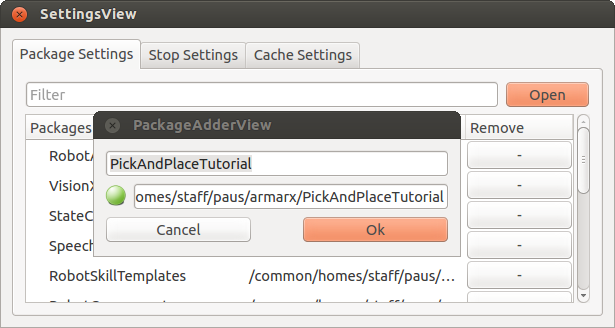
To test whether our statechart works as intended, we need to create a scenario. Open the ArmarX GUI and open the scenario manager ("Add Widget"->Meta->ScenarioManager). Click on "Configure" (wrench symbol) and open the newly created package pick_and_place_tutorial.
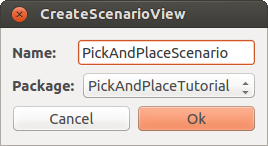
After that click on "New Scenario" and create a scenario with the name PickAndPlaceScenario in the package pick_and_place_tutorial.
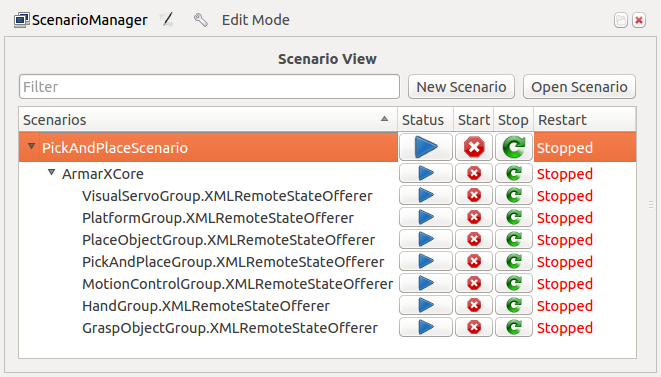
First we need to add the statechart groups which we used in our own statechart to the scenario. To accomplish that locate the following statechart groups inside the statechart editor> and use drag and drop from the statechart editor to the ScenarioManager to add them to your scenario (they are all part of RobotSkillTemplates):
- GraspObjectGroup
- HandGroup
- MotionControlGroup
- PlaceObjectGroup
- PlatformGroup
- VisualServoGroup These groups will be automatically configured and provide access to the statecharts we used in our PickAndPlaceGroup (e. g. MovePlatform, GraspObject).
Finally add our own statechart group PickAndPlaceGroup via drag and drop. Don't forget to set the property for the start state before proceeding.
The finished scenario should look similar to the following screenshot:
- Note
- You may wonder how the PickAndPlace state knows where to find its substates. Take a look at
${ARMARX_WORKSPACE}/pick_and_place_tutorial/source/pick_and_place_tutorial/statecharts/PickAndPlaceGroup/PickAndPlace.xmlScroll down to substates. There you see five remote states and two end states. You'll notice that for each substate there is a proxy name telling the PickAndPlace state where to find the remote substates.
Execution
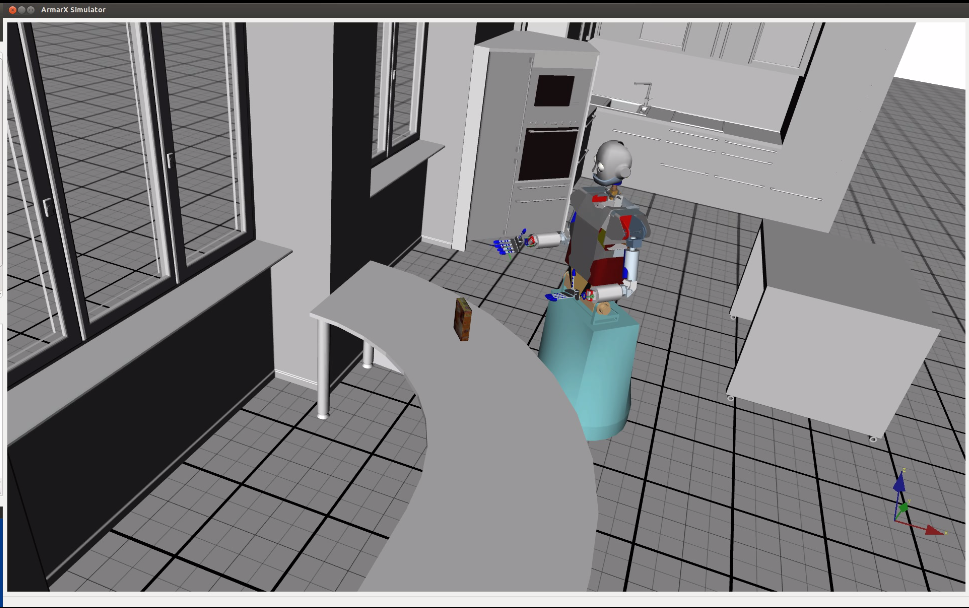
We can finally run the scenario. First we have to start the simulation. We can simply add the Armar3Simulation scenario from the ArmarXSimulation package.
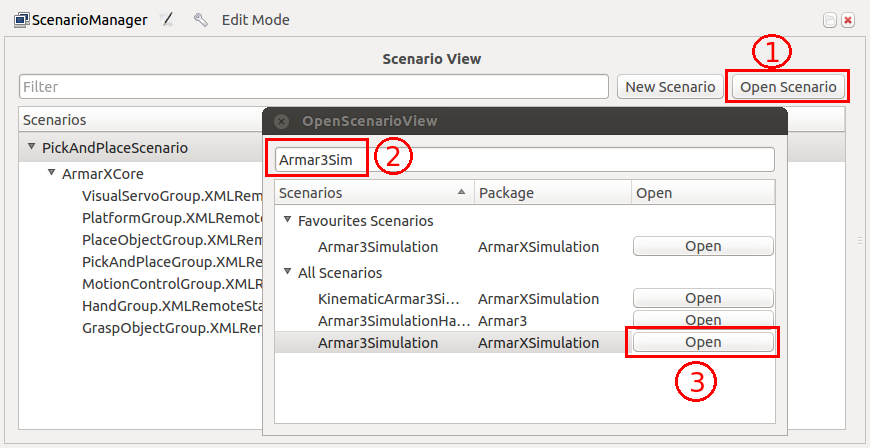
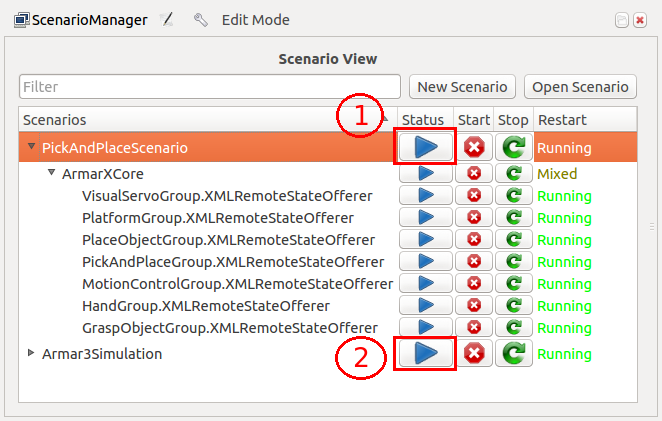
Now start the scenario Armar3Simulation using the start button in the GUI. A window showing Armar3 in a kitchen environment should appear.
Next we have to start our scenario using the corresponding start button. Once our scenario is loaded, the cereal box should appear and Armar3 should start grasping it.
The start buttons can be found in the scenario view right next to the corresponding scenarios.
Results
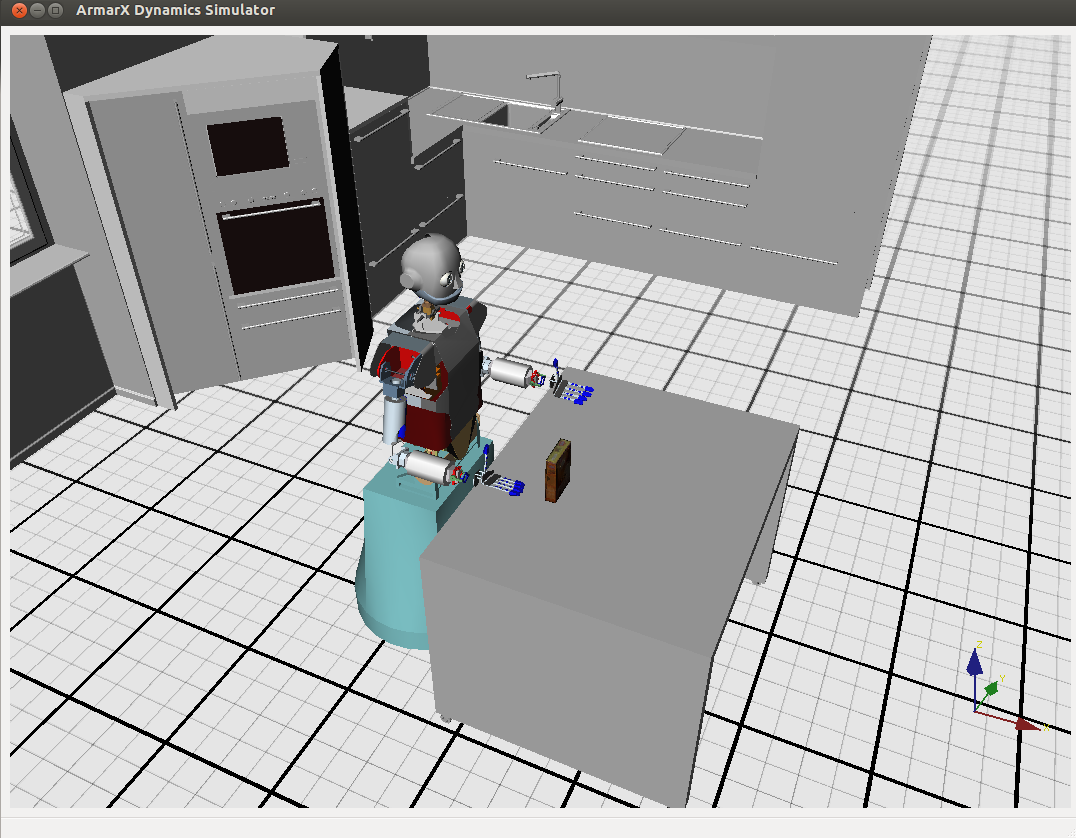
Our state placed the object.
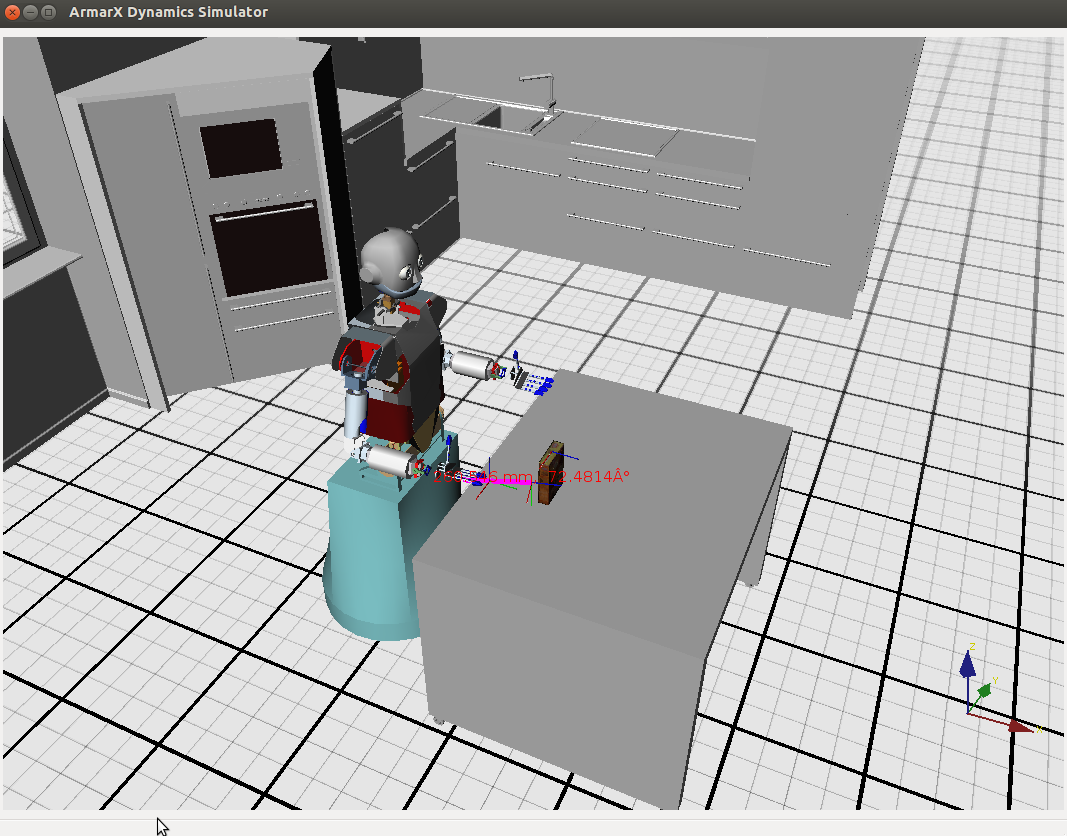
Visual tracking used to move the TCP to the grasp prepose.
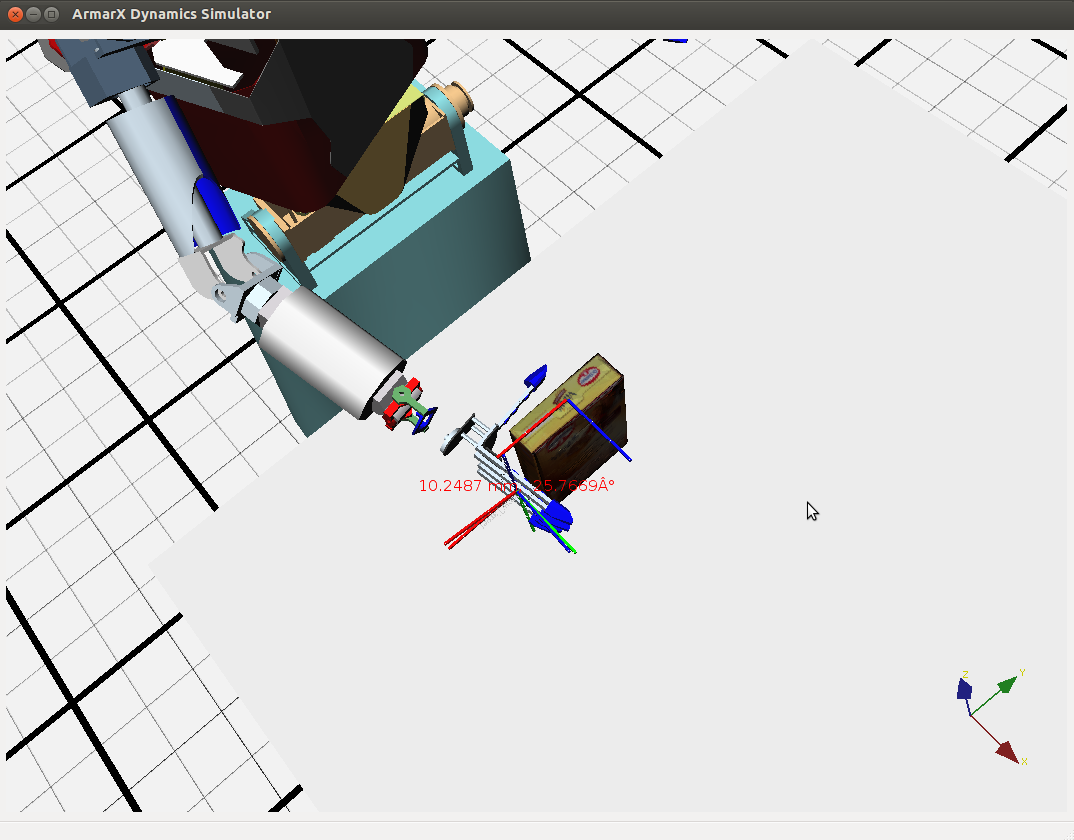
Moving to the grasp pose. (This step can take a while.)
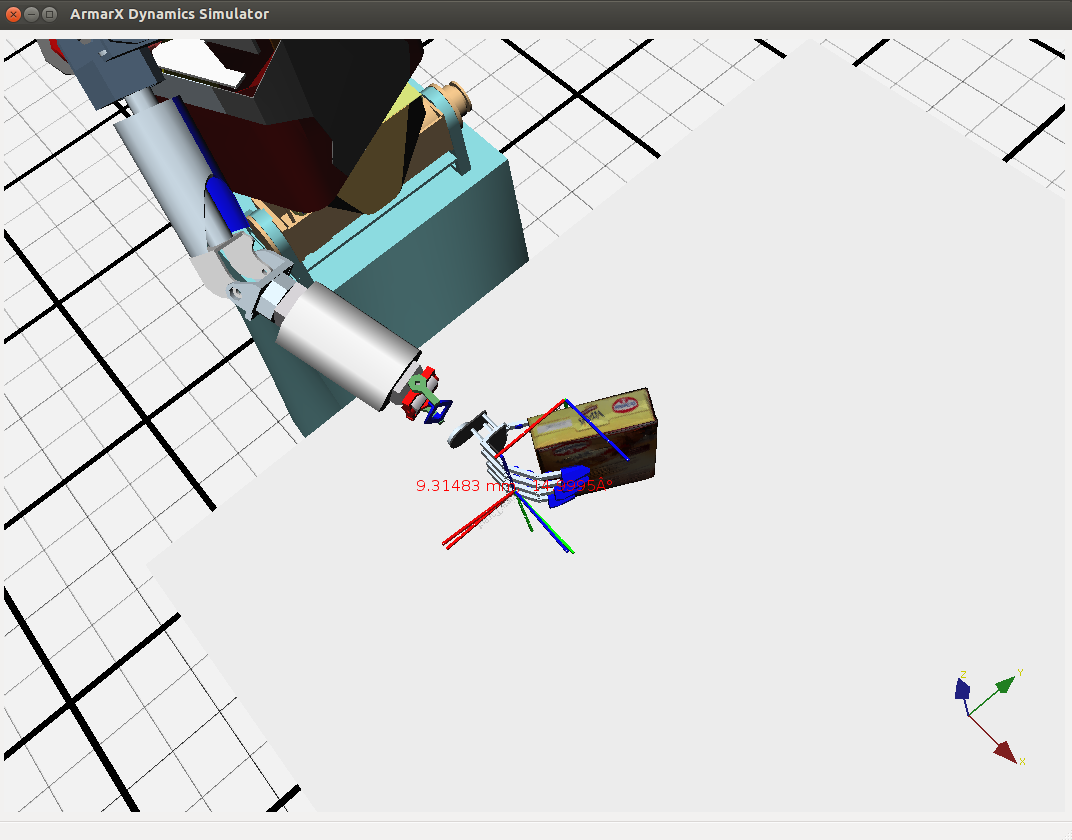
Grasping the object.
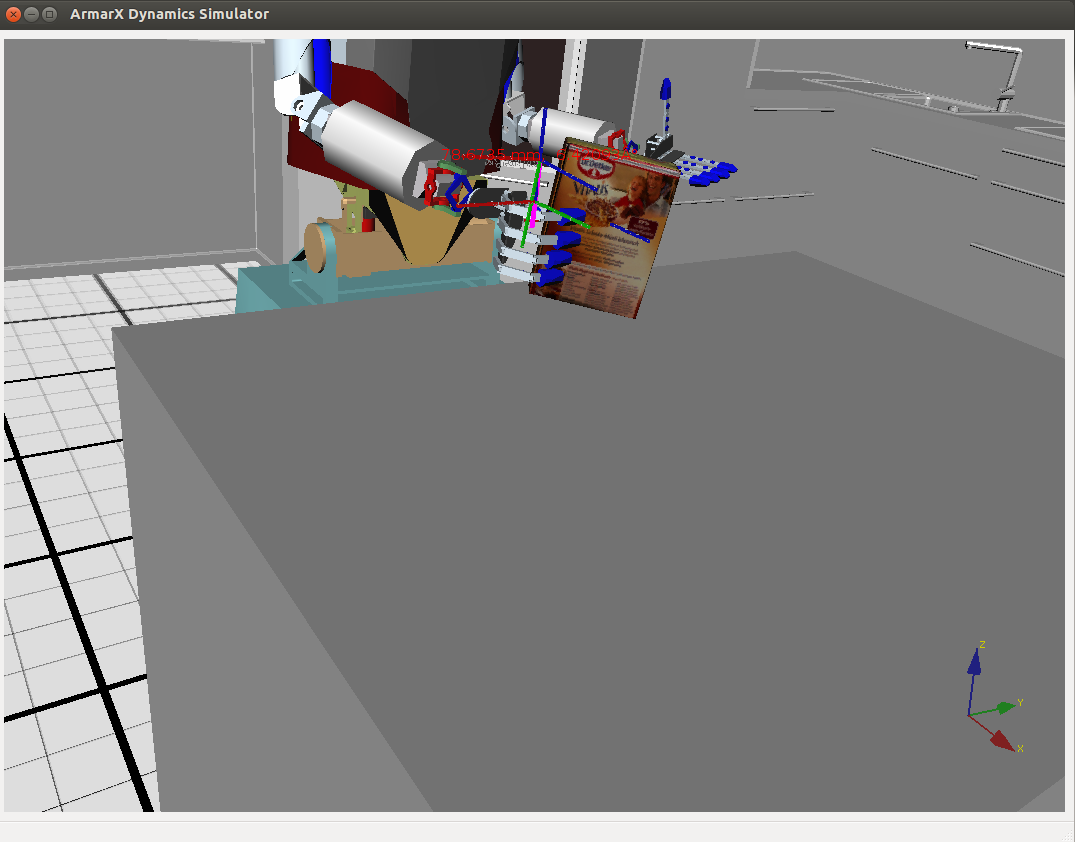
Lifting the object.
Moving to the placing position.

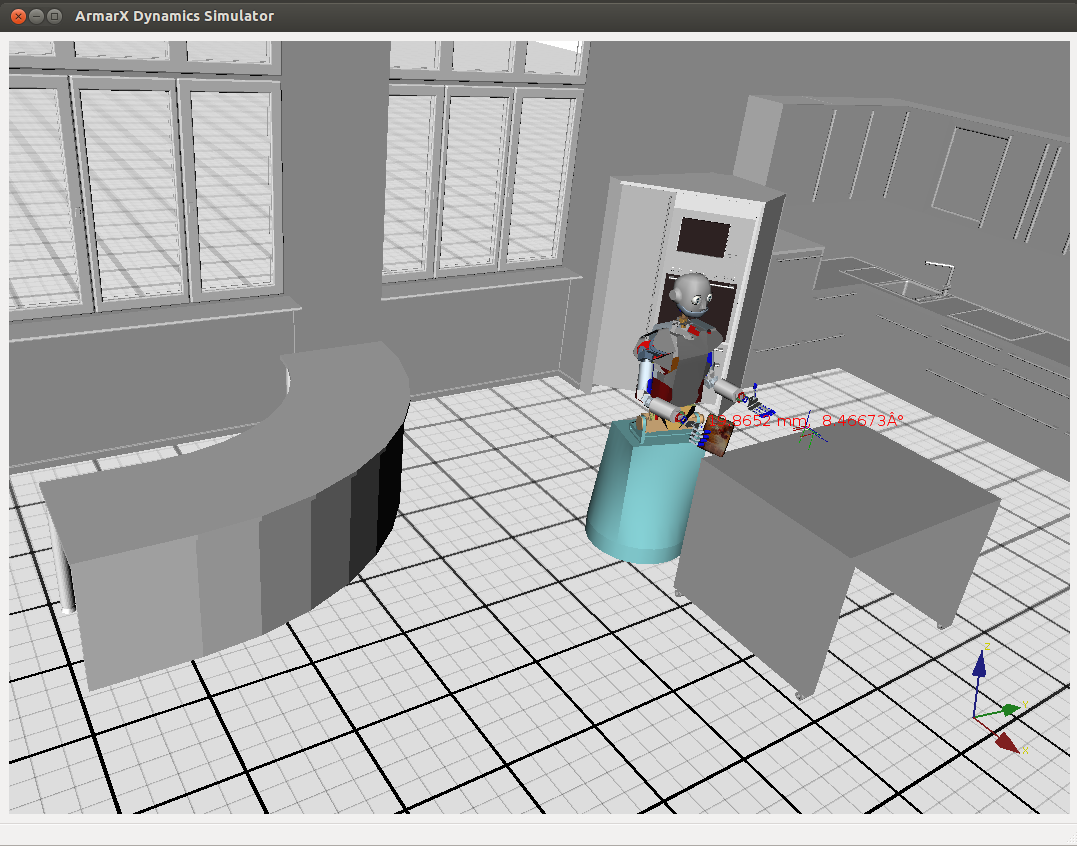
Visual tracking used to move the TCP to the placing position.
Armar3 placed the object.
Or it should look like this:
- Note
- You can try to find parameters for 'TcpTargetPose', 'OrientationalAccuracyRadPlace' and 'PositionalAccuracyPlace' to place the object upright. Also, in case Armar gets stuck somewhere, you can try increasing the tolerance parameters.
