Table of Contents
Introduction
This tutorial will guide you through the process of creating a running program within the ArmarX framework. Programs in ArmarX are designed as statecharts. They consist of states and transitions between these states. Defined events can cause the program to transition from one state to another. To design statechart programs in an easy and clearly represented way, ArmarX provides a graphical statechart editor. We will make use of this tool.
In this tutorial, we will implement a simple counter. To actually count, a counter state will increment a counter by one, then transition to itself, increment the counter again and so on until a maximum value is reached. The program will then transition to an end state and terminate. You will be able to verify the correct execution of the program by the console output.
- Note
- The goal of this tutorial is to give you an overview about what it takes to develop a program in ArmarX using the Statechart Editor. You will also get an understanding of the statechart concept.
In the next tutorial, we will expand the statechart and the code to actually move the robot in simulation.
Getting Started
First of all, you need to obtain a copy of ArmarX, which you will use to complete this tutorial.
To obtain a copy of ArmarX, follow the steps from https://git.h2t.iar.kit.edu/sw/armarx/meta/axii.
Make sure you have
- Downloaded and installed axii
- Created a default workspace, e. g. named "workspace"
ArmarX Packages
The basic structure of ArmarX consists of packages. ArmarXCore is the base package all other packages depend on.
Each ArmarX package contains source code, interface definitions, documentation and other extras (see Structure for details).
For now the most important directories will be build and source. The source directory contains a subdirectory named after the package. Within this directory all source code is divided into several groups like applications, statecharts, components, gui-plugins and so on.
The build directory contains all files generated during the configuration and build process. Included are executables, libraries, documentation, scripts, and much more.
The ArmarX Package Tool
After completing the Installation-Tutorial, your ArmarX directory should contain at least the following ArmarX packages:
~/workspace$ ls
armarx  armarx_config  armarx-workspace.json  armarx-workspace.rc  deps  dmp  h2t  ivt  semantic-object-relations  simox  tools
~/workspace$ echo $ARMARX_WORKSPACE
/home/username/code
- Note
- If you are using the deb-packages instead of a self compiled ArmarX, these packages are installed in the default paths of the system and are found automatically. All binaries can be used without prepended path. To check if a package can be found (and where) type for example
armarx-dev locatePackage ArmarXCore.
Among other things, compiling ArmarXCore has left you with a handy utility called armarx-package. armarx-package is located in the build directory of the "Core"-package (${ArmarXCore_DIR}).
You can invoke armarx-package from the command line. Navigate to the root of your ArmarX directory:
cd $ARMARX_WORKSPACE
and call armarx-package without any arguments to get a brief list of commands:
~/workspace$ armarx-package
The output should be similar to this:
usage: armarx-package [-h] [-v] {init,add,remove,status,cpp-class,help} ...

  ArmarX package creation tool

  Copyright 2013 H2T, Karlsruhe Institute of Technology. All rights reserved.

  Licensed GNU General Public License
  http://www.gnu.org/licenses/gpl-2.0.txt


optional arguments:
  -h, --help            show this help message and exit
  -v, --version         show program's version number and exit

sub-commands:
  {init,add,remove,status,cpp-class,help}
    init                Create a new ArmarX package
    add                 Creates a package element
    remove              Removes an existing package component
    status              Lists package information
    cpp-class           Create a C++ class
    help                Detailed help content

Use 'armarx-package help <sub-command>' for more details on a specific sub-command.
- Attention
- If you are missing armarx-package something has gone wrong during the compilation!
Creating your own package
It's time to use the armarx-package tool to create your own package called "statechart_tutorial". First make sure, to navigate to the root of your ArmarX directory:
cd $ARMARX_WORKSPACE
Now you can call armarx-package to generate the files for your package by executing the following code. Make sure you name everything exactly like the given names, as they will be hardcoded into copyable code in this and the next tutorial.
armarx-package init statechart_tutorial -d ${ARMARX_WORKSPACE}/
This tells the armarx-package tool to create an ArmarX Package named "statechart_tutorial" in "${ARMARX_WORKSPACE}/" next to all the other checked out packages.
Check if everything worked as intended by calling "ls". You should find a directory called "statechart_tutorial" among the other packages in the directory.
Have a look at the content of the statechart_tutorial directory by executing
cd statechart_tutorial
ls
You should at least find the following files:
statechart_tutorial/CMakeLists.txt
statechart_tutorial/data
statechart_tutorial/etc
statechart_tutorial/LICENSE.md
statechart_tutorial/README.md
statechart_tutorial/source
Navigate into the build directory and run cmake.
cd statechart_tutorial
mkdir build
cd build/
cmake ..

export statechart_tutorial_DIR=${ARMARX_WORKSPACE}/statechart_tutorial/build # Set the required env variable manually
Start Implementing
Start Ice
ArmarX relies on Ice (the Internet communication engine) to enable communication between its components. Before you can use these components, such as the ArmarX GUI, you will need to start Ice. Starting Ice is as simple as executing the 'armarx start'.
- Note
- Ice needs to be started only once on the system. However, if you start it again the system will tell you that ice is already running.
Start the ArmarX Gui
ArmarX provides a graphical user interface (GUI) that lets you interact with ArmarX through a number of widgets. We are going to use the Statechart Editor which is a widget for this GUI. In order to use it, you have to open the GUI first.
Open the Statechart Editor
Once you start armarx GUI, you get the "ArmarX GUI Use Case Selection". Here, you can click on the option "Armar3 Statechart Programming" that will automatically set the correct profile for this tutorial. Then you can jump to the next section "Start Creating Your Statechart". Otherwise, you can click "open empty GUI" and open the StatechartEditor manually following the "Add widget" menu. This is a slower option right now, but later on you may need to open the StatechartEditor editor using this option.
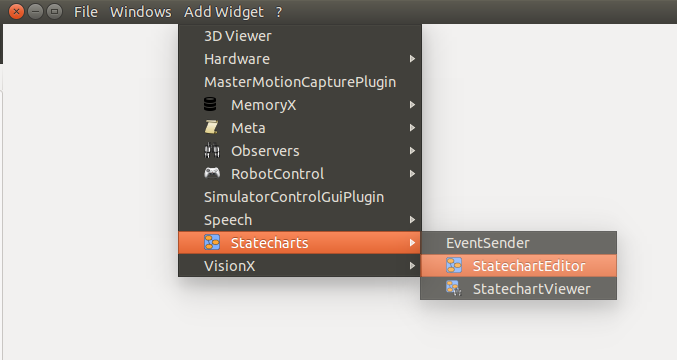
To manually open the StatechartEditor, goto "Add Widget" and select "StatechartEditor" in the drop down menu. The current version of the StateChartEditor might look a little bit different compared to the following images, but the essential structure has stayed the same.
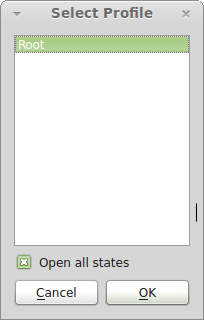
After opening the StatechartEditor you are prompted with a dialog that requires you to select a profile on which you want to work. For further information about Statechart Profiles, see here. In case you have a minimal installation it looks as follows:
In case you have at least one robot project installed it looks as follows:
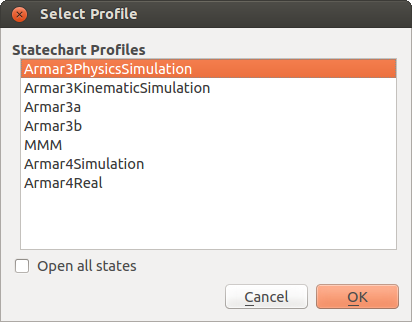
For this tutorial, choose any of the Armar3 profiles or the Root profile (The Root profile shows up if you have no robot projects installed and thus, no profiles can be found).
Open the Statechart Editor
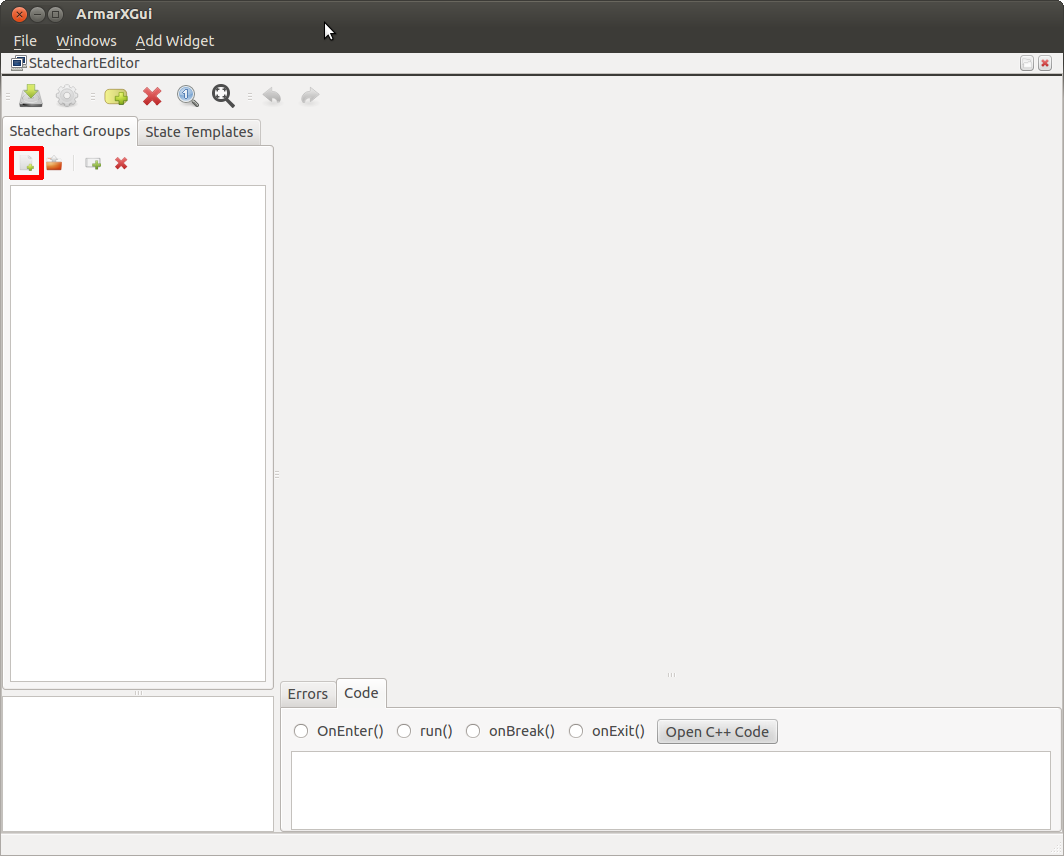
Create a new statechart group by pressing the "New Statechart Group" button (the one on the far left with the little green plus).
Switch to the "General" tab, select your tutorial folder (${ARMARX_WORKSPACE}/statechart_tutorial), and fill out the group name field as indicated in the screenshot:
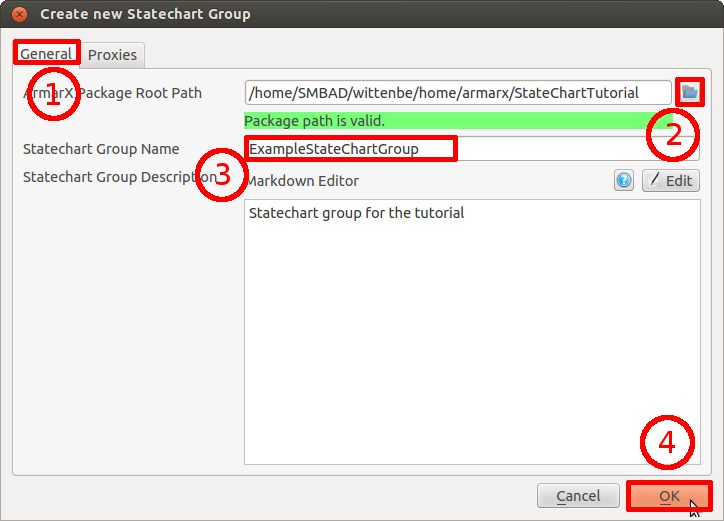
Now the Statechart Editor is readily set up and we can start implementing our program!
Implement the statechart using the StateChart Editor
Add states to the statechart group
Our final program will consist of three states: A main state, a counter state and an end state. The main state represents the whole statechart and will house the other two states as substates. The counter state will do all the work (counting) and trigger a transition to the end state when done. The end state will terminate the program.
- Note
- See ArmarX Statecharts for more information on statecharts.
First, we will only set up the main state and the counter state. We will look into creating the end state a little later.
- Note
- Please note that all state names, parameter names, event names etc. are case-sensitive.
To create the main state, first select our statechart group and then click on the other button with a green plus (next to smaller button with the red X).
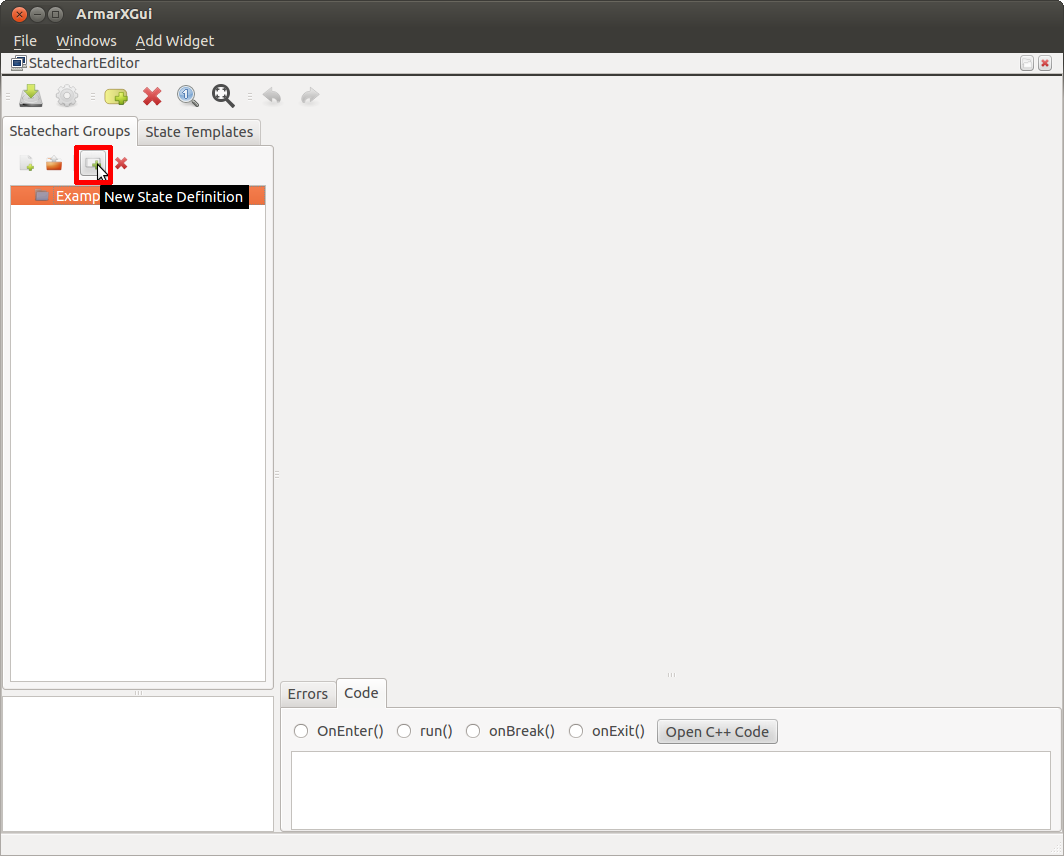
In the dialog that will open, enter the name MainState, select "Create C++ Files" and confirm.
Right click on MainState and make it a public state.
In the very same way, create a second state called CounterState. The counter state, however, does not need to be public.
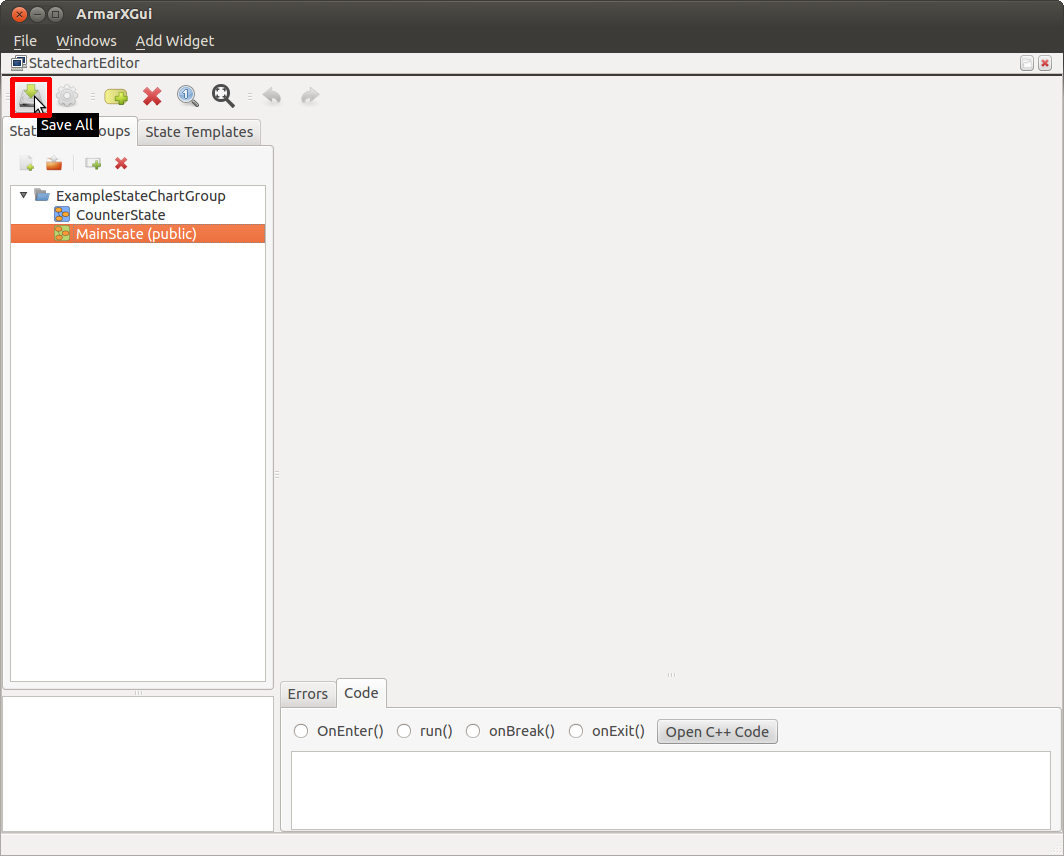
After this, your Statechart Editor window should look like the following image. Go ahead and save your work by clicking on the "Save All" button.
Edit the Main State
Now that we have created our states, we will need to edit them. There are two ways of editing states, both of which we will need and learn in this tutorial: Some edits can be made right in the GUI, e.g. defining parameters. Others will need to be made in the C++ source code of the states, e.g. define the actual state behavior.
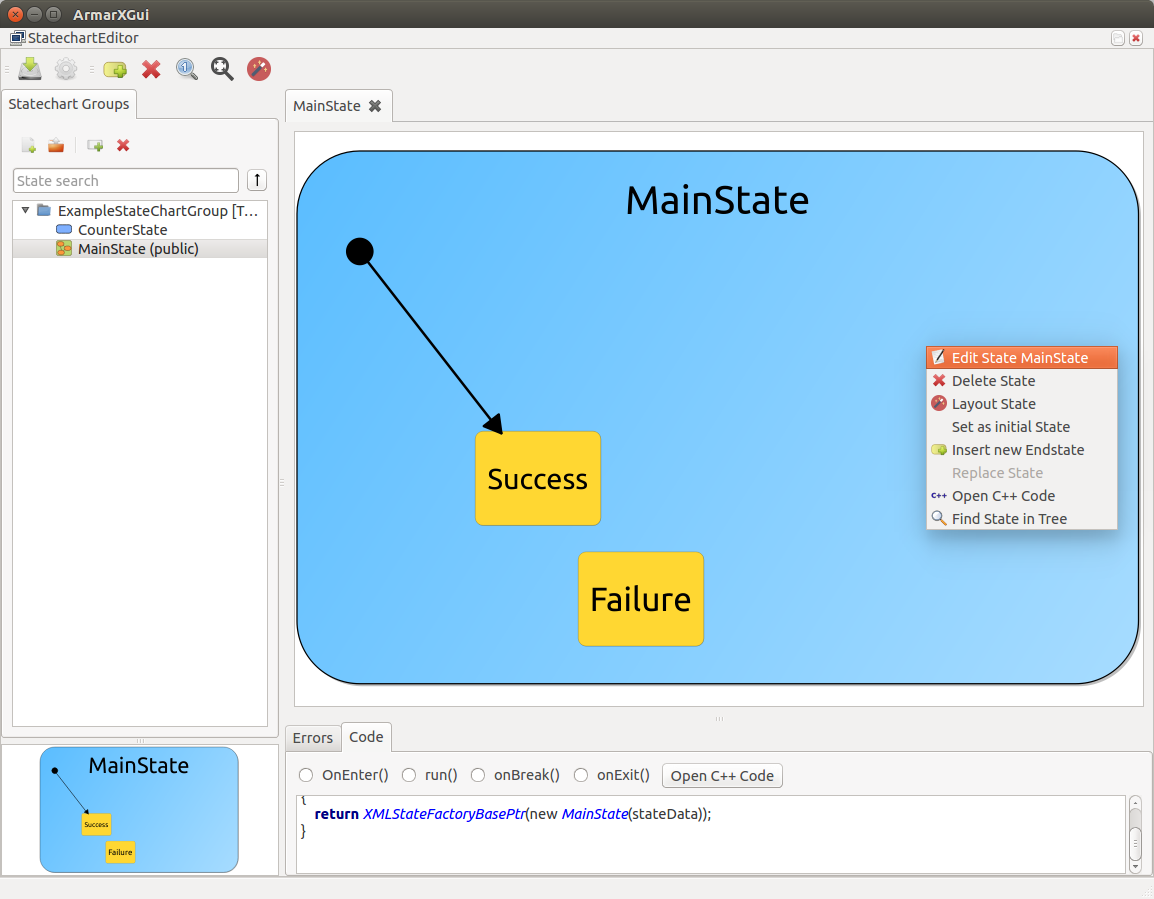
We will start by editing the main state directly within the GUI. To open the main state, double click on its name. A blue shape will appear in the right section of the editor, representing the main state. Note that by default, all states contain the substates Success and Failure, indicating how the execution of that particular state ended. Another default behavior is that the starting state of all newly-created states is Success; we will change that in a bit. Both Success and Failure act as explicit end (sub-)states for that particular state, as indicated by their yellow color. If any end substate is ever reached, the state that houses it is considered to be done.
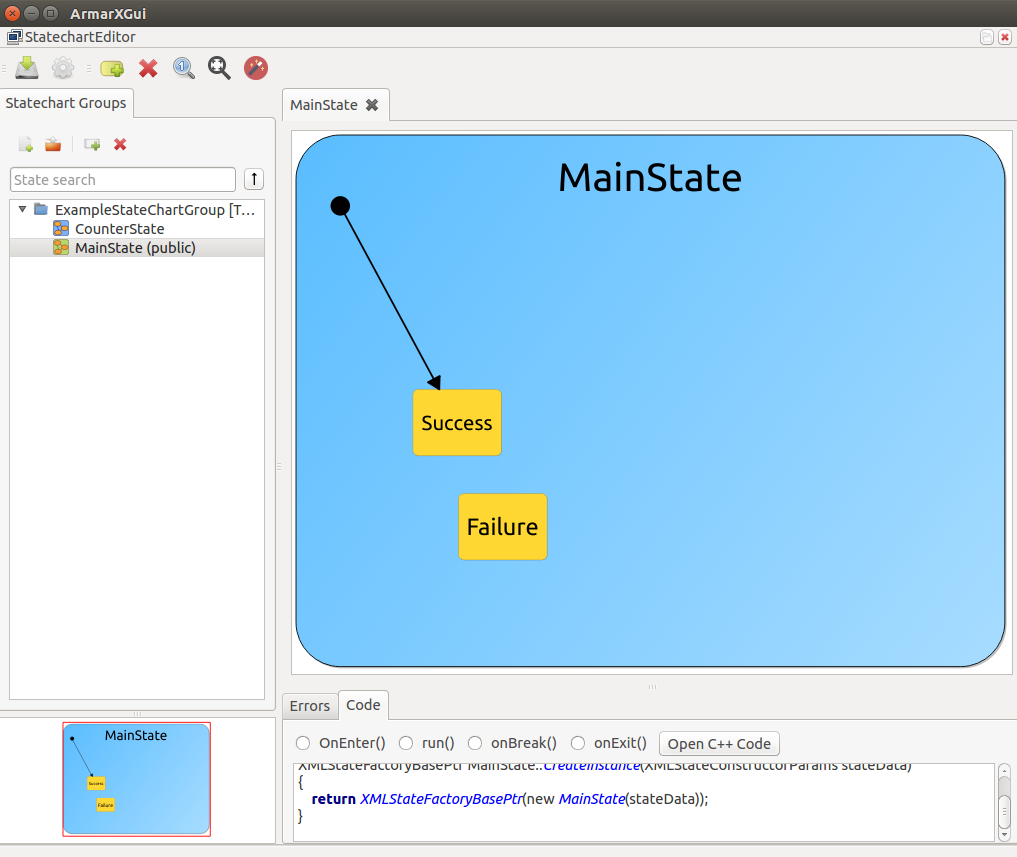
To start editing the main state, right click in the blue surface and select "Edit State MainState".
The main state will have one input parameter and one local parameter. The input parameter will be the value up to which the counter should count. The local parameter will be a reference to the current value of the counter.
To configure our Input parameter "counterMaxValue", choose the tab "Input Parameters" and edit the ROOT profile so that it looks like this image:
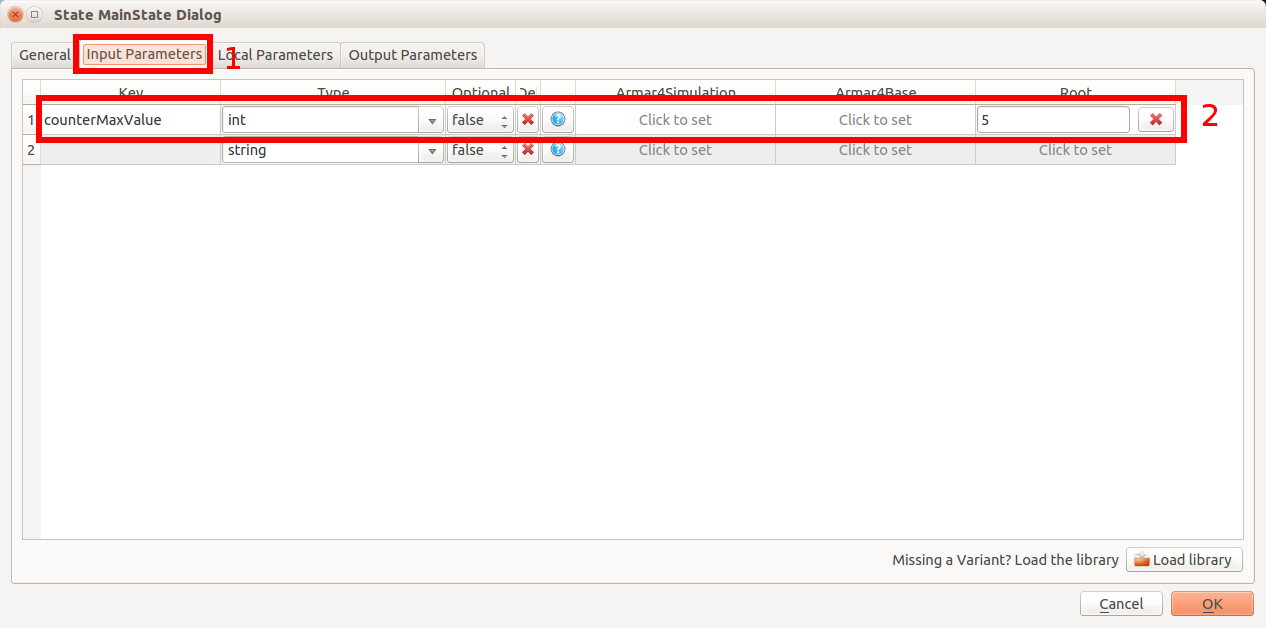
- Note
- By providing 5 as value in the ROOT profile we define a default value for the parameter "counterMaxValue".
- You might be asking yourself why we don't mark counterMaxValue as optional, since we provide a default value for it. However, "optional=true" means that we may not want to work with the parameter at all and will want to check if it's defined by the caller, while "optional=false" means that we always want to work with the parameter (like in this case), so the value has to be always supplied by the caller, or by using a default value. It is very rarely necessary or appropriate to set optional to true, so don't worry about it too much.
Quite similarly, edit the local parameter "counterId":
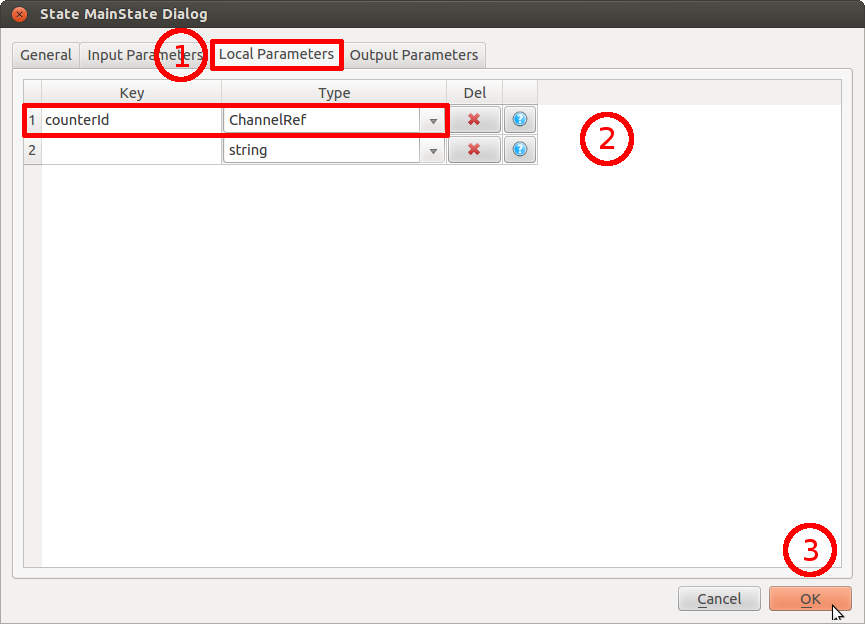
You may wonder why the type of "counterId" is ChannelRef. We will come to this shortly.
Edit the Counter State
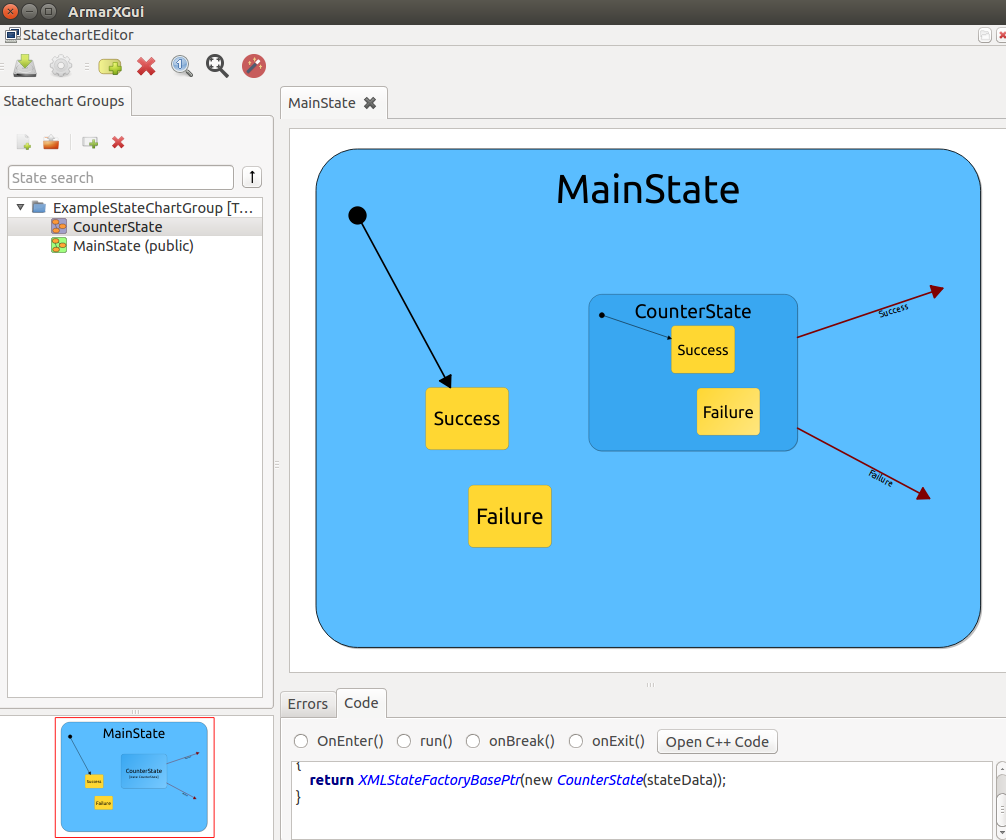
In a very similar way, we are now going to edit the counter state. Via Drag&Drop, drag the counter state from the tree on the left of the editor window into the main state. It will appear as a smaller blue box within the MainState. It, too, starts with the substates Success and Failure, the former of which is once again the starting substate.
Your Statechart Editor should now look like this:
Just as we edited the parameters of the main state, we will now edit the parameters of the counter state. It will only have two input parameters that it gets from the main state: One will be the maximum value of the counter and the other one the reference to the current counter value.
Moreover, we will define events that can trigger transitions from the counter state to other states.
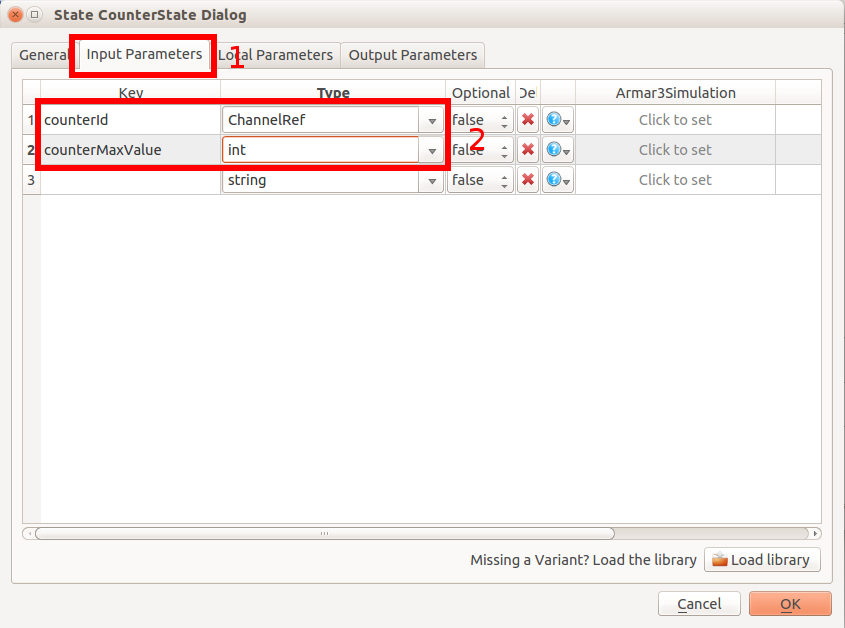
To edit the counter state, right click on its blue shape and select "Edit State CounterState". Edit the input parameters as shown in the following image:
The counter state will increment the current counter value by one each time it is entered. It will then have two transition options: One will be triggered if it has not yet reached the value it is supposed to count up to. This transition will bring the program right back to the counter state. The other transition will be triggered if the counter has actually reached the maximum value, and consequently bring the program into the end state.
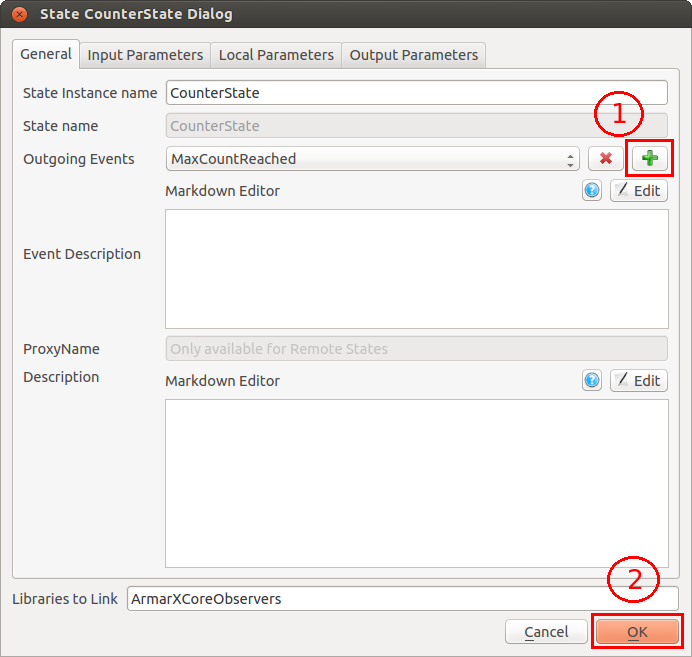
To create these two transitions, we will now define outgoing events in the counter state that trigger our transitions. Therefore, chose the tab "General", click on the green plus and name the new event "MaxCountReached". Do the same to create the second event, "MaxCountNotReached".
Once done, the statechart should look something like this:

Edit the Substates
While recovering from failure (for example, expections during execution) is a very useful feature, for the sake of simplicity, we will omit any sort of error handling. This means that we don't need the Failure State of the Counter State and it can be safely deleted (right-click on the state and select "Delete State").
You'll notice that CounterState still has its default Success State, which is even its starting state. We've already defined the Event MaxCountReached, which is sent when we're completely done with CounterState and implies successful execution up until now. MaxCountReached is also more descriptive, so we don't need CounterState's Success state and you can delete is as well.
Connect the Transitions
First, you'll want to set CounterState as the statechart's initial state, do so by right-clicking CounterState and selecting "Set as initial State". The two red arrows that represent the transitions that we've just created are not connected yet. To tell the statechart editor where these connections should lead to, we have to drag their tips to the respective state. By doing so, connect the "MaxCountReached" arrow to the final state Success and the "MaxCountNotReached" arrow back to the counter state. You can connect the "Failure" to the failure state. The connections should now look like this:
- Note
- Don't worry if the arrows look messy. Just click on the "Layout state" button shown below to automatically arrange the layout.
Edit the Transitions
The last thing we can edit directly in the GUI of the Statechart Editor are the transitions. Now the transitions know from where to where they go, but they still need to know which parameters they should pass between the states.
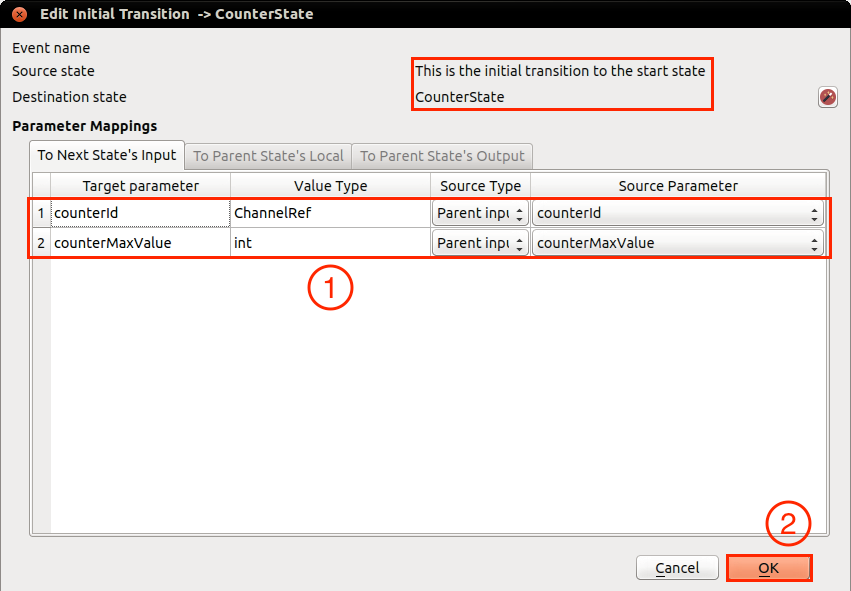
We will start by editing the initial transition that goes from MainState to CounterState. Select the arrow that represents the transition, then right click and select "Edit Transition".
Now we will tell the transition to pass both parameters of MainsState to CounterState by editing the dialog box, accordingly. When you are confident that your dialog looks exactly as shown in the following screenshot, hit the OK button.
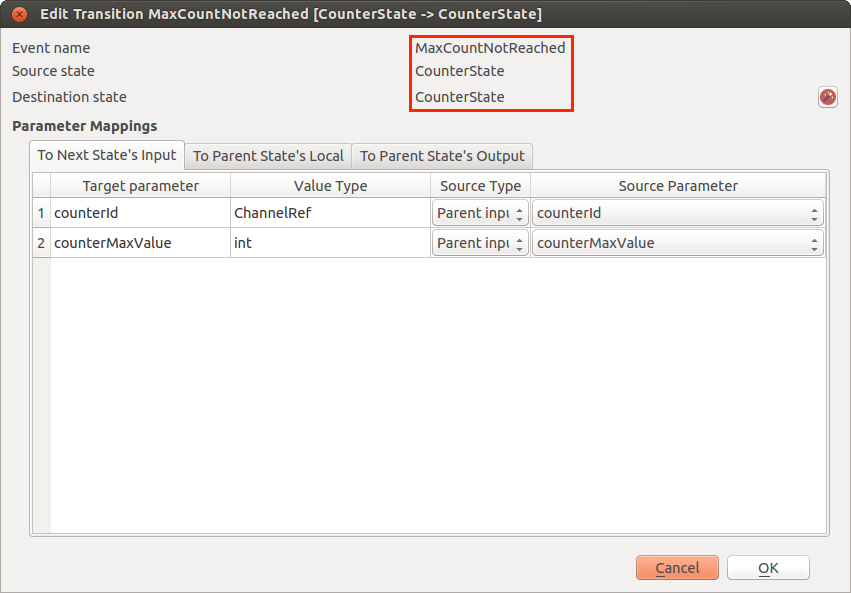
Repeat the step for the "MaxCountNotReached" transition.
Edit the source code
After all we did so far, our statechart looks pretty good. However, there are some modifications we still need to do before we can run the program. The counter state, for example, does not even know how to count yet. These modifications will need to be implemented in the source code of the states.
Before we go on, don't forget to save your statechart with "Save All" again.
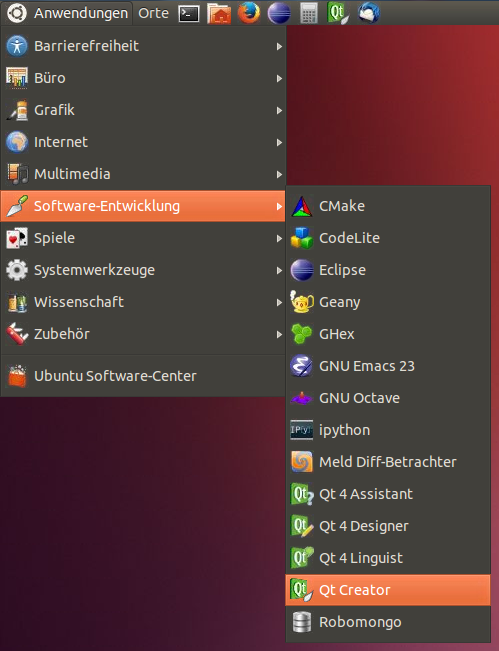
Editing C++ source in a default text editor can be difficult. One option to overcome this is to use Qt Creator. If you are working on a lab pc (local or remote), you can just start Qt Creator from the start menu. Otherwise you can also install qt-creator 5.0 via axii. It is important to launch qt creator from a terminal with the axii environment sourced. You can use the following command to do so:
${ARMARX_WORKSPACE}/tools/qtcreator/5.0/install/bin/qtcreator
- Note
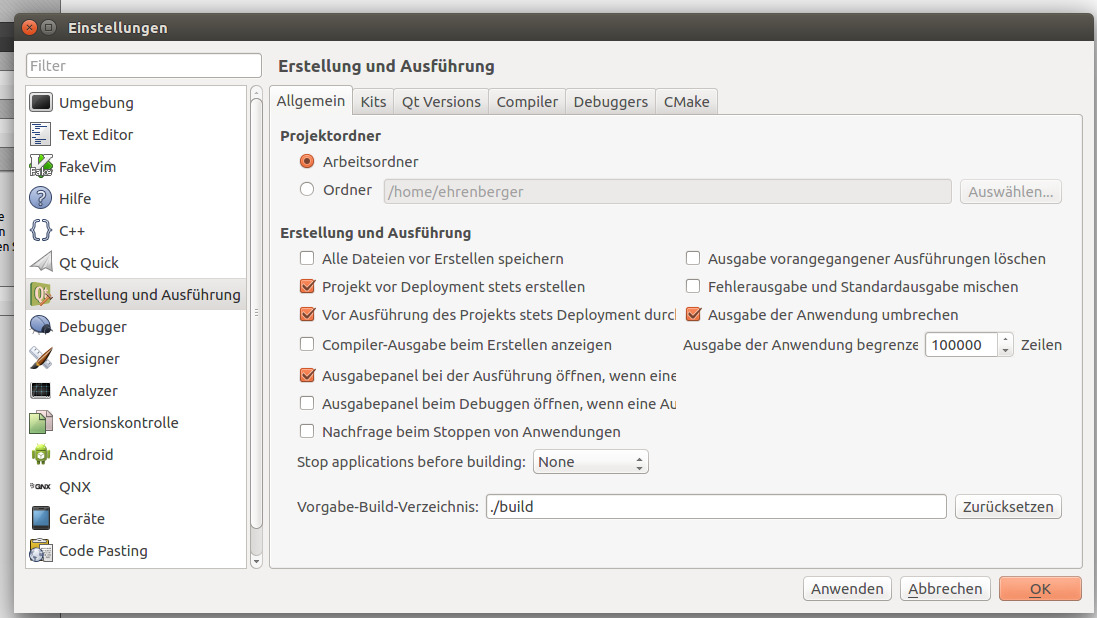
- If you are not working on a lab PC it might be necessary to configure the Qt Creator. Open its settings and open the "build and run" window. First you need to adjust the build directory. To do so click on the tab "general" and make sure all settings are as in the first picture below.
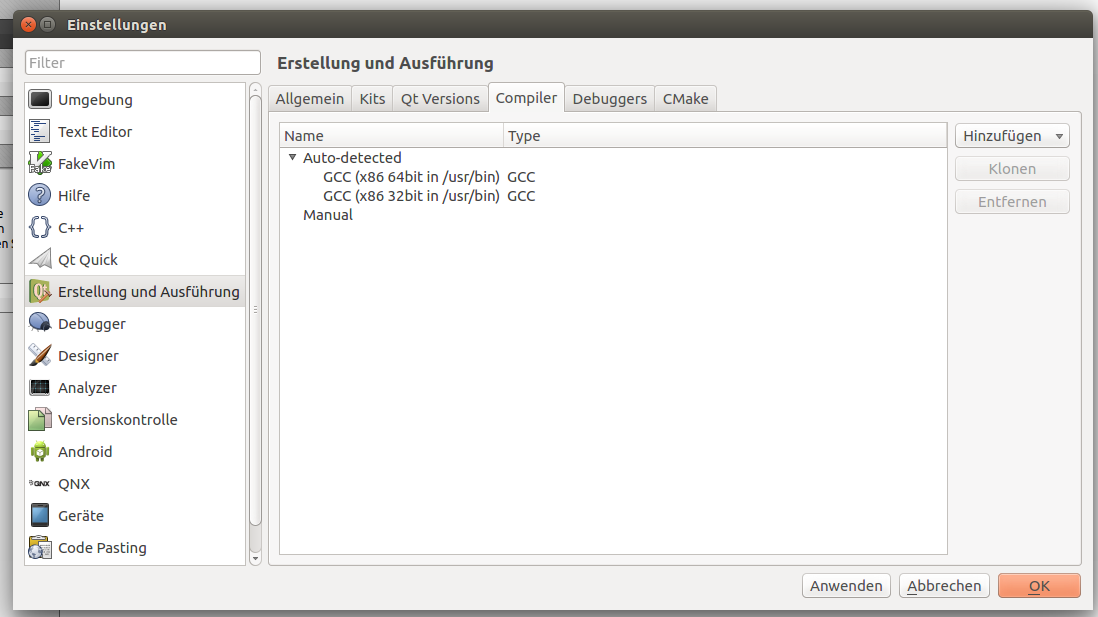
Also you need to add compiler settings. Open the tab "compilers" and add the compilers as shown in the second picture.
When Qt Creator has started click on File->Open File or Project (Datei oder Projekt öffnen / Ctrl+O).

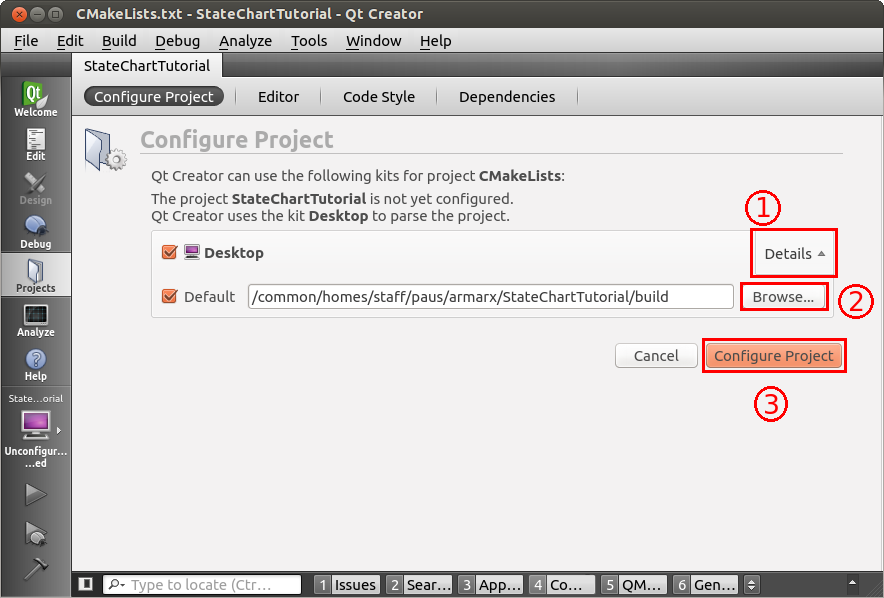
Navigate to ${ARMARX_WORKSPACE}/statechart_tutorial/ and select CMakeLists.txt. In the next dialog expand the details option and select ~/$ARMARX_WORKSPACE/statechart_tutorial/build as your build directory. Click "Configure Project" to open the project.
Qt Creator will open statechart_tutorial as a project.

Finally, go to File->Session management and select "Load last session on startup". To check if it worked, close Qt Creator and start it again. Qt Creator will reopen your project.
Here is a list of useful shortcuts when working with Qt Creator:
| Shortcut      | Description                                   |
| ------------- | --------------------------------------------- |
| Ctrl + Click  | Follow symbol (mostly works)                  |
| F4            | Switch between header and cpp file            |
| Alt + Left    | Go back                                       |
| Alt + Right   | Go forward                                    |
| Ctrl + K      | Find symbol (Like Ctrl + , in Visual Studio)  |
Take a look at MainState.h
Before we add any code, let's take a look at MainState.h. As you can see the MainState class is derived from MainStateGeneratedBase<MainState>, which is defined in the header MainState.generated.h.
Now open MainState.generated.h (Ctrl + Click on the included header in MainState.h). As the filename suggests, this file is generated by the Statechart Editor in the GUI and you won't need to make any manual changes. In fact, any manual changes are overwritten the next time you save your statechart in the editor.
If you take a close look at the contents you will notice the member variables in, local and out, which are of the types MainStateIn, MainStateLocal and MainStateOut. These provide us with convenient interfaces to access the in-, output and local parameters we defined in the GUI. Now close MainState.generated.h again.
Edit MainState.cpp
We will need to register our counter in the code of the main state. Open the file MainState.cpp and have a look at the code. You will come across the function onEnter(), which is empty so far. We will make two changes to this function: First, we will add a log output that lets us keep track of the execution of the program. This change does not affect the functionality of the program. Afterwards, we add some code to make the counter work (detailed explanation follows after the screenshot) This code is crucial for the program. You can copy it from here:
Insert it in the MainState.cpp so that it eventually looks like this:
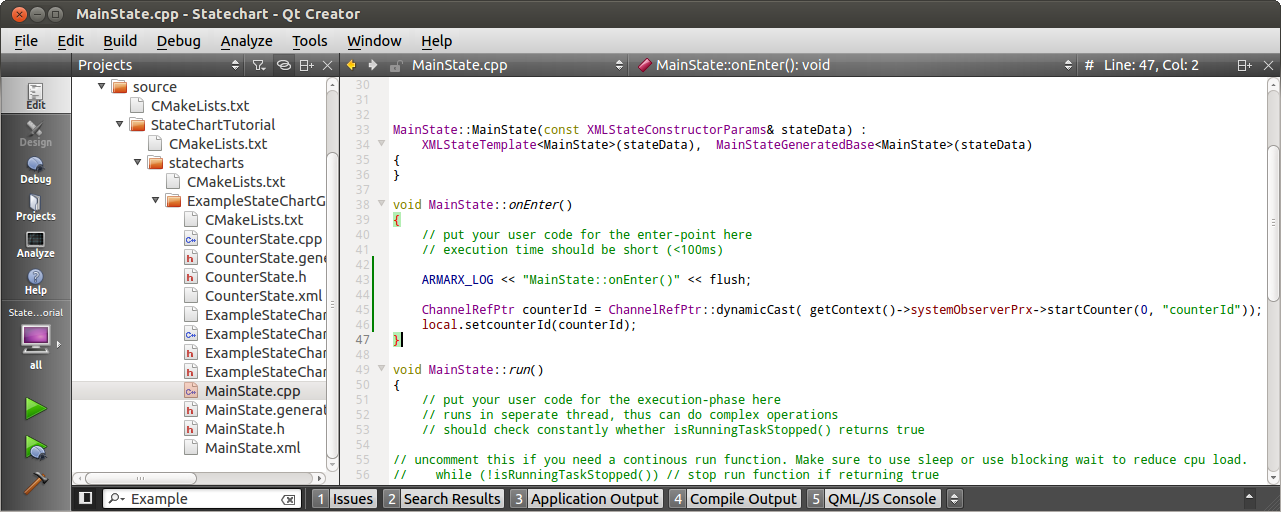
The first line just prints "MainState::onEnter()" when the function is called. The second line
is more interesting. Here, we acquire a channel reference on a counter that is provided by the armarx::SystemObserver. Our statechart is embedded in an armarx::StatechartContext, which provides access to different components and can be obtained by calling getContext<StatechartContextTemplate>() within any state. However, the generated state subclass provides convenience access functions to all proxies, e.g. this->getSystemObserver(). One of these components is the armarx::SystemObserver that provides timers and counters. By calling
we tell the SystemObserver to create a new counter with name "counterId" and initial value 0. We receive a ChannelRefPtr, which we can later use to access this counter again. In the third line of code we store this reference in the states local parameter "counterId".
- Note
- To learn more about Observers and Channels take a look at the Observer documentation.
Edit CounterState.cpp
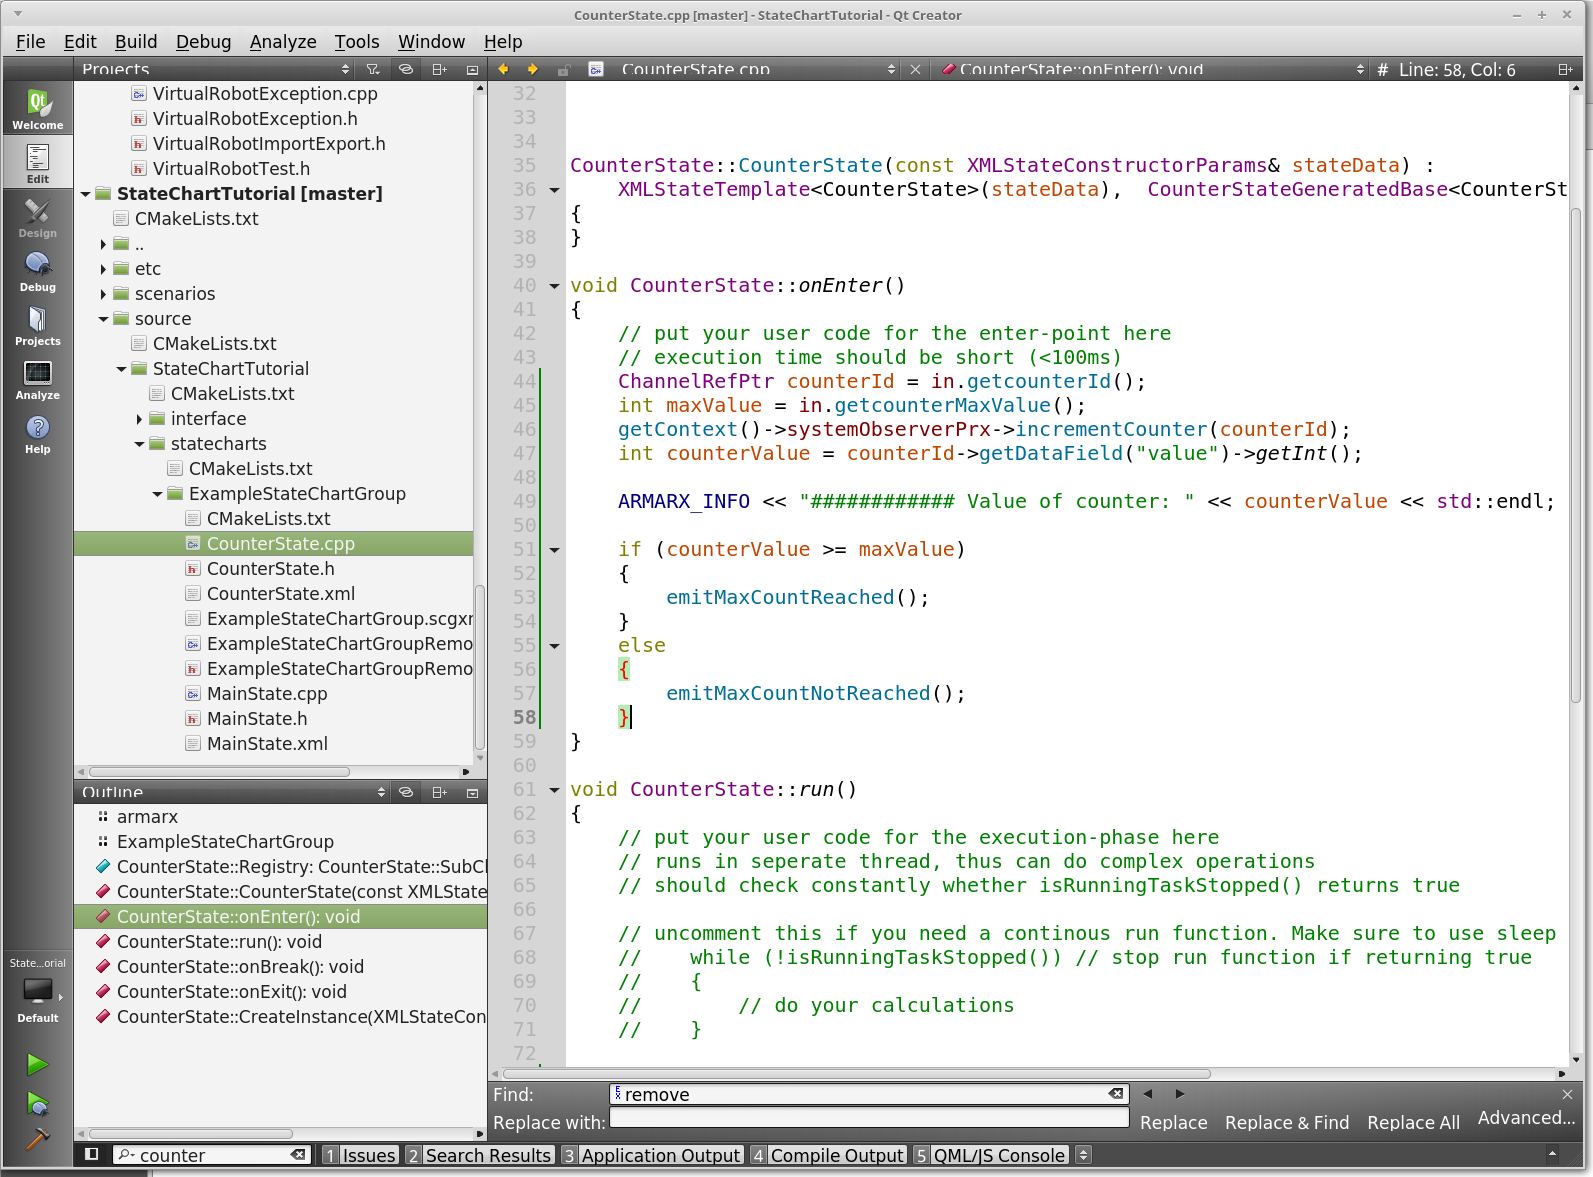
Last, we have to teach the CounterState how and what to count. Moreover, we tell it when to trigger which event. All this information is packed into the following code. Copy and paste it in CounterState::onEnter():
In the Statechart Editor we set the input parameter "counterId" of the CounterState to the value of the local parameter "counterId" of the MainState. Hence, we can now obtain the reference to the counter created in MainState::onEnter() via in.getcounterId().
The line
tells the SystemObserver to increment the counter.
- Note
- The SystemObserver offers the functionality for distributed counters and timers. A local counter would also be possible, but with a distributed counter it is easy to check the current status of the counter online with the Observerview Gui.
Next, we compare the current value of the counter to our maximal counter value. If the counter value exceeds the maximal value, we emit the event MaxCountReached, else MaxCountNotReached.
Open the CounterState.cpp file and insert the above code into the onEnter()-function.
Your CounterState.cpp should now look like this:
Build the program
Finally, we can compile/build our package! All you need to do for building is hammering these lines of code into the console:
Alternativly you can use Qt Creator to execute these steps. Click the menu option Build->"Run CMake" and then Build->"Build Project statechart_tutorial" to build the program.
Prepare to execute your program
At this point, we are done implementing our program! However, a couple of things need to be done before we can execute our program and see if it actually counts without crashing. registering an ArmarX package and creating an ArmarX scenario.
Registering a Package
As you will see, a couple of applications need to be executed in order to run the newly created statechart. You can either execute those programs one after the other or you can create a so called Scenario. A Scenario creates a configuration file for starting all required applications.
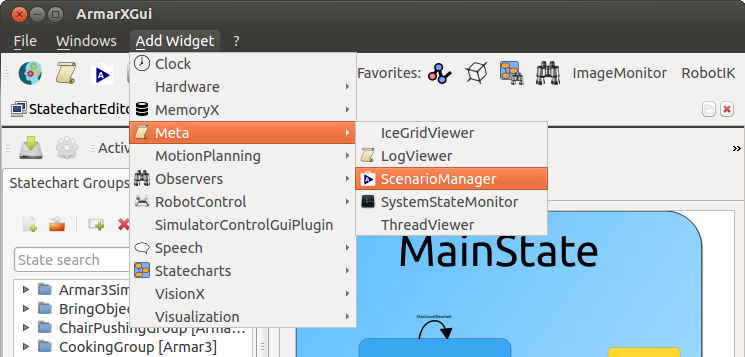
We will use the scenario manager to create and run our scenario. To start the scenario manager click on the menu option "Add Widget"->Meta->ScenarioManager.
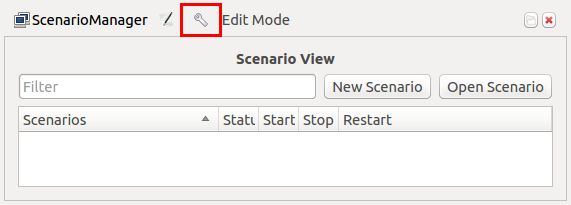
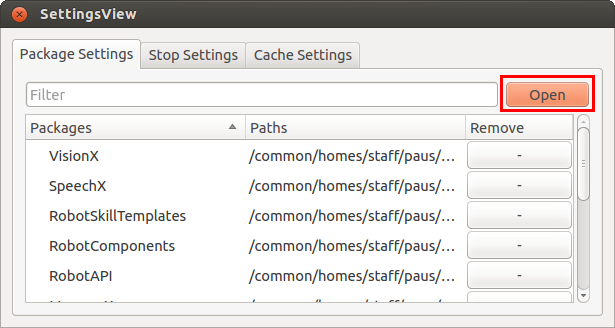
Before we can create a scenario we have to register the package that we created earlier. Open the settings view by clicking the configure button.
In the settings view click the open button to open our package.
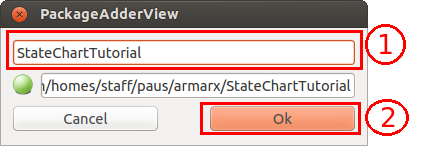
In the packager adder view type the name of the created package (statechart_tutorial). The path to the package should be automatically detected. Confirm this dialog by pressing OK.
Creating a Scenario
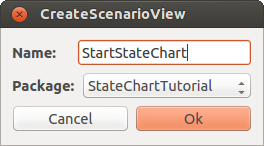
Now we can create our scenario via the scenario manager by clicking on"New Scenario".
Set the name of the new scenario to StartStateChart and select the previously registered package statechart_tutorial. To finish the creation press the OK button.
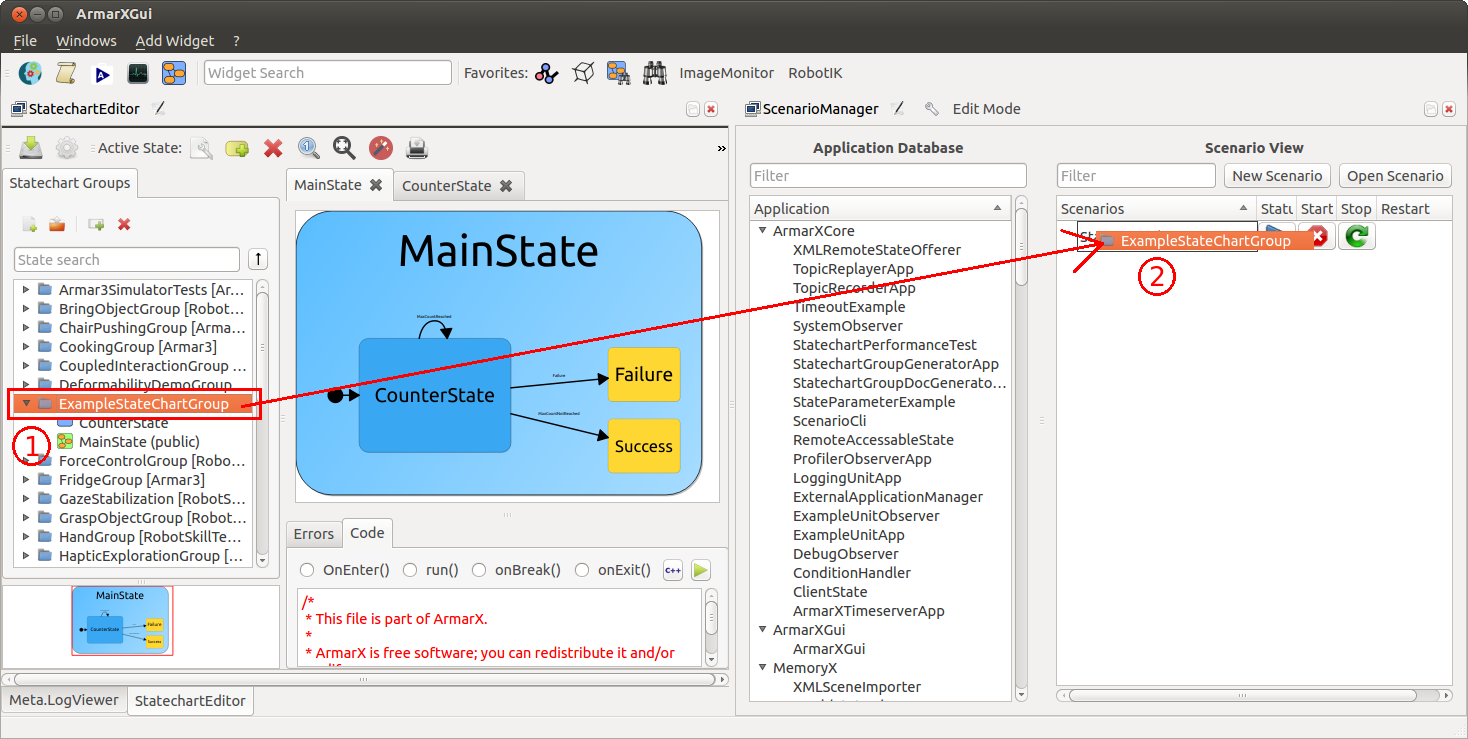
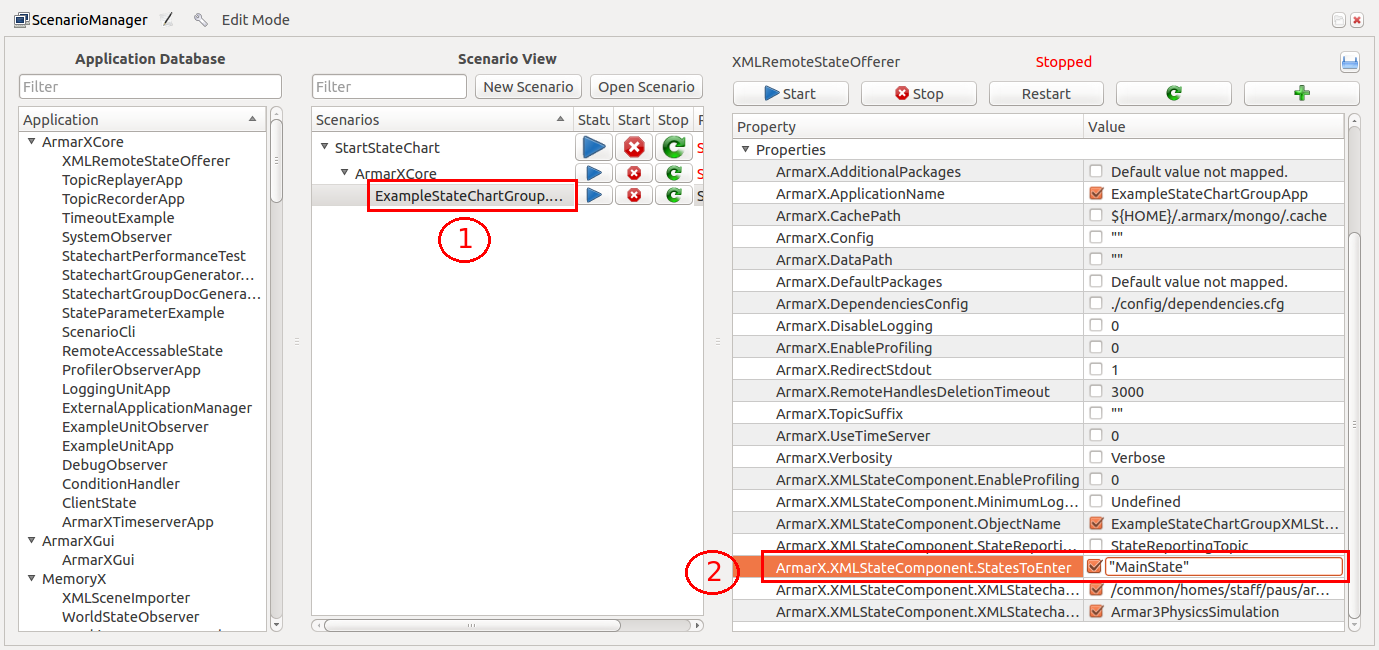
Now we need to add our statechart group to our scenario and configure it. First drag and drop the ExampleStateChartGroup onto the StartStateChart scenario. You may have to arrange the StatechartEditor and ScenarioManager windows before performing this step.
After you have added the statechart group you have to select the group in the scenario manager and set the property "ArmarX.XMLStateComponent.StatesToEnter" to "MainState". This property determines which state of the group will be automatically entered upon startup.
Now use the application database in the scenario manager to search and add the two applications ConditionHandler and SystemObserver. You can add an application to a scenario using drag and drop onto the target scenario. These applications are required to execute our statechart.
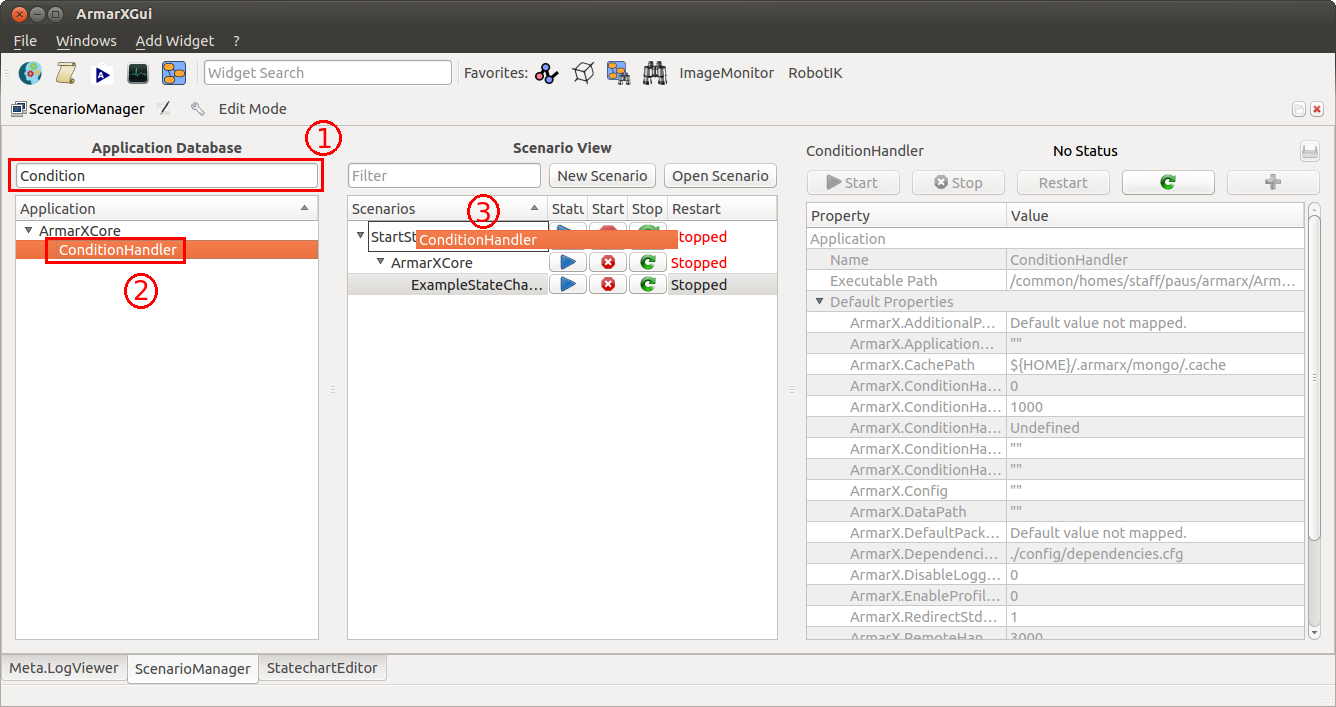
The applications ConditionHandler and SystemObserver provide components with the corresponding names. Both components are required by the statechart context and can be accessed from the other processes via Ice.
- Note
- See the Ice manual to learn more about sharing objects (i.e. components) via Ice.
Execute your program
Finally, we can execute our program by pressing on of the two start buttons in the scenario manager.
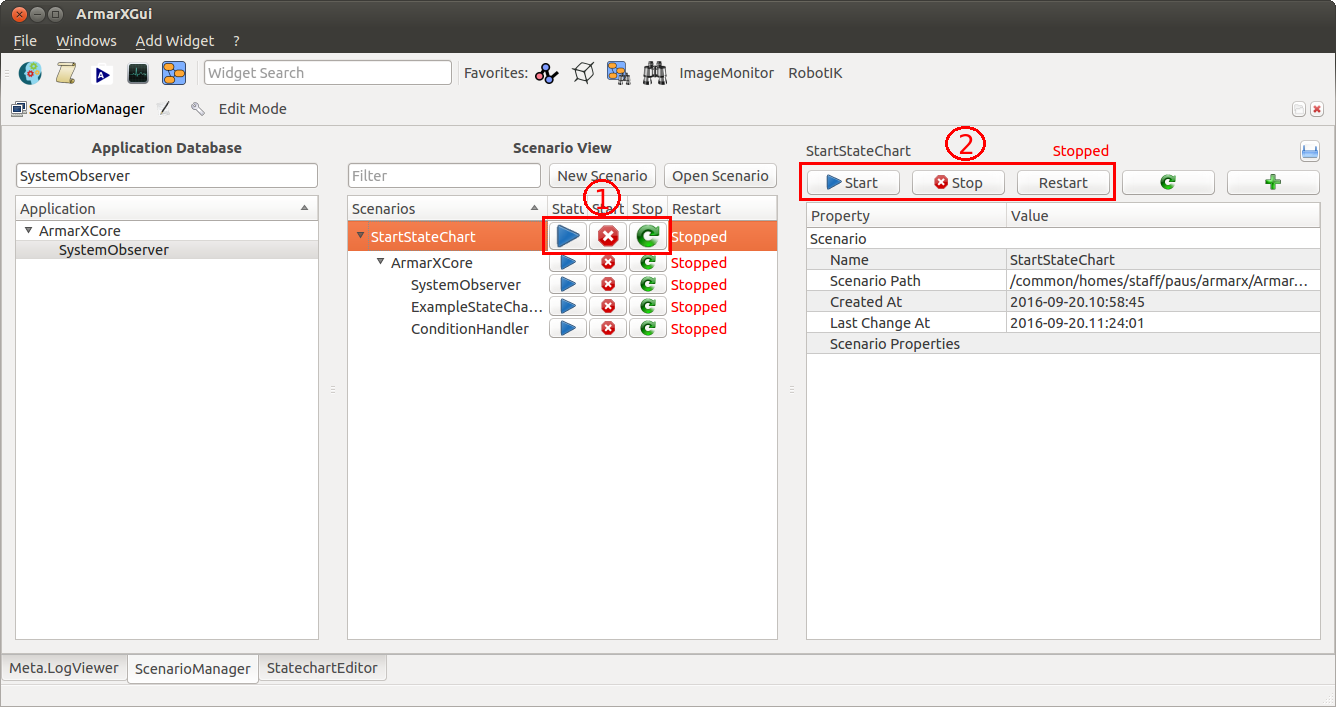
If something goes wrong, check the output via the Meta.LogViewer in the ArmarX GUI and check your statechart and scenario configurations. Remember to stop the scenario by pressing one of the two stop buttons.
Another way to start and stop a scenario is via the command line interface. To start our scenario use the following command
and to stop it use the very similar command
Note that you can start a scenario via the GUI and stop using the CLI and vice versa. Both methods are equivalent and can be used interchangeably. To get more information about the CLI you can use the help command.
- Note
- What will happen during the scenario is exactly what we intended: The CounterState will increment the counter. If the maximum value is not yet reached, it will transition to itself and keep on counting. Once the maximum value is reached, the program will transition to the end state and terminate. You can see what your program did in the console output.
Note the following expressions
TRANSITION due to Event 'MaxCountNotReached'
and
TRANSITION due to Event 'MaxCountReached'
In the Meta.LogViewer, you should see output that includes similar lines given in the following:
[31177][10:24:20.143][XMLStateComponent][State: MainState]: TRANSITION due to Event 'MaxCountNotReached' (EventReceiver: 'CounterState')...
[31177][10:24:20.143][XMLStateComponent][State: CounterState]: Leaving State 'remoteStateWrapper_of_MainState->MainState->CounterState' (id: 9)
[31177][10:24:20.143][XMLStateComponent][State: CounterState]: Entering State 'remoteStateWrapper_of_MainState->MainState->CounterState' (id: 9)
[31177][10:24:20.143][XMLStateComponent][State: MainState]: TRANSITION due to Event 'MaxCountReached' (EventReceiver: 'CounterState')...
[31177][10:24:20.143][XMLStateComponent][State: CounterState]: Leaving State 'remoteStateWrapper_of_MainState->MainState->CounterState' (id: 9)
[31177][10:24:20.143][XMLStateComponent][State: EvSuccess]: Entering State 'remoteStateWrapper_of_MainState->MainState->EvSuccess' (id: 10)
Congratulations you built your first ArmarX program!
