Table of Contents
Objective: Learn how to call a subskill.
Previous Tutorial: Using Parameters of Skills via ARON
Next Tutorial: none
Reference Code: skill_tutorials
Calling a skill as a subskill in ArmarX is used to avoid code duplication and easily re-use already implemented skills that are helpful to your problem. Subskills are usually solving a problem in a general manner, so that components can stay clearly arranged.
Using a Subskill
As the core::SaySomething class does not have access to callSubSkill(), and shall be independent of the skill framework, we pass a function from skills::SaySomething to core::SaySomething. For our example, this will be std::function<bool(const std::string&) sayHello as an attribute of core::SaySomething::Subskills. The function is defined in skills::SaySomething when creating the instance impl of the core::SaySomething class.
Since this explanation may have been a little fast, let's look at it step by step.
First of all, we create a new skill library and skill provider named say_something like we did in earlier tutorials. Don't forget to tell CMake and the skill provider about your new library and rearrange the order of the add-subdirectories in the first source CMakeList.txt. You can also just use the library and skill provider created back then. If you did not create them, go back to Create a Skill.
Let's begin by adding the sayHello() function, which wraps the subskill into the core::SaySomething subskills struct. Additionally, we'll include a list of names that we want to use with our subskill to the properties struct.
In core/SaySomething.h:
Next, we add the following lines to the _execute() function in core/SaySomething.cpp, calling the sayHello() function we just defined in the subskill struct as many times as there are entries in namesList.
In core/SaySomething.cpp:
We add two properties to the skills::SaySomething class: useParametersSkillProviderName and useSubskill. The first one is the skill provider name of the subskill that we want to use and the second one gives us the option to disable the subskill. In this tutorial, we reuse use_parameters as a subskill but you can use any other skill.
In skills/SaySomething.h:
Inside the skill, we have to define the wrapper for calling the subskill. To do so, in skills/SaySomething.cpp we define a lambda that takes a string as input parameter and returns a boolean:
In skills/SaySomething.cpp:
Inside, we pass the subskill's name, an ID and the modified aron parameters to the callSubskill() function. In order to use the aron parameters of our subskill we need to make them available to the skill by including them in skills/SaySomething.cpp. Afterwards we can access the parameters via skill_tutorials::use_parameters::arondto::UseParametersParams p.
In skills/SaySomething.cpp:
In the last part of the main function, you can see the mysterious impl instance we mentioned in the beginning. It is an instance of the core::SaySomething class that has all the functionality we've just implemented.
Executing our Skill from the GUI
To execute our skill say_something from the ArmarX GUI, we adapt the say_something_skill_provider by adding the skill provider name of the subskill as well as the previously mentioned boolean to the properties of the component and pass them on to the skill.
In Component.h:
In Component.cpp:
Don't forget to build your project when you have implemented everything!
Running the Skill in ArmarX GUI
Now, you can open the ArmarX GUI and try out your new skills! Start the skill provider and its dependencies in the ScenarioManager. Note, that you also have to add the skill providers for your subskills. Then, you should see the skill in the Skills.Manager and be able to execute it: 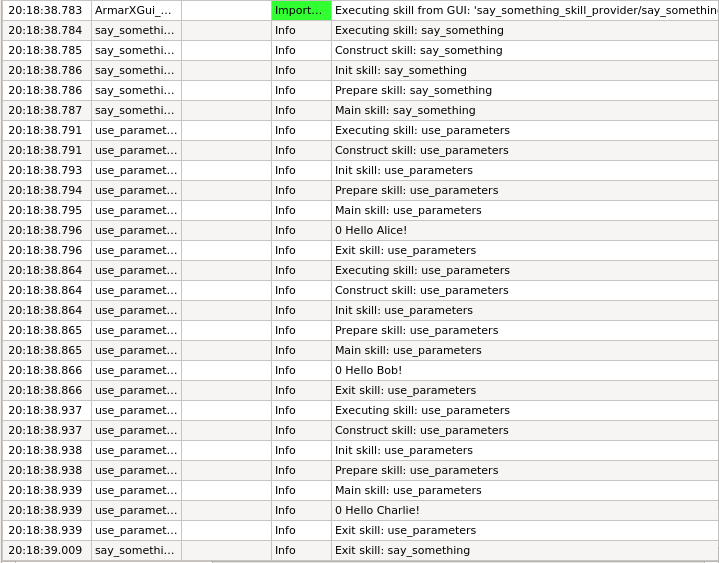
Awesome, you did great! If you want to put your newly acquired skill knowledge to the test, try modifying the say_something skill in a way that you can use the GUI to set the values of the properties that will be printed by the subskill. Hint: look at the last tutorial again.