Table of Contents
Prerequisites: None
Introduction
This tutorial will show you how to create a new ArmarX gui-plugin by implementing a simple timer as a ArmarX gui-plugin.
- Attention
- This tutorial assumes that you have already installed ArmarX (at least ArmarXCore and ArmarXGui). If you haven't done yet, follow the Installation instructions for ArmarXCore to install them.
Getting Started
You can use the armarx-package tool to create new packages, gui-plugins, template files required for them, etc.
Create Your Own Package
If you already have a package in which you would like to add a new qui-plugin, go to the next step: Generate Template Files for Your New Gui-Plugin.
In order to create a new ArmarX package called "GuiPluginTutorials", execute the following code in the directory where you want to make your package,
or you can use "-d" option to specify the directory.
- Note
- If
armarx-packageis not found, try${ArmarX_DIR}/ArmarXCore/build/bin/armarx-package. \endnote
Generate Template Files for Your New Gui-Plugin
Execute the following command in the toplevel directory of your package. All required files relevant to a new gui-plugin called "MyOwnTimer" will be generated.
- Note
- Avoid suffixing your gui-plugin with "GuiPlugin". Instead, try to use an expressive name such as "XYViewer", "XYEditor", "XYManager", "XYSegmenter", ... \endnote
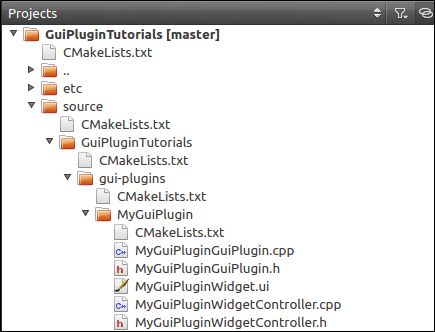
Have a look into the directory to check if everything worked as intended. You should find the following files:
In older versions of ArmarX (or older gui-plugins), you may also find these files:
Start Implementing
Next step is the implementation.
ArmarX Gui wigets are created based on Qt. Thus, using QtCreator is good solution to edit .ui files and C++ source. Open your project in QtCreator by following the Tutorial: Counting with Statecharts -> Edit the source code; then, you find the file tree like this (mentally replace "MyGuiPlugin" with "MyOwnTimer"):
- Note
- Before running
cmake, make sure your package has a dependency on the ArmarXGui package (otherwise, running cmake will fail.) The CMakeLists.txt at the top-level directory of your project should contain this line:depends_on_armarx_package(ArmarXGui "OPTIONAL")
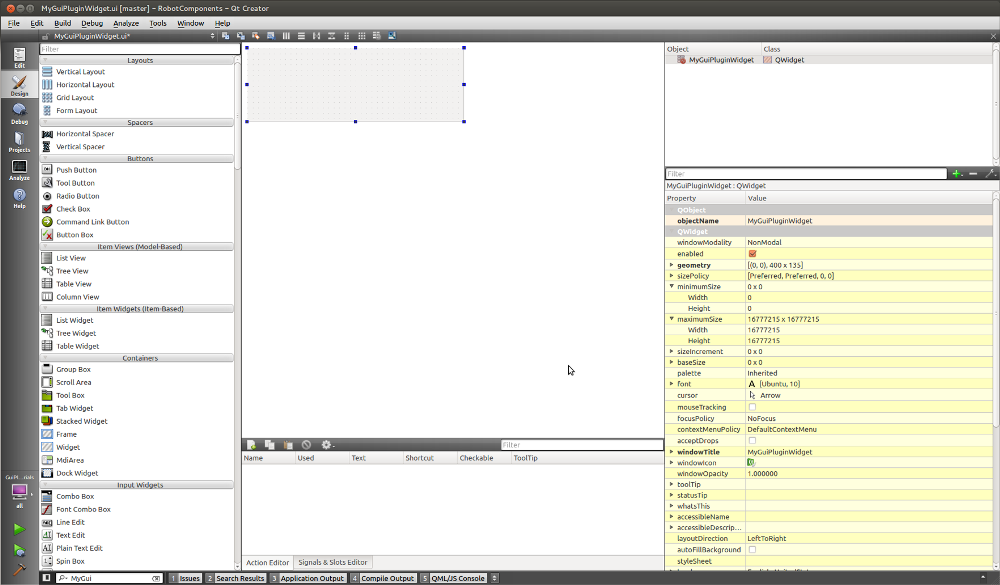
Design the GUI Widget in QtCreator
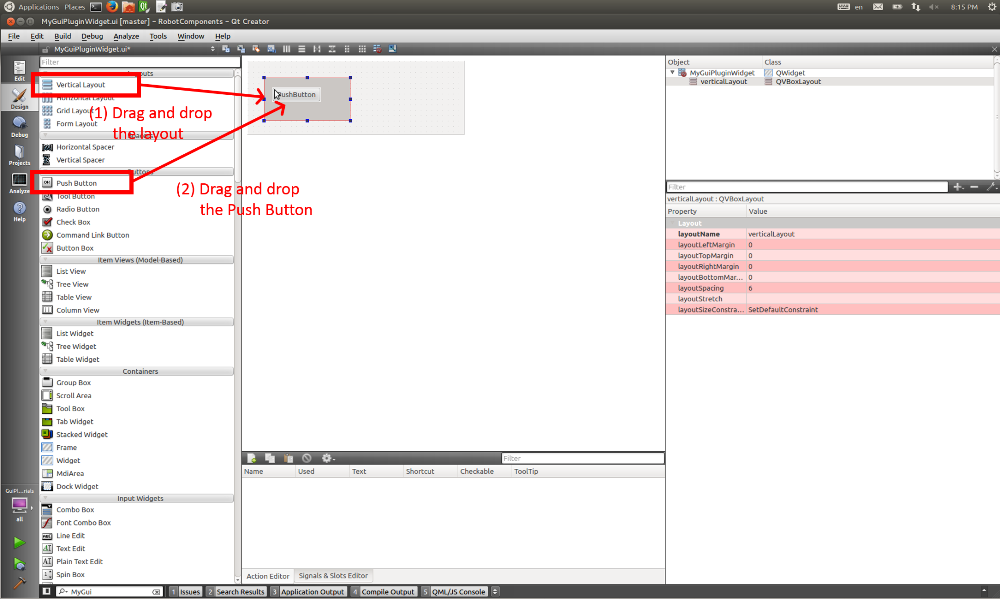
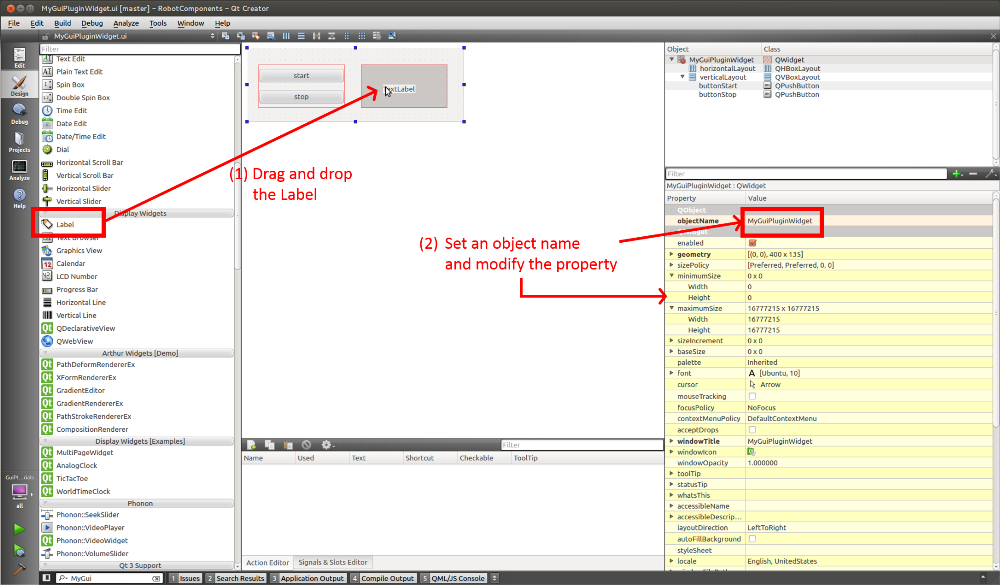
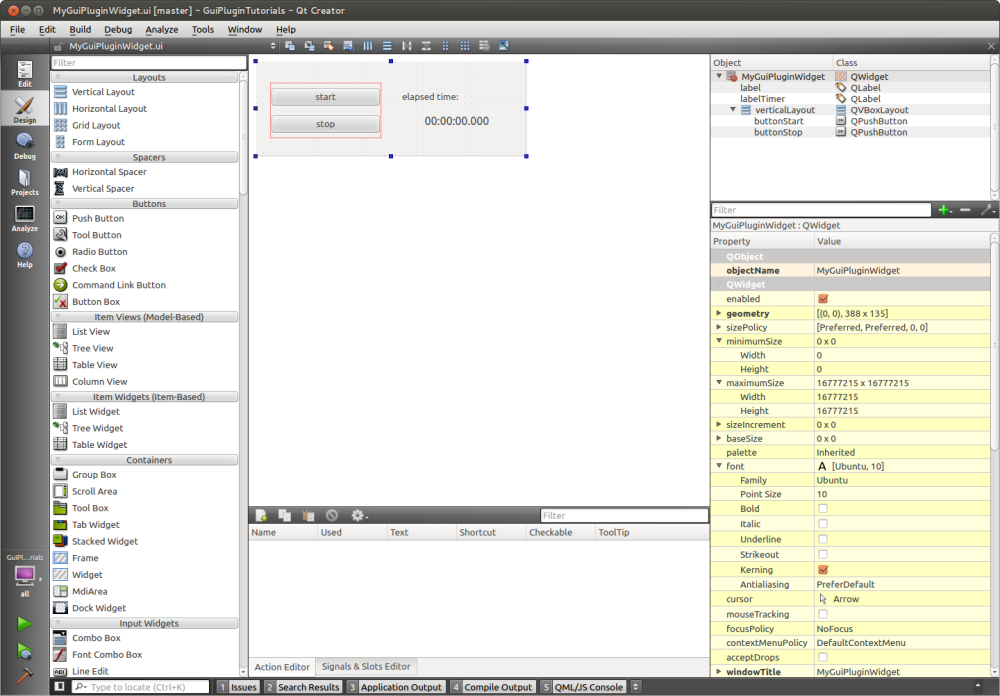
The simple timer needs two buttons to start and stop and a text box to display the time on the widget. Open MyOwnTimerWidget.ui from the file tree on the left side of QtCreator. Add Qt UI elements by selecting from the left-side list, and setting paramters like the following way:
- Open MyOwnTimerWidget.ui
- Add "Vertical Layout" and a "Push Button" to the widget. Layout elements help to align child UI elements. Visit Qt's HP (for example Qt Examples And Tutorials) to learn how to design a GUI in Qt and on QtCreator.
- Change the button's instance name to
buttonStartand its initial text to "Start".
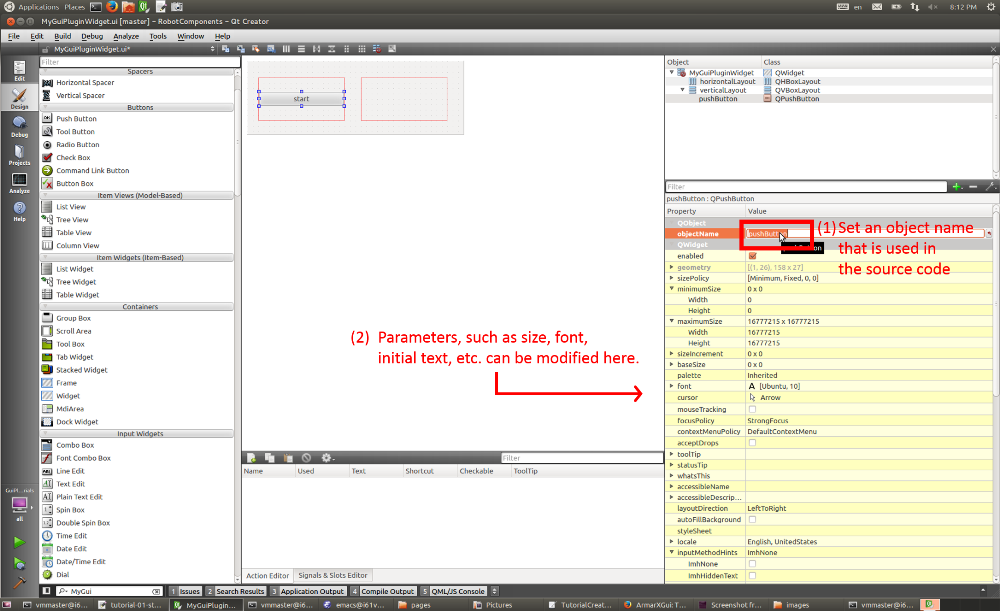
- Repeat the same process for "stop" button and call it
buttonStop.
- Add a "Label" to show the elapsed time, and change its instance name to
labelTimerand initial text to "00:00:00.000".
- The following is the sample design.
Edit the Source Code
Next step is adding some souce code into the template files. The main file to edit is the MyOwnTimerWidgetController.h. There, the functionality of your gui-plugin is defined and controlled.
- Note
- In older versions of ArmarX, you may have another file called
MyOwnTimerGuiPlugin.h. MyOwnTimerGuiPlugin forms the interface between your gui-plugin and ArmarXGui, telling ArmarXGui that your plugin is there and how to load it. You usually do not need to modify it, unless you rename your controller class. In newer versions of ArmarX, this file is auto-generated by CMake. \endnote
In MyOwnTimerWidgetController.h, add a QTimer to build a periodic task in your gui-plugin and two slots related to the PushButtons' operations.
Signals and slots are Qt's event handling system. UI elements, such as buttons, fire signal when something happens, e.g. when a button is pressed or a value has changed. Signals can be connected to slots, which are functions to be called when the event occurs. Signals can carry arguments.
- Note
- Try naming your slots according to what they are doing, not when they are called. For example, prefer
startTimer()overstartButtonPressed(). Qt allows slots to be connected to multiple signals, and vice versa, so it makes less sense to name a slot after the signal that "usually" triggers it than to express what it will do when it is triggered. \endnote -
Qt has its own memory management system based on object ownership. A parent widget usually frees all its child widget when it is destructed. Therefore, Qt client code makes heavy use of raw pointers (
QTimer*) instead of smart pointers (std::unique_ptr<QTimer>). When creating Qt objects (e.g.new QTimer()), always make sure to add them to a parent widget on construction (e.g.new QTimer(parent)) or after construction. \endnote
To be able to use QTimer, we either have to
or forward declare it via (outside any namespace)
Forward declarations are a nice way to reduce code included by the header (and header subsequently including yours). If you use the forward declaration in the header, you must use the real include in the .cpp file.
Now, implement the slots and initilize the QTimer in MyOwnTimerWidgetController.cpp:
1) Create the QTimer
2) Connect Qt's signals and slots
- Note
- In Qt 5, signals can also be connected to lambdas: \endnoteconnect(widget.buttonStart, &QPushButton::pressed, [](){// To something when the button was pressed.});
3) Implement the slots
Build Your Package
Then, you can build your package/gui-plugin. All you need to do for building is hammering the following lines into the console:
Load Your new Gui-Plugin in ArmarXGui
Finally, you can use your new gui-plugin!!
Manually Load the Gui-Plugin
- Start ice
- Note
- Ice needs to be started only once on the system. If you have already started Ice, skip this step.
armarx start
- Start ArmarXGui Then, let's pen ArmarXGui by using the following command: orarmarx gui.../ArmarXGui/build/bin/ArmarXGuiRun
- Load your new gui-plugin
First, you have to load the library of your gui-plugin in order to open it on ArmarXGui. In ArmarXGui, select "File" -> "Load Plugin" -> select your gui-plugin library (in this case libMyOwnTimerGuiPlugin.so in GuiPluginTutorials/build/lib/). Then, you can select your library from "Add widget" as follows.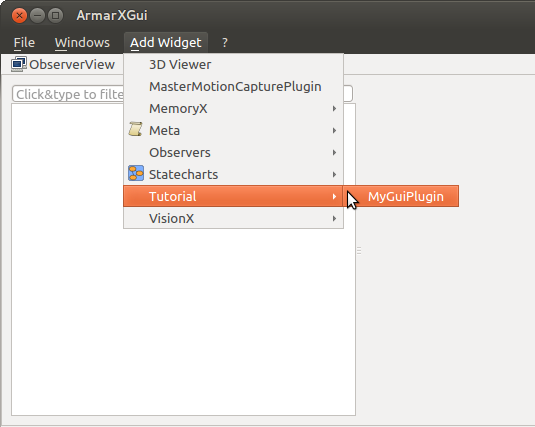
- Note
- The name of your gui-plugin presented in "Add widget" tree is defined in the getWidgetName() in MyOwnTimerWidgetController.h. You can determin the hierarchy of the tree by using "." for the name. virtual QString getWidgetName() const{return "Tutorial.MyOwnTimer";}
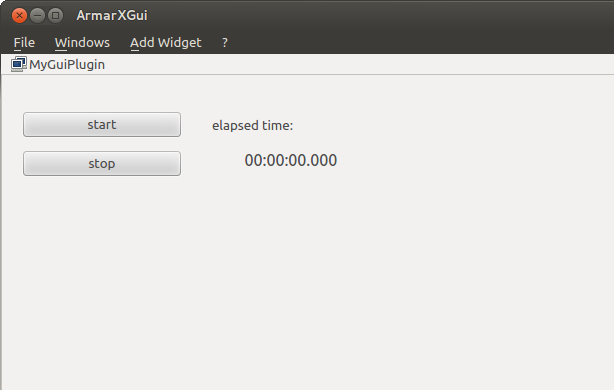
- Execute your simple timer!!
Automate Loading of Gui-Plugins
We can automate the loading of all gui-plugins from an ArmarX package.
- Open the file
~/.armarx/default.cfg:gedit ~/.armarx/default.cfg - Append your package to
ArmarX.AdditionalPackages(after a comma, without a space):# Put your custom ArmarX Packages in this list, e.g. so that the gui can find their plugins.ArmarX.AdditionalPackages=...,GuiPluginTutorials
