Table of Contents
Introduction
In this second tutorial covering programming in ArmarX using the Statechart Editor, we will expand the program that we created in the first tutorial quite a bit. We will add another widget to the GUI that lets us see a 3D simulation of Armar3. We will create and add states that let Armar3 move in this simulation. Once our program is completed, compiled and running, Armar3 will wave his left hand at us. The waving actions will be counted by our CounterState. Once Armar has waved the specified number of times, the program will terminate.
- Note
- The goals of this tutorial is to make you even more familiar with the Statechart Editor. You will get to know and learn how to use the KinematicUnit that lets you connect to the robot simulation. You will furthermore learn how to use more complex parameters for states in the forms of maps, scripted in JSON.
- Attention
- This tutorial assumes that you have completed the first tutorial and saved the code that you have created. Steps that were described in the first tutorial won't be described as detailed again.
Getting Started
If your Statechart Editor in the ArmarX GUI is still open from the first tutorial, you are ready to go. If not, make sure Ice is running on your system by executing
and start the ArmarX GUI with the following command:
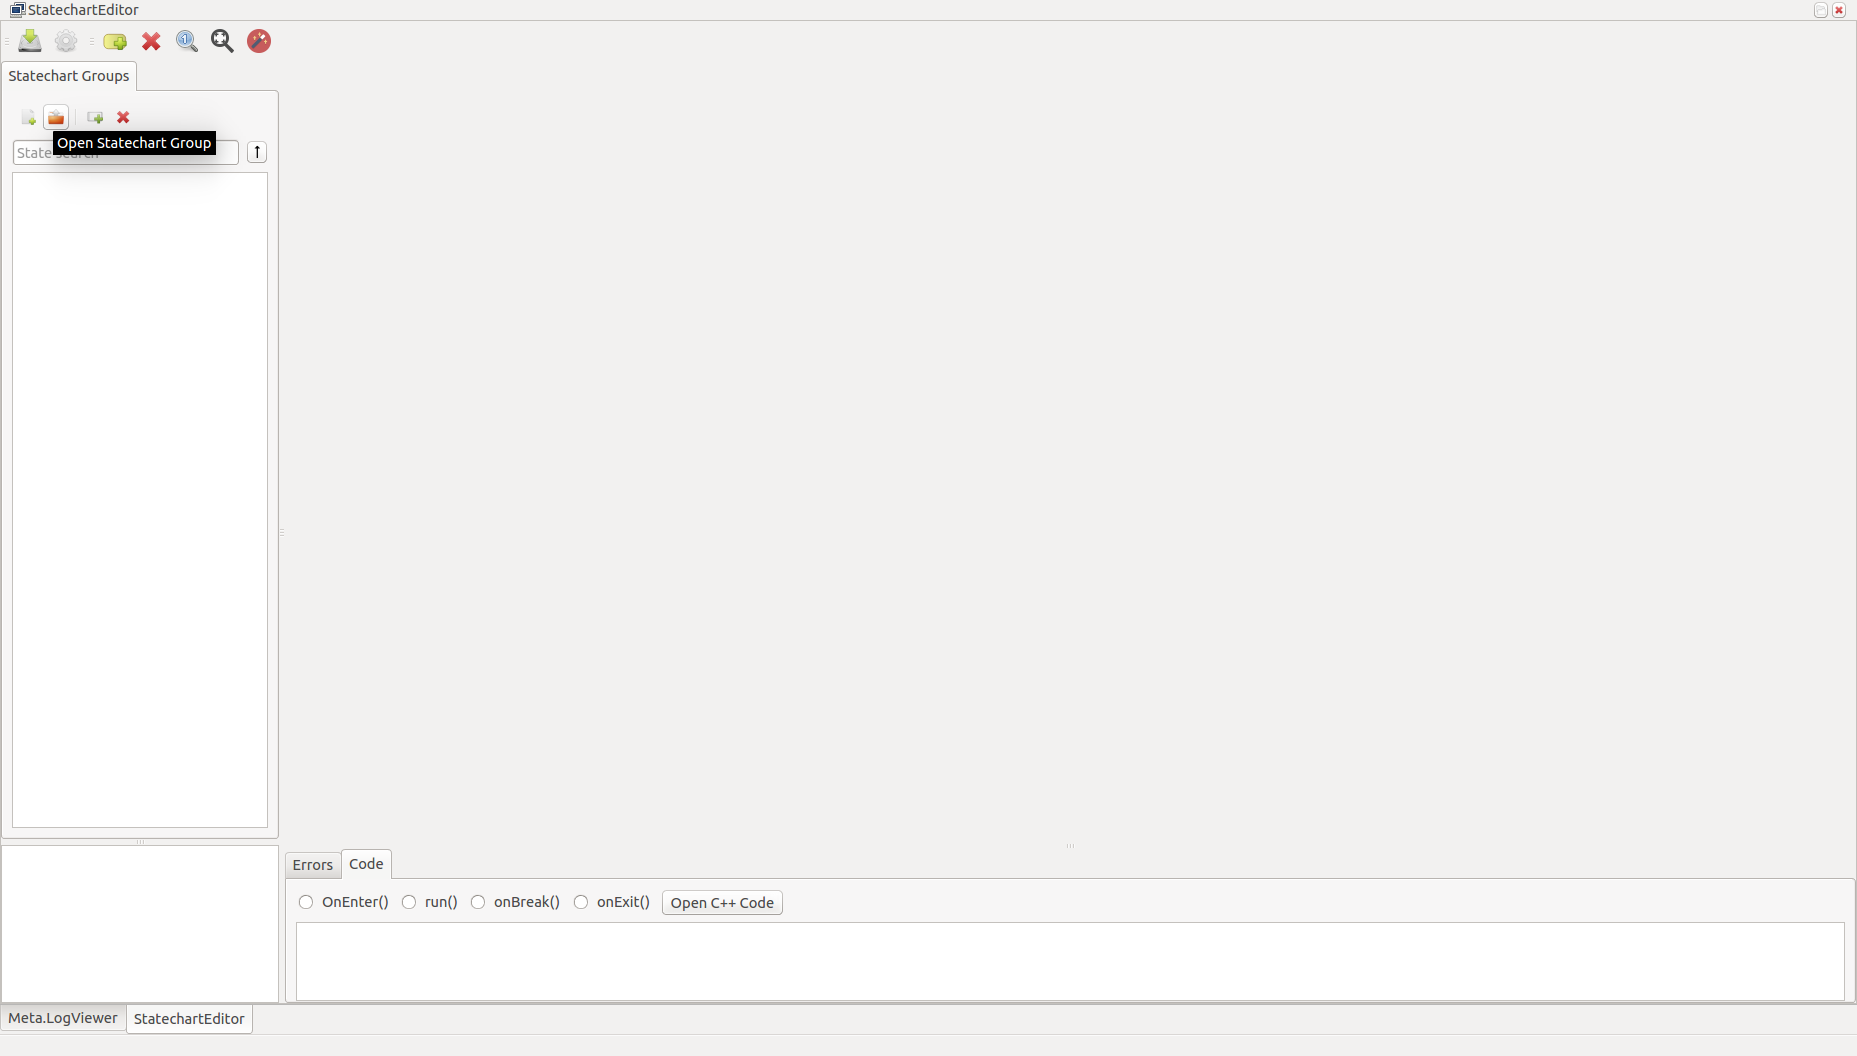
Open the Statechart Editor widget. Now we will open what we have created in the first tutorial. To do so, hit the "Open Statechart Group" button as shown in the following image. The statechart that we previously created should be located in ${ARMARX_WORKSPACE}/StateChartTutorial/source/StateChartTutorial/statecharts/ExampleStateChartGroup/ExampleStateChartGroup.scgxml. Find this file and open it.
- Note
- Alternatively, you can click on the gearwheel icon and just select the StateChartTutorial folder with "Add Path". This will cause the Statechart Editor to search all subfolders for any scgxml files to open, which will save you a lot of clicking in the long run.
Expand the statechart in the GUI
Create two new state classes
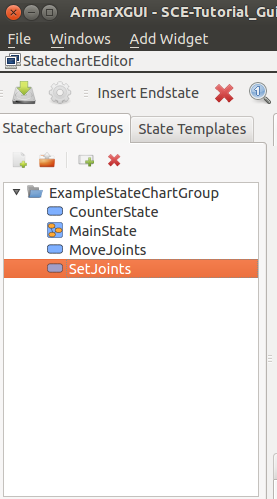
By selecting the folder "ExampleStateChartGroup" and clicking the button "New State Definition", create two new states (don't forget to check "Create C++ Files"). One should be named "MoveJoints" and one should be named "SetJoints". After creating these two states, your Statechart explorer should look similar to this:
MoveJoints will be able to move one or more joints in the robot simulation with specified velocities until they reach their specified target positions. SetJoints will simply set the joints to their specified target positions with more or less infinite "velocity". Both states will fire events that trigger transitions when the target pose is reached.
Edit the state classes in the GUI
It is now time to outline the structure of our program: Once the program starts, it will enter a state that sets the position of Armar's joints to an initial value. This state will be of the type SetJoints. From there, it will transition into a state that lets Armar move his hand forward. This state will be of type MoveJoints. It will then transition into a second MoveJoints state that lets Armar wave his hand backwards again. This will continue for a while. However, in between waving forward and backward we will hook up our CounterState that will keep track of how often Armar has waved yet. If he has waved often enough, the counter will not transition to the next MoveJoints state but to the end state, and the program will terminate.
Edit the Statechart
In case MainState is not public yet, right click on MainState and make it a public state. Now double click on MainState to open it in the GUI.
To create the three new states in the statechart, drag&drop SetJoints once and MoveJoints twice into the main state. Rename SetJoints to "InitPose", "MoveJoints" to "WaveFwd" and "MoveJoints_2" to "WaveBack" (right click on the respective state -> select "edit state" -> select tab "General" -> set "State Instance name"). Feel free to delete the Success/Failure sub-states within InitPose and WaveFwd/WaveBack.
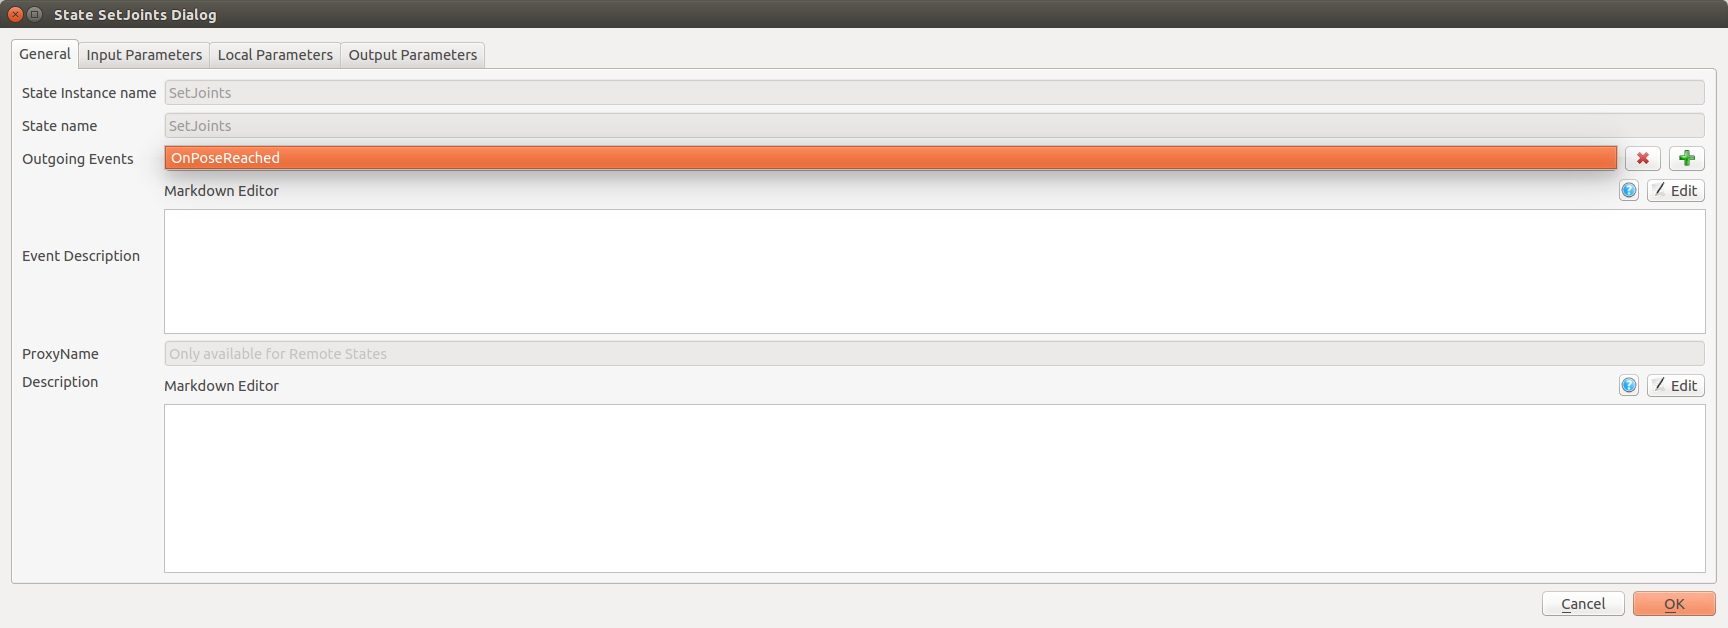
Both newly created state classes (SetJoints and MoveJoints) need parameters and events. For both states, add the event "OnPoseReached" as it was described in the first tutorial. The following image is just a reminder as of how to create events:
- Note
- It does not matter whether you edit WaveBack or WaveFwd, as they are both instances of the same class MoveJoints. If you add an event in WaveBack for example, it will automatically appear in WaveFwd, too.
Both states also need input parameters. InitPose (instance of SetJoints) only needs to know where to set the joints and therefore only needs one parameter, that we will name "JointTargetPose". It is of type Map(float), which allows us to specify multiple joint names and their respective positions in only one parameter. We will look into how to edit this map later. For now, just make sure that your input parameter tab of the InitialPose state looks like this:

- Note
- You can only select what the value type of Map is (here it's float); the key type is always string
MoveJoints will have the very same input parameter. But not only does it need to know where to set the joints but also how fast it should move them. So it needs a second parameter that specifies the joint velocities. We will name it "JointVelocity" and it will also be of the same map-type. The input parameter section of your MoveJoints instances WaveBack and WaveFwd should look like this now:

Connect the transitions as seen in the picture below.
- Note
- You can set a state as initial state by right clicking on it and selecting „set as initial state“. Drag the tips of the other positions to the respective state.
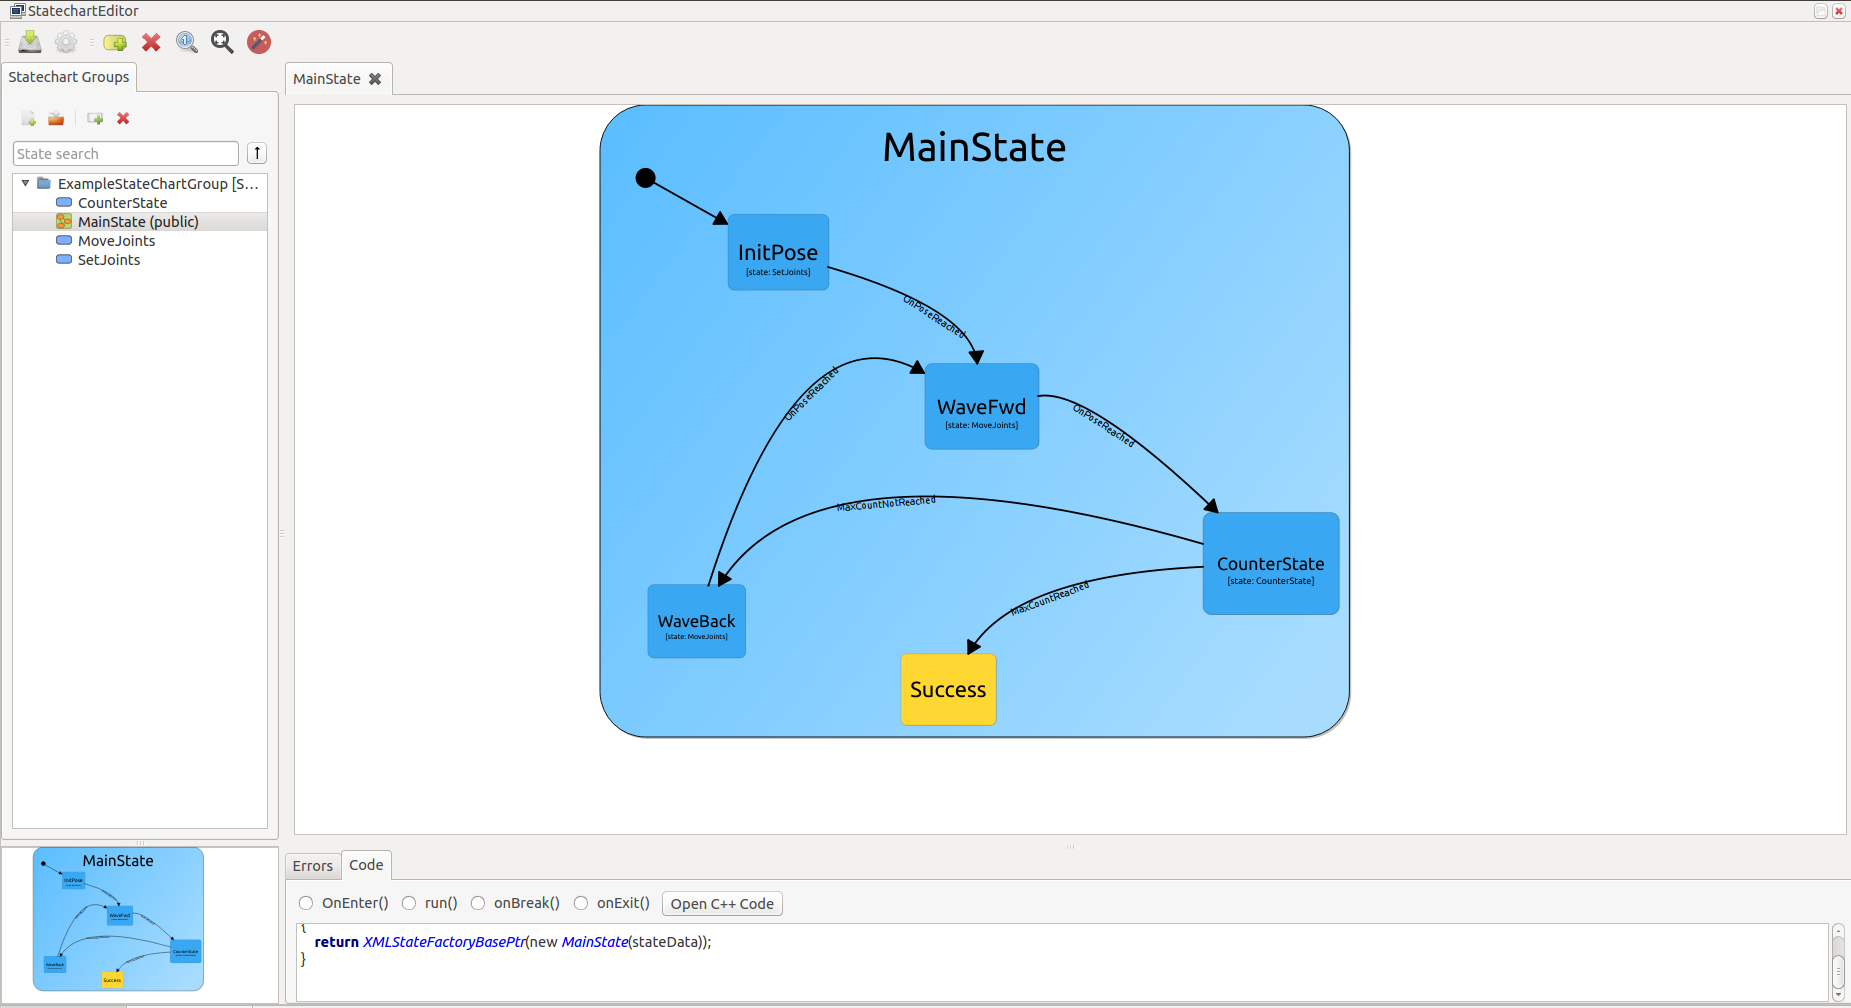
Once you click on the Layout State button, it should look like this:
Edit the Main State
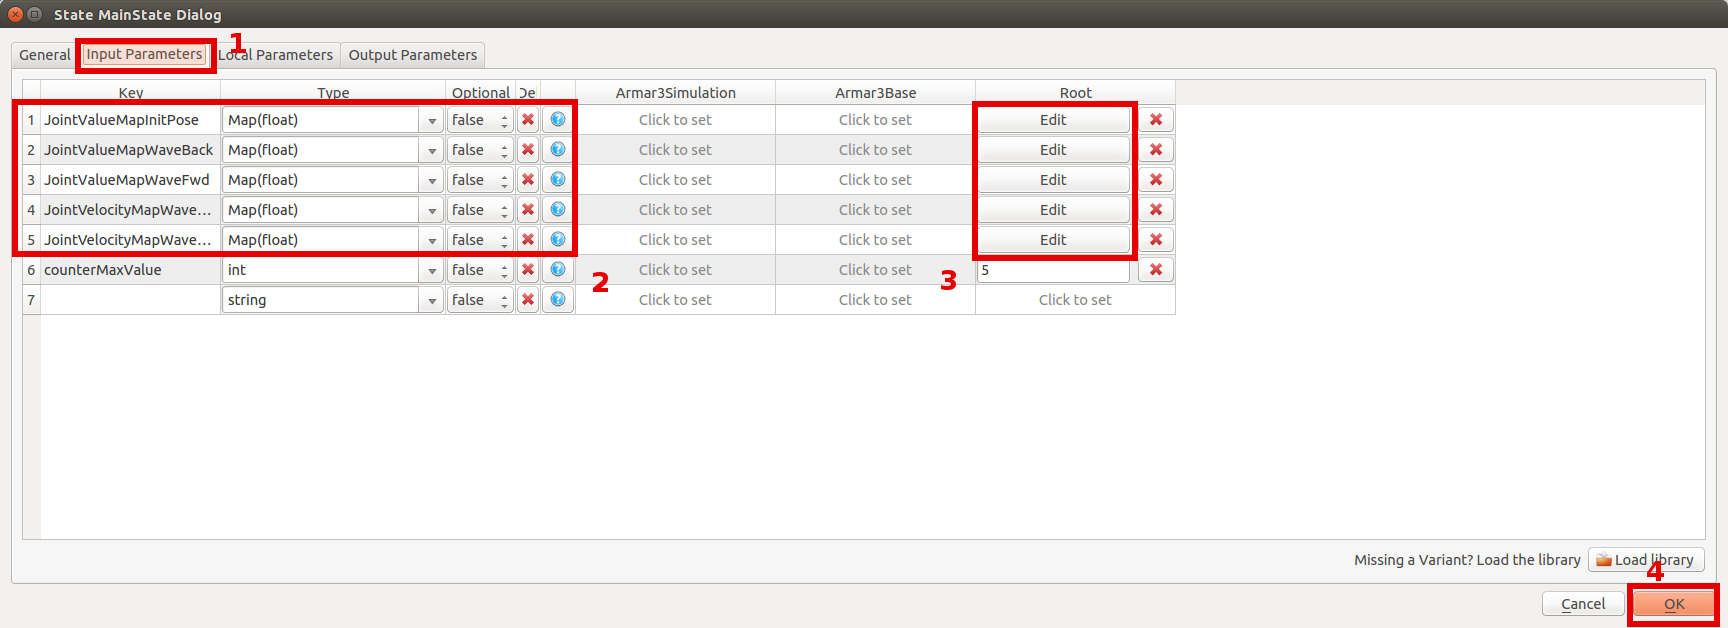
So far, we have not really learned anything new. This will change now. We will edit the MainState, we will give it a lot of maps as input parameters and we will learn how to edit these parameter maps as JSON scripts. Open the input parameter tab of the MainState and add the five new parameters that you can find in this list:
| Key | Type | Optional | Def |
|---|---|---|---|
| JointValueMapInitPose | Map(float) | false | yes |
| JointValueMapWaveBack | Map(float) | false | yes |
| JointValueMapWaveFwd | Map(float) | false | yes |
| JointVelocityMapWaveBack | Map(float) | false | yes |
| JointVelocityMapWaveFwd | Map(float) | false | yes |
After that, the input parameter tab should look like this:
Now comes the interesting part. Similarly to "counterMaxValue" we can also define default values for complex types such as "Map(float)". Click on "Click to set" and then on the "Edit" button of "JointValueMapInitPose". A small editor window will open where you can input what your JointValueMapInitPose should contain. It is essentially a 2D list that contains any number of joints and their positions as absolute joint angle values. Have a look at the syntax to understand more about it. You can copy and paste the default values for the initial pose from the following block of code:
{
  "Shoulder 1 L": -1.25,
  "Shoulder 2 L": 1.5,
  "Elbow L": -1.38,
  "Underarm L": 1.0
}
Similarily, copy and paste the other scripts into their respective editor windows.
Default values for JointValueMapWaveBack:
{
  "Elbow L": -0.8
}
Default values for JointValueMapWaveFwd:
{
  "Elbow L": 0.3
}
Default values for JointVelocityMapWaveBack:
{
  "Elbow L": -1.0
}
Default values for JointVelocityMapWaveFwd:
{
  "Elbow L": 1.0
}
Edit the transitions
You will need to edit all the transitions in your statechart diagram to tell them which parameters to pass and from where they come. To do so, right click on the arrow that represents a transition. The parameters expected by the target state will already be displayed. All you have to do is to select "Parent input" as Source Type and to choose a feasible source parameter from the drop-down list. With the help of the parameter names, this should be relatively easy. The following image gives you an example of how the edited transition from the main state to the InitPose should look like:
- Note
- In case there are no source parameters in the drop-down list or a parameter is missing, you selected an incorrect type for some parameter somewhere.
Preparing the Kinematic Unit Proxy
In order to manipulate the joint angles, we need access to a KinematicUnitInterface. A kinematic unit, which implements a KinematicUnitInterface, is a sensor-actor-unit that allows us to control the joints of a robot. Here, this will allow us to make a simulation of Armar move its arm, which we will be able to see in a GUI plugin.
Add the Kinematic Unit Proxy
First, right-click the ExampleStateChartGroup and select Group Properties. Under the tab "Proxies", select "[RobotAPIInterfaces] Kinematic Unit" and confirm with OK:
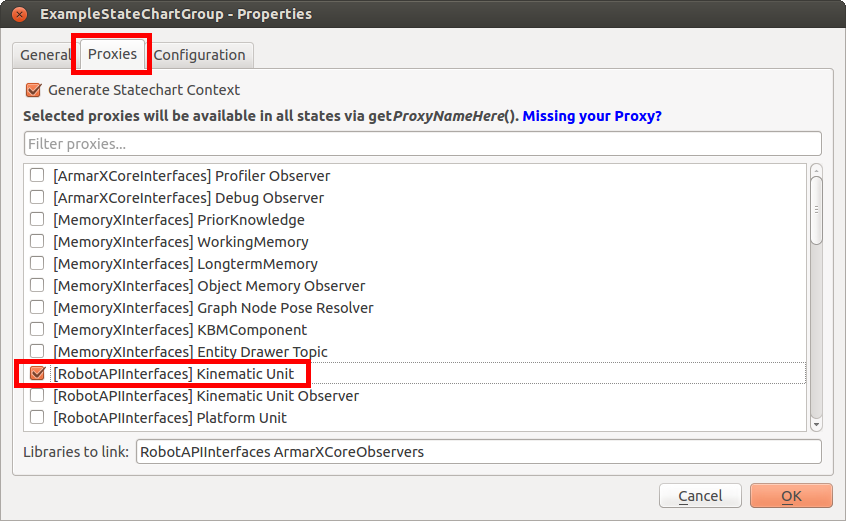
Doing this will allow us to communicate with the kinematic unit by calling getKinematicUnit() in any of the states. We will use that to set the joint angle positions/velocities. Once you're done, don't forget to save your statechart. The generated state file will now contain a function to get the Kinematic Unit proxy (getKinematicUnit()).
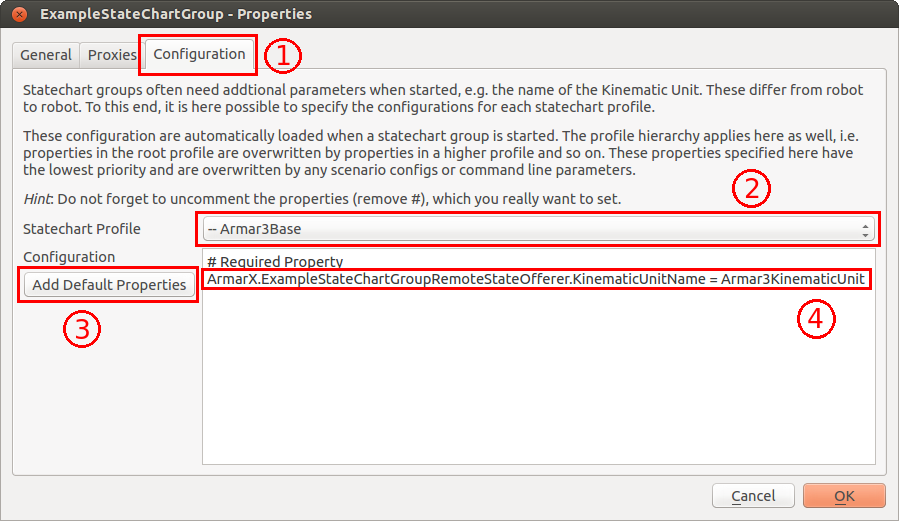
Configure the Kinematic Unit Proxy
Now open the tab "Configuration". Select the profile "Armar3Base" and add the following line to the configuration text box:
Alternatively you can press the button "Add Default Properties" which generates the property for the KinematicUnitName and you only have to fill in the name, i. e. Armar3KinematicUnit.
- Note
- Don't forget to remove the comment "#" from the property line. It tells our statechart which kinematic unit to use.
Edit the source code
Add dependencies
In order to use the Kinematic Unit proxy we need to add a dependency on RobotAPI in ${ARMARX_WORKSPACE}/statechart_tutorial/CMakeLists.txt. Furthermore, we need the libraries Eigen3 and Simox.
In the CMakeLists of our Statechart Group (${ARMARX_WORKSPACE}/statechart_tutorial/source/statechart_tutorial/statecharts/ExampleStateChartGroup/CMakeLists.txt), we need to add the dependencies "Eigen3::Eigen" and "Simox::VirtualRobot" as system dependencies. In addition, the statechart group depends on several ArmarX libraries listed below. Make sure that your CMakeLists.txt contains the following:
In summary, the top-level CMakeLists.txt should look like this:
Finally, configure your project by running CMake inside a terminal:
or from inside Qt Creator.
Edit MoveJoints.cpp and SetJoints.cpp
So far we only defined the OnPoseReached event in MoveJoints and SetJoints. We have not yet specified when these events will be triggered. This is what will do now in the .cpp-source of our two states.
Open MoveJoints.cpp. Find the onEnter()-method which should be empty. Insert the following code. It will trigger the OnPoseReached event if the actual pose is very close to the specified pose (+/- 0.05).
Do the same in SetJoints.cpp.
- Note
- By calling the function installConditionForOnPoseReached(poseReachedConditions) we are telling the ConditionHandler to emit an event OnPoseReached once the conditions we define in the term currentConditions are fulfilled. The joint name refers to a KinematicUnitObserver that observes the joint values in our KinematicUnit. See ArmarX Observers to learn more about observers and sensor-actor-units.
Now we will actually and finally tell the two states what they are supposed to do. In the run()-method of MoveJoints.cpp, replace any existing code with the following. Have a look at the code, it is quite interesting. The essence lies in the very last line, of course. Don't forget to uncomment the definition of the run()-Method in the header file.
First, we tell the kinematic unit that we wish to velocity control all the joints defined in our input joint velocity vector. Then, in the last line we set the desired velocity.
Delete what you can find in SetJoints::run() and insert the following code. You can see a close similarity to the code above. Again, the essence of what to do lies in the last line.
Compile your program
Compile your program from the terminal by executing cmake and make in your build directory:
Edit the scenario
We will first open our scenario in edit mode. Then we will add and configure new applications.
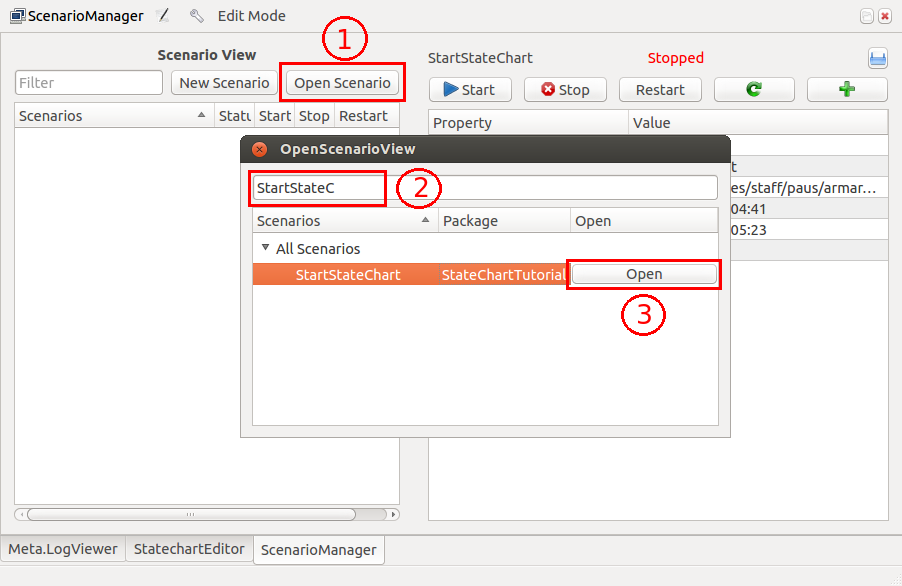
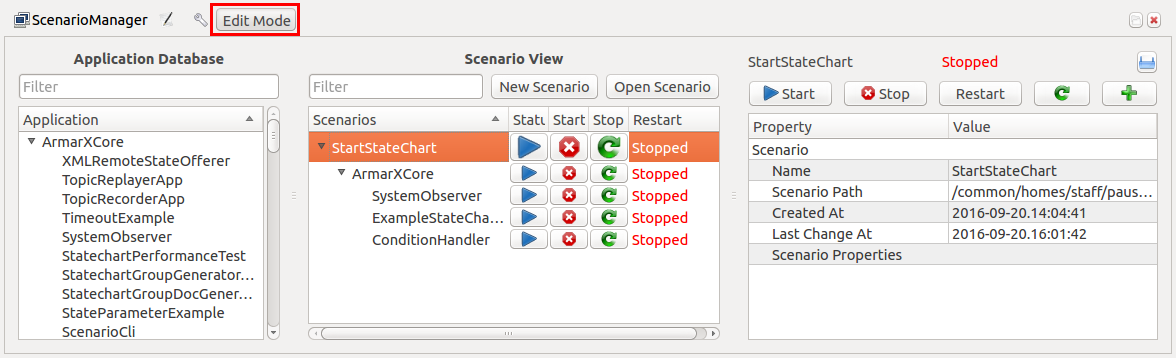
Open scenario in edit mode
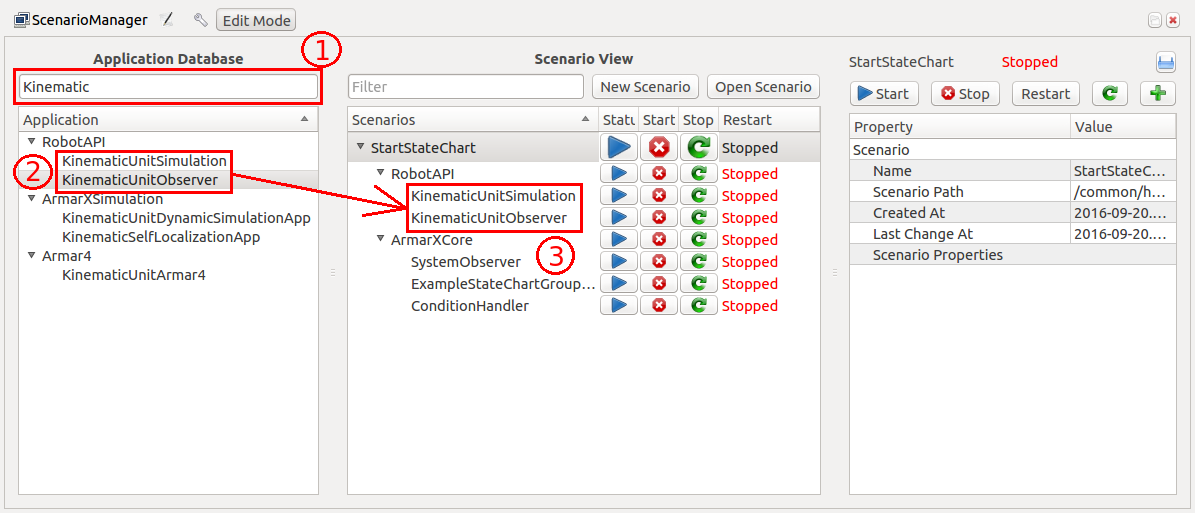
Open the scenario manager ("Add Widget"->Meta->ScenarioManager). If the StartStateChart scenario is not loaded automatically, use the open scenario button. You can use the text box to search for our scenario and load it via the open button next to its name.
Enable the edit mode by clicking the corresponding toggle button. Otherwise you will neither be able to edit the properties of the scenario nor add new applications.
Add new applications
Use the search in the application database to search for KinematicUnitObserver and KinematicUnitSimulation. Add these application to the StartStateChart scenario using drag and drop. The result should look similar to the following screenshot:
If you get an error similar to the following:
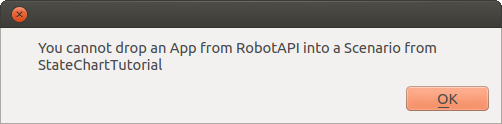
you should make sure that you added the dependency on RobotAPI to the correct CMakeLists.txt and CMake has been run after this change. It my be necessary to restart the scenario manager so all changes are detected.
Configure applications
If you take a look at the scenario view, you'll notice that in contrast to the first tutorial we now have two additional applications: KinematicUnitSimulation and KinematicUnitObserver. The application KinematicUnitSimulation creates a simulated kinematic unit. KinematicUnitObserver creates an observer that observes our simulated kinematic unit, which we need to detect when we reached our target poses.
Before we can run our program and see Armar wave, we need to edit the properties of these applications.
First click on KinematicUnitObserver in the scenario view and set the values for the following properties:
This tells the component KinematicUnitObserver which robot model to use and what the name of the observer should be. Note that we used the very same name in our onEnter()-methods.
Next repeat the process for the KinematicUnitSimulation and set these properties:
As stated before the KinematicUnitSimulation creates the kinematic unit use in our run()-methods. It simulates the kinematics of the specified robot - here Armar3. The object name defines the name of the kinematic unit.
Run the program
Now start the scenario via the GUI or use the terminal:
In order to visualize what the scenario is actually doing, we have to set up the GUI. If the GUI is not open, open it. Add the widget RobotControl->KinematicUnitGUI. In the dialog that pops up ArmarIII kinematic unit must appear automatically. Make sure the option 'Enable 3D Viewer' is activated, to display a 3D simulation of Armar3. Then confirm the default configuration parameters. It might take a few seconds before you can see a full body model of Armar3!
You can arrange the widgets by dragging them around. A useful configuration of the GUI with the scenario manager and the KinematicUnit GUI might look like this:
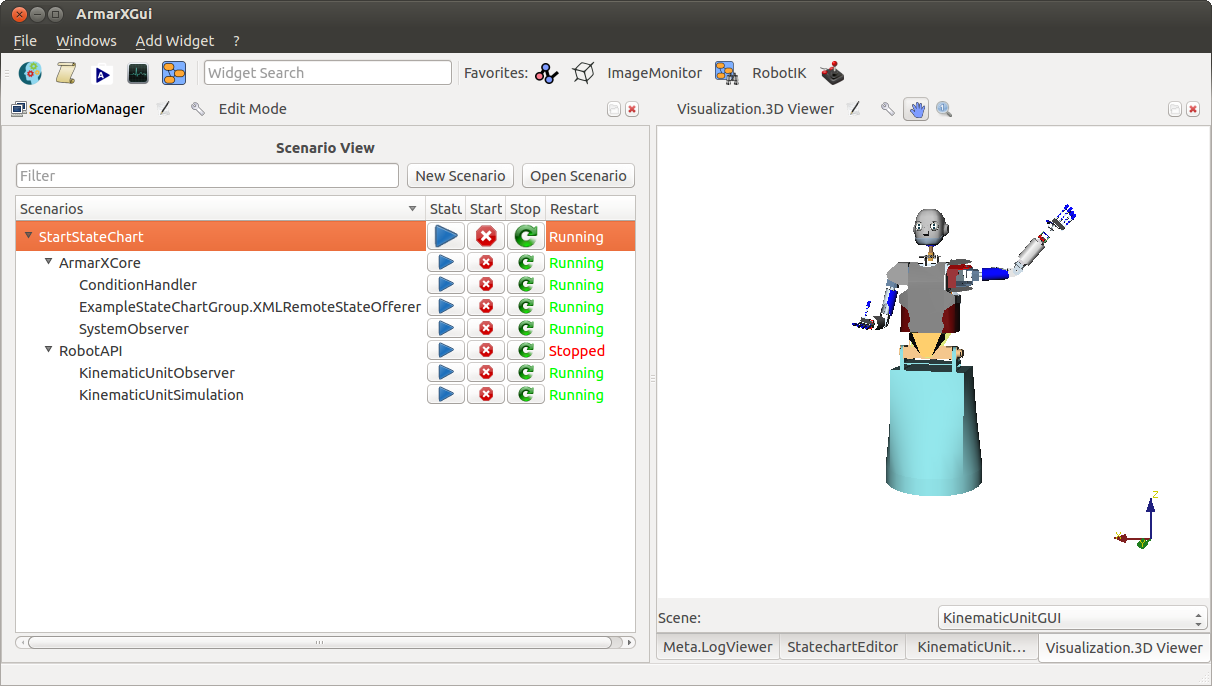
You should finally see that Armar3 waves his left hand five times and then stops!
You can now stop and restart your scenario to see it again! To stop the scenario either use buttons in the scenario manager or the terminal:
