Table of Contents
Objective: Learn how to create an ArmarX package, write a component that writes "Hello World!" to the log, and start it in the ArmarX GUI.
Previous Tutorials: none
Next Tutorials: Understand Distributed Systems
Reference Code: component_tutorials
Developing in ArmarX
So, you want to write code that does stuff in ArmarX? Okay, then let's get you started. First, we'll have to teach you the basics:
- How to create your own ArmarX package, and
- how to create and run a component in that package.
Create an ArmarX Package
If you want to write code that does stuff in ArmarX, you need an ArmarX package. An ArmarX package is a CMake project with a special kind of structure. CMake is a tool that manages C++ projects and tells the compiler (e.g. GCC, Clang) and build system (e.g. Makefiles, Ninja) how to build the project. A CMake project is a directory with CMakeLists.txt files in it. These files tell CMake how the project is structured, e.g. which C++ files should be bundled into a library and which C++ files should be turned into executables.
CMakeLists.txtfiles are written and maintained by hand by the developers. For example, when you add a new classAwesomein a pair ofAwesome.handAwesome.cppfiles, you need to add these files in the respectiveCMakeLists.txtfiles. More on that later, though.
The ArmarX Package Tool
To create and interact with ArmarX packages, ArmarX provides the ArmarX Package Tool armarx-package. Let's see what this tool can offer:
- Note
- This is another command than
armarx: It isarmarx-package, with a hyphen, notarmarx package.armarxmanages the ArmarX background communication service.armarx-packageinteracts with the files and directories making up an ArmarX package.
Let's see whether there is something about creating ArmarX packages ...
... _(This is the part where you run the command above and read the output!)_
Aha! The init command looks like a good candidate:
Ask the command how it is used:
Create a Package for This Tutorial
Okay, something like armarx-package init our_project_name should get us going. But before we create the package, we need to find a good place for it (although you can also move it later). For the sake of this series of tutorials, let's create a directory in your ArmarX workspace:
In that directory, you will create your first ArmarX package. (Nervous? No need to! It is like going to the dentist, just ... well ok, it is nothing like going to the dentist. Anyway...) Wisely choose a package name, e.g. component_tutorials (we will continue to use the package in later tutorials).
Then, when you are ready, take deep breath, and run:
This command should output something along these lines:
Examine the Created Package
Run ls or open a file explorer and explore what the command created:
It created a directory with the name of our package (component_tutorials) in our current working directory (tutorials). Let's see what's inside:
We will briefly go through the created files and directories:
README.md: A README file. This file is shown on GitLab when you put this project in a repository on that platform.LICENSE.md: The License file. ArmarX packages typically use the GPLv2 license.CMakeLists.txt: The top-level CMakeLists.txt. As said above, all ArmarX packages are Cmake projects, and this file is the main entry point for CMake.data/: Here you can place a bit of data, e.g. object models. Files and directories indata/directories of ArmarX packages can be found in code.etc/: Miscellaneous files, e.g. additional doxygen documentation.scenarios/: Configuration files of scenarios. If you did the tutorials in the Getting Started level, you already got to know one scenario from the user perspective.source/: The actual C++ source code (i.e..cppand.hfiles, among others).python/(not generated by default): Likesource/, but for Python code. This directory is only created when you add a first Python package in your ArmarX package. More on that in a later tutorial, though.
Optional: Create a Package in a Git Repository
For this tutorial, it is not necessary to put the package under version control. However, for your own project (e.g. your thesis), you should definitely set up a Git repository and add the package to it right away. See How to Create an ArmarX Package in a Git Repository for how to do that. If you are just doing the tutorial, you can skip this part and check it later for your real project.
Configure and Build the Empty Project
An empty package should also be a valid one. So let's try to configure and build the empty project.
By convention, build artifacts from CMake projects are often stored in a directory called build. There, we will configure and build the project. If we build the project manually, we first have to create it. Go the top-level directory of the created package, and create the build directory. Then, go to the created build directory, and invoke CMake like this:
This is the typical way of running CMake (not just for ArmarX packages). To summarize, it typically involves these steps:
- Create a
builddirectory next to the project's top-levelCMakeLists.txt. - Go into that directory.
- Run
cmake .., where the..points to the parent directory, which contains the top-levelCMakeLists.txt.
On Ubuntu 18, you might get the following error:
[...]== Setting up ArmarX project ...-- ArmarX next generation package.-- Configuring ArmarX project `component_tutorials`.CMake Error at /.../code/armarx/ArmarXCore/etc/cmake/latest/setup.cmake:9 (message):Minimum compiler version of 8.2 (for gcc) is required for ArmarX! You areusing: 7.5.0Call Stack (most recent call first):/.../code/armarx/ArmarXCore/etc/cmake/ArmarXProject.cmake:146 (include)CMakeLists.txt:10 (armarx_project)-- Configuring incomplete, errors occurred!See also "/.../code/tutorials/component_tutorials/build/CMakeFiles/CMakeOutput.log".See also "/.../code/tutorials/component_tutorials/build/CMakeFiles/CMakeError.log".This is because the standard compiler on Ubuntu 18 is GCC 7. However, ArmarX requires at least GCC 8. We need to help CMake choose the correct compiler. To this end, run this command:
cmake -DCMAKE_C_COMPILER=$ARMARX_C_COMPILER -DCMAKE_CXX_COMPILER=$ARMARX_CXX_COMPILER ..You only need to do that once. If CMake runs successfully, it will remember this setting.
The warnings
No project() command being present,'armarx_enable_modern_cmake_projekt' will be removed, andLegacy mode: Including Use-fileare expected at the moment and can be ignored.
The last lines printed by cmake .. should look something like this:
As you can see, CMake actually performs two steps:
- Configuring: CMake goes through all
CMakeLists.txtfiles, gathers information and understands your project. - Generating: CMake generates files for the build system (e.g. Makefiles or Ninja).
Note that CMake is not building your project: CMake is a build system generator, not a build system. For example, when you are using Makefiles as a build system (which is the default), you should find a file called Makefile in the build directory. This is generated by CMake, which in turns allows you to run make to build the project.
So, in order to actually build the project, we need to invoke the build system. In the build directory:
where the . points to the directory containing the generated files (i.e. build). (This is different from plain cmake .., which needs the directory where the CMakeLists.txt is.)
The output should look like this:
In other words ... nothing. Isn't this strange? Shouldn't this do something?
Well, no. Your project is empty, remember? So there is actually nothing to do. But we did not encounter any error, so that is good.
By the way, you can also invoke the build system directly, which is sometimes less of a hassle than using CMake to build the project. For example, when using Makefiles (which is the default), you can just run
in the build directory. At the moment, this should do nothing as well.
Okay, let's summarize: We have got an empty ArmarX package that we can configure and build, although it is not very interesting yet. So next, we will add something to build to the package!
A few more words about the
builddirectory: Configuring and building will generate files in this directory. These files should not be committed to version control (i.e. Git), as they would create unneeded conflicts and unnecessarily bloat up the repository. For this reason, thebuilddirectory is ignored by default.
Add a Hello World Component
In a hello world example, you might expect a file main.cpp with a main function like int main(int argc, char* argv[]). In ArmarX, these technical details are hidden from you. Instead, we want you to think in components.
In simple terms, a component is a process that communicates with ArmarX. We talk more about what "communicate" actually means here in the next tutorial. For now, think of a component as a program that you can start (e.g. as part of a scenario) and that has entry points for your code. So, not that different from the main.cpp after all.
Note one additional detail though: To be completely precise, the executable that you start is an application. An application has a main() function, and then loads one or multiple components in its process. So technically, the relationship between applications and components is 1 to N (as in 1 application can have N components, with N >= 1). However, in most cases, the relationship is 1 to 1, as in you start 1 application which loads 1 component.
Just keep that in mind:
An application is a process (in operating systems terms), and it consists of one or multiple components, although one is the usual case.
Create an Empty Component
Now, back to our hello world component. Just as we used the armarx-package tool to create the ArmarX package, we can use it to create a component in a package. The only difference is that we need to run the command from the root directory of the ArmarX package to which it shall add the component. So, go to that directory, and call armarx-pacakge:
The arguments add component tell the pacakge tool to add a component, and hello_world is the component's name. The command should print something like this:
As you can see, the command created a new subdirectory components/hello_world/ in the source/component_tutorials/ directory. The structure of the source directory is now:
We can notice a few things here:
- The first directory in
sourceiscomponent_tutorials, i.e. a directory with the project's name. This is a C++ best practice: It makes sure that all includes start with the project name. For example:#include <component_tutorials/components/hello_world/Component.h>// Instead of:#include <components/hello_world/Component.h> - The next directory is called
components. This is an ArmarX convention: All components are placed in thecomponentsdirectory by default, although this is not strictly necessary. It makes the project cleaner, however. - The next directory is
hello_world: This is where your new component is located. - Inside the
hello_worlddirectory, there are aCMakeLists.txt, a header fileComponent.h, a source fileComponent.cpp, and a strange fileComponentInterface.ice. The.hand.cppfile are the C++ source code of your component. TheCMakeLists.txtdefines the component in CMake. Do not worry about that frosty strange file for now, we will come to that in the next tutorial. - Finally, note that almost all directories in this hierarchy have their own
CMakeLists.txt. This is to make them more "local" and "explicit". For example, your component is defined in itsCMakeLists.txt(i.e. the one inhello_world). TheCMakeLists.txtincomponentsonly has a single lineadd_subdirectory(hello_world), which tells CMake to recurse into thehello_worlddirectory and read theCMakeLists.txtthere. A take-away here is that CMake only looks at files and directories that we explicitly tell it about: It does not automatically recurse into all subdirectories of the project and find all.cppand.hfiles, for example. And that is a good thing.
Build the Empty Component
To check whether everything is working and to get you used to it, we will build the project again and see whether anything changed now. So, just as before, go to the build directory, then configure (cmake ..), then build (make) the project:
Actually, you could have skipped the
cmake ... When building an ArmarX package (make), an ArmarX package will automatically CMake again if it detects modified files. However, in normal (non-ArmarX) projects, you usually have to re-run CMake explicitly.
Now the output of make should look like this:
You may get warnings about clock-skews on H²T lab PCs: You can ignore them (they are caused by minor delays due to network-based file access).
Look at that a bit. Note especially the lines starting with Built the target .... We can find these lines:
Here we see that the component we generated actually defines three "targets" (a target is something that can be built), with different suffixes (_ice, _cmp, and _run).
- The
_icetarget has to do with the strange.icefile from before - it can wait for later. - The
_cmptarget is the main target of the component. Technically (in C++ terms), it is a library, i.e. a collection of code (e.g. classes and functions) without amain()function. It is not executable on its own.- Note
- We will use the term "library" in a narrower, more semantic sense in ArmarX: Libraries are a place for code that can be used to solve your concrete use case. A component is already a use case, and is not meant for re-use on a code-level. So in this semantic sense, a component should not be seen as a library.
- The
_runtarget is the application (we mentioned it above). This one is an executable, i.e. a program with amain()function that can be executed.
Start the Empty Component
Why don't we start the application/component pair right now and see what happens? After all, an empty component is also a valid one (it is just pretty boring). The executable (also sometimes called a binary, although compiled libraries are binary as well, of course) is in the build/bin/ directory, and has the same name as the application target. So, from the build directory, we can run it this way:
If you get an error like this:
$ ./bin/hello_world_run[315165][14:44:13.557][][std::cerr]: Could not contact default locator at 'IceGrid/Locator:tcp -p 16927 -h localhost'Did you start armarx?To start armarx: armarx startTo kill a hanging armarx: armarx killIcedo as said and start ArmarX (
armarx start), then try again.
The application will probably print something like
and will then keep running (like the ArmarX GUI before). You can stop it by pressing Ctrl+C in the terminal window:
Hooray! We created, built, started and stopped our first ArmarX component! However, it is not very interesting at the moment. So, let us fill it with life.
Make the Component Do Stuff
... where "do stuff" means printing "Hello World!", as is customary for a first program in a new world. For that, we have to edit the component's source code. And for that, we need an IDE.
Excursion: Set up a C++ IDE
There are different C++ IDEs out there: QtCreator by Qt, Visual Studio by Microsoft, CLion by JetBrains, and of course hundreds of editors with C++ extensions that fight for their right of being called an IDE. They all have their benefits and shortcomings. Here, we will focus on QtCreator. One reason is that the ArmarX GUI is built on the well-established GUI framework Qt, and the QtCreator is equipped with tools for that purpose. However, it is also a pretty solid C++ IDE in general. Of course, you are free to use whatever IDE or vim-like editor you want, but you have to map what we show here to that yourself.
To set up QtCreator and configure it properly for ArmarX, follow How To Set up QtCreator for ArmarX.
Open the ArmarX Package in QtCreator
Start QtCreator from a terminal where your ArmarX workspace is active:
Starting it from the terminal that QtCreator uses the well-defined environment of your ArmarX workspace.
In QtCreator:
- From the menu in the top, choose File > Open File or Project ...
- Navigate to your package (
$ARMARX_WORKSPACE/tutorials/component_tutorialsif you followed this tutorial). Choose the **CMakeLists.txt** and press Open. - Now QtCreator asks you to configure the project's Kit. This step is only necessary when you open a project in QtCreator for the first time. A Kit is a suite of settings that QtCreator uses to configure projects (and their CMake). If you have set up QtCreator according to the instructions above, you should have an "ArmarX" Kit. This what you want to use. Also, you usually want to build in "Release with Debug Information". This means that you want the compiler to somewhat optimize the code, but leave enough information that you can debug an application. You achieve that this way:
- Uncheck the Imported Kit
- Check the ArmarX Kit
- Expand the ArmarX Kit and uncheck all entries except "Release with Debug Information".
- Make sure that the build directory is correct, i.e. the same we used so far (
.../component_tutorials/build).
The Kit configuration should look like this:
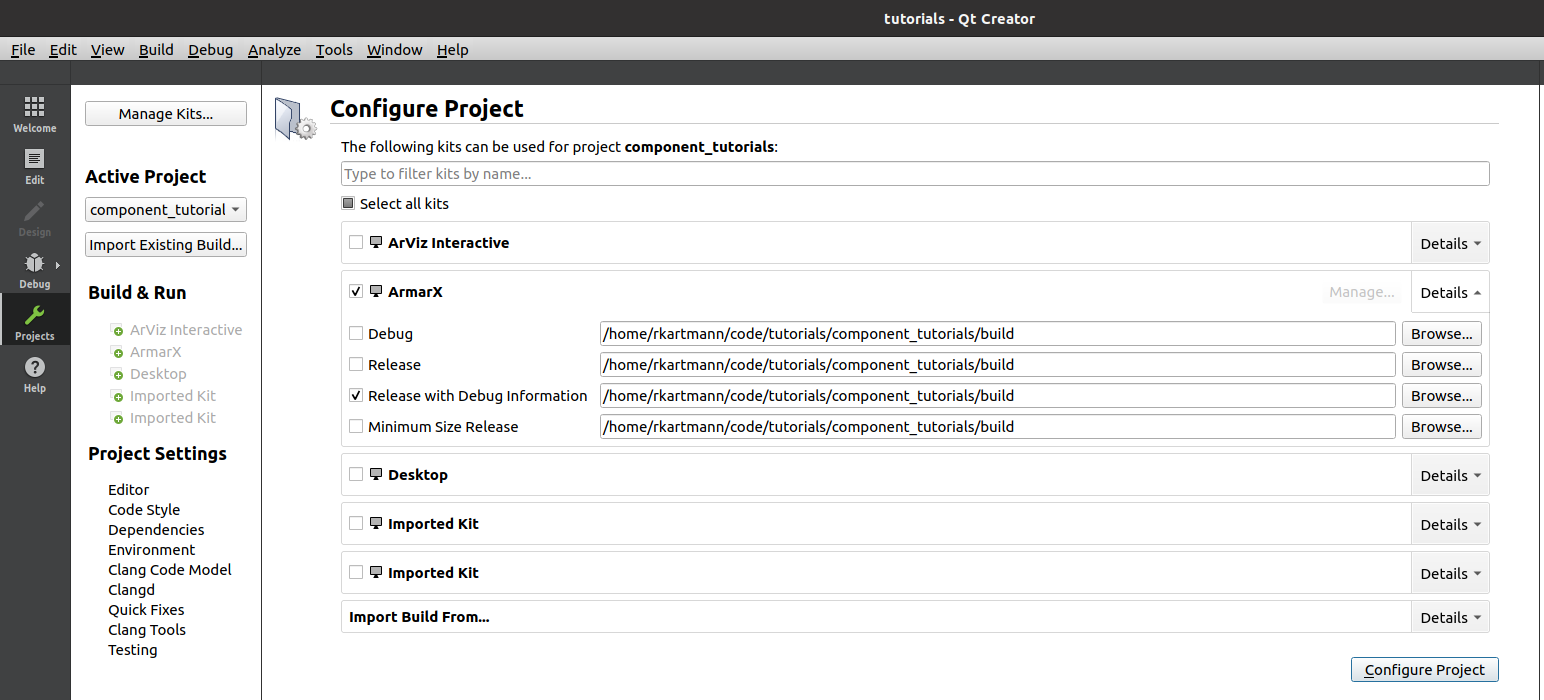
Finally, press Configure Project (button on the lower right). This should lead you to the Edit mode. (Look at the dark grey sidebar on the left side. You were at the Projects mode just now.) Expand your project.
If the project tree contains an entry <File System> like here,
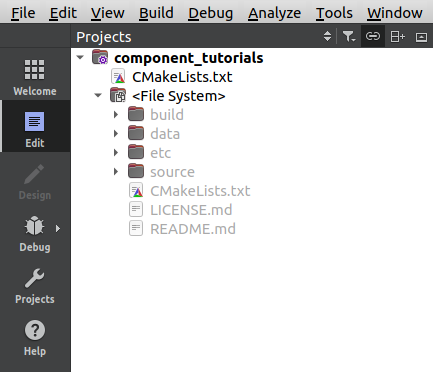
it means that QtCreator was not able to fully parse the project. To fix it, we have to change back to the Projects mode. You will probably find something like this:

In this case, press Re-configure with Initial Parameters and confirm with Yes. This should resolve the warning.
If you now go back to the Edit mode and expand your project, it should look like this:

What a beauty! It is a really nice package, if I may daresay.
You can see the different directories and files that we found after creating the component. The lines with the small hammer icon are the CMake targets: (As said before, a target is something that can be built. Modern CMake has a strong focus on targets.) Looking closely, you can see that there are the same three targets we noticed before: hello_world_cmp, hello_world_ice and hello_world_run. In addition, you see how the files are associated with them:
Component.handComponent.cppbelong tohello_world_cmp.ComponentInterface.icebelongs tohello_world_ice.- The
hello_world_runlooks a bit strange: It is actually associated with a filedecoupled_main.cppfrom ArmarXCore. If you open that file, you can find a smallmain()function. This is a bit of a trick to save some build time and disk space. For now, you do not have to think about it too much.
At this point, take a moment to open your component's CMakeLists.txt (the one in hello_world). It should look something like this:
This is CMake code: Yes, CMake is a bit of its own programming language. The lines starting with a # are comments. Note the following things:
- There is a single command,
armarx_add_component(), which takes several arguments. - The first argument (written on the same line) is
hello_world: The component's name. - The next arguments are written in a key-values pattern: First the KEY in capital letters, then (indented) one or more values.
- We can discover our files:
ComponentInterface.iceis part of theICE_FILESargumentComponent.cppis part of theSOURCESComponent.his part of theHEADERS
- Also, there are
DEPENDENCIESandICE_DEPENDENCIES, which containArmarXCoreandArmarXCoreInterfacesat the moment. - There are a lot of out-commented lines. These are common lines that you often want to add, so they are added as opt-in directly, so you can easily enable or delete them.
See CMake for more details about ArmarX CMake commands.
Okay, so far so good. Let's open some actual code!
Examine the Component's Source Code
Finally, let's have a look at the C++ code. Let's start with the header file, Component.h. Open it using your mouse-enabled double click skill.
The Header File (<tt>Component.h</tt>)
As you can see, the component's code also has a lot of opt-in code which is out-commented by default. Let's remove all that for the moment. When remove even more, so we get the absolute minimum, the component header looks like this:
Let's quickly go through the most important parts:
This is a standard C++ include guard. Every header file should have it. In older files, you will find a #ifndef XY_H / #define XY_H / #endif combination. #pragma once is like a modern shorthand for that.
Here, we include the base class of all components: armarx::Component. It is located in the ArmarX package ArmarXCore.
The armarx-package tool generates your component in a respective namespace, which is made to match the directory structure. Therefore, the first part is the package name (component_tutorials), the second part is components (analogous to the directory), and the last part is hello_world for your component. It is a good idea to try to match directories with namespaces (to the extent where it makes sense).
The component is a class which derives / inherits (at least) from the armarx::Component base class.
The armarx::Component class has a few abstract methods ("pure virtual" in C++ terms) that our component class needs to implement. One of them is getDefaultName(), which should return the component's default name ("hello_world" in our example). In addition, we have a static method with the same purpose. Why do we have both?
- The static function can be called without creating an instance of the class.
- Static functions cannot be inherited in C++. Therefore, the non-static function is necessary to allowing inheriting it. In turn, this enables the base class (
armarx::Component) to call it using polymorphism.
These are the main functions we use to customize the component. The first (createPropertyDefinitions()) has to do with properties. Properties are the ArmarX solution for making components parameterizable. Think of a "property" like a "parameter" of your component has, e.g. a name or a threshold.
The other methods are used to implement the component lifecycle. There are different states a component can be in:
- Initializing itself (
onInitComponent()), - being connected to other components (
onConnectComponent()), - having lost connection to a required component (
onDisconnectComponent()), - and being shut down (
onExitComponent())
See the documentation of ManagedIceObject for details about the lifecycle.
This static member variable is used to implement the static function GetDefaultName(). Also, we close the class Component here.
- Note
- In C++ terms, a "member" is an element of a class. For example, a method would be a "member function." An attribute would be called a "member variable." So a "member" can be an attribute or a method. Its opposite are "free" variables and functions, which are not part of a class.
Finally, we close the namespace.
Okay, let's go to the source (.cpp) file:
The Source File (<tt>Component.cpp</tt>)
The minimal source file of our component looks like this:
Let's go through it.
First, we include the header file Component.h - this is standard C++. In addition, we need a header DecoupledSingleComponent/Decoupled.h from ArmarXCore. Remember the file decoupled_main.cpp from ArmarX that was associated with the application target (hello_world_run)? This has to do with that.
Next, we open the same namespace as in the header. Again, standard C++.
This is the definition of the static const variable defaultName that was declared in the header. In C++, static variables need to be defined in source (.cpp) files (with a few exceptions such as int).
In C++, many things such as functions and variables are declared in header files
and defined in source files.
A declaration makes a symbol (e.g. a function or variable name) known to the compiler and tells it a few important things, such as the function signature or type. The definition actually defines the content of the symbol, i.e. the function code or variable value.
Next, we have (almost) empty definitions (i.e. implementations) of the property and lifecycle methods declared in the header. This is where will soon hook ourselves into.
These are the implementations of the default name-related functions. They both just return the static constant defaultName. You usually do not have to change anything here.
This special line again has to do the "decoupled" main thing. Just leave this line as is and do not think too much about it.
Finally, we close the opened namespace.
Edit the Component's Source Code
So far so good. Now, where were we ...? Oh yes, we wanted to print "Hello World!" somewhere. Where would we add that now?
When a component is being started, a few things are happening in order:
- The component is constructed, i.e. an instance of our
Componentclass is created. - The component is initialized. Here, we can initialize the component internally.
- The component is connected. Here, we can hook up with other components.
We usually do not create or edit the component's constructor. So, the first point where we can do stuff, is during the initialization. Therefore, we need to edit the method onInitComponent(), which is called during initialization to allow the component to initialize itself.
We are finally going to write code! Take the method onInitComponent(), and add the following line to it:
This is the standard way of printing things to the standard output in C++.
You could now build the project in the terminal like we did before (make or cmake --build . in the build directory). However, you can also do it in QtCreator directly.
- Either press the hammer icon in the lower left corner
- or just use the shortcut Ctrl+B.
QtCreator should open the Compile Output pane showing you the log of the build process. Wait until the build is finished.
Let's run the new build. As with building, we could start the application from the terminal (./bin/hello_world_run). But QtCreator can help us here, as well: You can start run the application by pressing the green play button in the lower left corner, just above the hammer icon (the one without the bug). When you press that button, QtCreator should open the Application Output pane and display the output of the running application. There, you should see the following lines:
There it is! We did it! We created a component and convinced it to announce our very entering of the new world!
But wait, there is one more thing before we can pat ourselves on the back. The std::cout << ... << std::endl way of printing is very simple, but also quite limited. As many other frameworks, ArmarX has its own logging infrastructure. Using that, the line above would look like this:
No, you do not need the
<< std::endlat the end when usingARAMRX_INFO.
Change the code to this version now, then compile and run the application again.
If you get an error starting like this:
[23259][12:08:18.200][hello_world][void armarx::handleExceptions()]: Caught IceUtil::Exception:/.../code/armarx/ArmarXCore/source/ArmarXCore/core/ArmarXManager.cpp:278: ::Ice::AlreadyRegisteredException:::component_tutorials::components::hello_world::ComponentInterface with id `hello_world' is already registeredIt means that there is already an application running that registered the component
hello_world. In ArmarX, there can only be one component with a specific name (it is like an ID). Probably, you did not stop the application you started earler. Check your terminals and the Application Output pane of QtCreator. Stop any applications that are still running, and try again.
Now, you should see this line:
Compare that to the line from before:
They are not that much different from each other.
- The first parts are the process IDs (
23650and13579) and the time stamps, which naturally differ because we ran the component multiple times. - The next part,
[hello_world], is the same in both: This is the name of the running application, which is the same as the component's name. - The next part differs:
[hello_world]vs.[std::cout]. This part the log tag. It depends on the context of the logging code. In a component, the tag is just the component's name. In a plain C++ class, it can be defined by the programmer. So the log tag is a useful way to indicate where the log message came from.
However, when we use just std::cout << ... << std::endl, ArmarX has no way of knowing where the log came from, because std::cout does not track such information. Instead, the macro ARMARX_INFO is aware of its context and passes that information on.
In addition, ArmarX has several ordered log levels. They are, from most to least detailed:
ARMARX_DEBUGARMARX_VERBOSEARMARX_INFOARMARX_WARNINGARMARX_ERRORARMARX_FATAL
ArmarX provides tools that allow you to filter log messages according to their log level. So in summary, in ArmarX, do not use
but instead one of these logging macros, e.g.
(without the << std::endl at the end).
See Logging of output and data for more details about the ArmarX logging framework.
- Todo:
- Add an explaination on how to add the component in the scenario manager
Conclusion and TL;DR
You did it! Now you can start patting you on the back. Yes, right there. Good job.
Now, that probably felt like a lot. And yes, we touched on a lot of points. Let's look back at what you actually did:
- You created a new ArmarX package using
armarx-package init component_tutorialsin a directory of your choice. - You added a component
hello_worldto that package by runningarmarx-package add component hello_worldin the root directory of the created packagecomponent_tutorials. - You added the line
ARMARX_INFO << "Hello World!";to the methodonInitComponent()of the generated component class. - You configured the project by running
cmake ..and built it by runningcmake --build .ormakein thebuilddirectory of the package. - You ran the component by starting the executable via
./bin/hello_world_runin thebuilddirectory of the package.
In addition, you learned something about the background of each of these steps. We could go on, e.g. about how to create a scenario with your component and how to add parameters to it. But we will leave those topics for the next tutorials. For now, this tutorial is finished.
Next Up
If you are still up for more, you can continue with the next tutorial: Understand Distributed Systems
